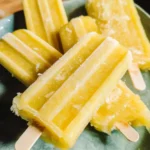
There are certain flavours that just scream summer, and pineapple is undoubtedly high on that list. I remember the first time I whipped up a batch of these Frozen Pineapple Pops. It was a sweltering afternoon, the kids were listless, and I was desperate for a healthy, cooling treat that wouldn’t involve a sugar crash later. I’d seen recipes floating around, but many seemed overly complicated or loaded with refined sugar. So, I decided to keep it simple, relying on the natural sweetness and vibrant tang of the pineapple itself. The result? Pure magic. The blender whirred, filling the kitchen with that intoxicating tropical scent. After a few hours of impatient waiting (mostly from the kids, okay, maybe a little from me too!), we unmolded these golden beauties. The first bite was an explosion of pure, refreshing pineapple flavour – icy cold, perfectly sweet with just the right amount of tang. My youngest, usually picky, devoured his in record time and immediately asked for another. My partner, initially skeptical about “healthy popsicles,” admitted they were incredibly delicious and satisfying. Since then, these frozen pineapple pops have become a staple in our freezer during warmer months. They’re ridiculously easy to make, endlessly customizable, and genuinely feel like sunshine on a stick. It’s the kind of simple recipe that brings instant joy and refreshment, proving that sometimes the best treats are the ones made with minimal fuss and maximum flavour.
Ingredients
- 4 cups Fresh or Frozen Pineapple Chunks: (Approx. 1 medium pineapple or a 20-24 oz bag of frozen chunks) The star of the show, providing natural sweetness, tanginess, and that unmistakable tropical flavour. Using frozen chunks can help achieve a thicker consistency faster.
- ½ cup Full-Fat Coconut Milk (canned): Adds creaminess and a subtle tropical backdrop that complements the pineapple beautifully. You can substitute with light coconut milk, pineapple juice, orange juice, or even water for a more sorbet-like, icier texture.
- 2-4 Tablespoons Maple Syrup, Agave Nectar, or Honey (Optional): Adjust the sweetness based on your pineapple’s natural ripeness and your personal preference. Start with less; you can always add more. For a completely sugar-free option, omit entirely or use a sugar substitute like stevia to taste.
- 1 Tablespoon Fresh Lime Juice: Brightens the pineapple flavour and adds a zesty counterpoint to the sweetness. Lemon juice can also be used.
- Pinch of Salt: Enhances all the flavours and balances the sweetness. Don’t skip this tiny but mighty addition!
Instructions
- Prepare the Pineapple (If Using Fresh): If you’re using a fresh pineapple, peel, core, and cut it into roughly 1-inch chunks. You should have about 4 cups. If using frozen pineapple chunks, you can use them directly from the bag.
- Combine Ingredients: Place the pineapple chunks, coconut milk (or your chosen liquid), optional sweetener (start with the lower amount), fresh lime juice, and the pinch of salt into the jar of a high-speed blender.
- Blend Until Smooth: Secure the lid on the blender. Start blending on low speed, gradually increasing to high. Blend for 60-90 seconds, or until the mixture is completely smooth and creamy. Use the blender’s tamper if necessary to push the ingredients down towards the blades, especially if using mostly frozen fruit.
- Taste and Adjust: Carefully taste the blended mixture. If it’s not sweet enough for your liking, add another tablespoon or two of sweetener and blend briefly to combine. If you want more tang, add another squeeze of lime juice. The flavour will be slightly less intense once frozen, so aim for a vibrant taste at this stage.
- Fill the Popsicle Molds: Carefully pour the pineapple mixture into your popsicle molds. Leave a little space (about ¼ to ½ inch) at the top, as the mixture will expand slightly when it freezes. If your molds have slots for sticks, you can insert them now. If using traditional molds without built-in stick holders, proceed to the next step.
- Insert Popsicle Sticks (If Needed): If your molds don’t have built-in holders, freeze the pops for about 1-2 hours, or until they are partially set (slushy but firm enough to hold a stick upright). Carefully insert the popsicle sticks into the center of each pop. This ensures the sticks freeze straight.
- Freeze Solid: Place the filled popsicle molds into the freezer. Freeze for at least 4-6 hours, or preferably overnight, until the pops are completely solid. Freezing time can vary depending on your freezer’s temperature and the size of your molds.
- Unmold: Once frozen solid, briefly run the outside of the popsicle molds under warm (not hot) water for a few seconds (10-20 seconds usually does the trick). Be careful not to melt the pops! Gently pull on the popsicle sticks to release the frozen pineapple pops from the molds. If they resist, run under warm water for a few more seconds.
- Serve or Store: Enjoy your homemade frozen pineapple pops immediately! If not serving right away, wrap each pop individually in plastic wrap or place them in airtight freezer bags or containers to prevent freezer burn. Store in the freezer for up to 1-2 months for the best flavour and texture.
Nutrition Facts
- Servings: Makes approximately 6-10 popsicles (depending on the size of your molds).
- Calories Per Serving (Approximate): 70-120 calories (highly dependent on the liquid used, amount of sweetener added, and popsicle size).
- Vitamin C: Pineapple is an excellent source of Vitamin C, an antioxidant crucial for immune system support and skin health.
- Dietary Fiber: Contains natural fiber from the pineapple, aiding digestion and promoting a feeling of fullness.
- Naturally Low in Fat: Primarily fruit-based, these pops are naturally low in fat, especially if using water or juice instead of coconut milk.
- Manganese: Pineapple provides manganese, an important mineral for bone health and metabolism.
- No Added Refined Sugars (Optional): Can be made entirely without added refined sugars by relying on the fruit’s natural sweetness or using natural sweeteners minimally.
(Note: These are estimates. Actual nutritional values will vary based on specific ingredients, quantities used, and popsicle size.)
Preparation Time
- Active Preparation Time: Approximately 10-15 minutes (includes blending and pouring into molds). If using fresh pineapple, add another 5-10 minutes for peeling and chopping.
- Freezing Time: Minimum 4-6 hours, but overnight is recommended for best results to ensure they are fully solid.
How to Serve
These Frozen Pineapple Pops are delightful on their own, but here are a few ways to elevate the experience:
- Poolside Refresher: The ultimate way to enjoy them – straight from the freezer on a hot day by the pool or lounging in the garden.
- Healthy Dessert Option: Serve after dinner as a light, refreshing, and guilt-free dessert alternative to heavier options.
- BBQ & Picnic Staple: Pack them in a cooler with dry ice or plenty of ice packs for a crowd-pleasing treat at outdoor gatherings. They are always a hit!
- After-School Snack: A fantastic, healthy, and hydrating snack for kids (and adults!) after a busy day.
- Party Perfect: Make a large batch for birthday parties or summer celebrations. They add a vibrant, tropical touch.
- Garnished Glam: For a slightly fancier presentation:
- Roll the pops in toasted shredded coconut just before serving.
- Drizzle with a tiny bit of melted dark chocolate (let it harden quickly).
- Garnish the plate with a fresh mint sprig or a small pineapple wedge.
- Breakfast Pop?: Why not? On a really hot morning, one of these could be a surprisingly refreshing start alongside some yogurt or granola.
- Mocktail Mixer (Adult Twist): Briefly pulse a pop in a blender with a splash of sparkling water or coconut water for a quick, slushy pineapple drink base.
Additional Tips
- Choose the Right Pineapple: For the best flavour, use a ripe, sweet pineapple. Look for one that smells fragrant at the base, has golden skin, and feels slightly soft to the touch. If your pineapple isn’t very sweet, you’ll likely need to add more sweetener. Using frozen pineapple chunks is a great shortcut and often yields a creamier result.
- Adjust Creaminess: The choice of liquid significantly impacts texture. Full-fat coconut milk provides the creamiest, richest result, almost like a Dole Whip. Light coconut milk offers moderate creaminess. Pineapple juice or orange juice creates a fruitier, more sorbet-like pop. Water results in the iciest texture, closest to a traditional ice pop. Experiment to find your favourite!
- Sweetness Control is Key: Taste the pineapple mixture before freezing. Pineapples vary greatly in sweetness. Start with minimal or no added sweetener and adjust accordingly. Remember that freezing dulls sweetness slightly, so make it a tad sweeter than you think you’ll want the final pop to be.
- Boost the Flavour: Don’t underestimate the power of lime juice and salt! Lime juice cuts through the sweetness and enhances the tropical notes, while salt makes all the flavours pop. You could also experiment by adding a few fresh mint leaves or a small knob of fresh ginger to the blender for extra complexity.
- Achieving Smoothness: A high-speed blender works best for pulverizing the pineapple fibers, resulting in a smooth, non-stringy texture. If you don’t have a high-speed blender, blend for longer and consider straining the mixture through a fine-mesh sieve before pouring into molds if you’re concerned about texture.
- Easy Unmolding: The warm water trick is essential. Don’t run the water for too long, or the pops will start to melt. Just 10-20 seconds should loosen them enough to slide out easily. Silicone molds are often easier to unmold than rigid plastic ones.
- Preventing Icy Pops: If your pops turn out too icy (rather than creamy or sorbet-like), it might be due to too much water content or not enough fat/sugar (which lower the freezing point). Using full-fat coconut milk, a touch of banana, or ensuring your pineapple mixture is well-sweetened can help create a smoother texture. Blending thoroughly also incorporates air, which helps.
- Storage for Longevity: To prevent freezer burn and keep your pineapple pops tasting fresh, wrap them individually after unmolding. Plastic wrap works well, or small popsicle bags. Store these wrapped pops inside a larger airtight freezer bag or container. They are best enjoyed within 1-2 months.
FAQ Section
- Q: Can I use canned pineapple instead of fresh or frozen?
- A: Yes, you can use canned pineapple chunks. Opt for pineapple packed in its own juice rather than heavy syrup. Drain the juice well before using the chunks. Since canned pineapple can sometimes be sweeter or have a slightly different flavour profile, taste the mixture before adding any extra sweetener and adjust as needed. You might use some of the drained juice as part of your liquid component.
- Q: What other fruits can I add or substitute?
- A: Pineapple pairs wonderfully with many other fruits! Try adding mango chunks for a pineapple-mango pop, some strawberries or raspberries for a berry twist, or even a ripe banana for extra creaminess and sweetness (like a tropical smoothie pop). Adjust liquid and sweetener amounts based on the fruits used.
- Q: How can I make these pineapple pops even creamier?
- A: For maximum creaminess: Use full-fat canned coconut milk as your liquid base. You could also add half a ripe banana or even 1/4 of a ripe avocado to the blender – these add healthy fats and create a very smooth, rich texture without overpowering the pineapple flavour significantly. Ensure you blend thoroughly.
- Q: Are these Frozen Pineapple Pops vegan and dairy-free?
- A: Yes, absolutely! As long as you use a plant-based liquid like coconut milk, pineapple juice, or water, and choose a vegan sweetener like maple syrup or agave nectar (or omit sweetener), this recipe is entirely vegan and dairy-free. Avoid honey if making them strictly vegan.
- Q: My popsicles seem very hard and icy. How can I make them softer?
- A: Iciness is usually due to high water content and low fat/sugar content. Sugar and fat interfere with the formation of large ice crystals, leading to a softer texture. Try using a liquid with more fat (full-fat coconut milk), adding a bit more sweetener (even natural sugars help), or incorporating a creamy element like banana. Blending longer can also incorporate more air, slightly lightening the texture.
- Q: How long will these homemade popsicles last in the freezer?
- A: When stored properly (individually wrapped and placed in an airtight container or freezer bag), these frozen pineapple pops should maintain good quality for 1 to 2 months. While they might be safe to eat beyond that, their flavour and texture might degrade, and they could develop ice crystals or freezer burn.
- Q: Can I make these without a blender?
- A: It would be challenging to get a smooth consistency without a blender. A food processor could work, but might leave the mixture slightly chunkier. If you only have an immersion blender, it might work if the pineapple is very soft or partially thawed, but it will take longer and may not be as smooth. Mashing very ripe fresh pineapple thoroughly and mixing well could create a chunkier-style pop, but blending is recommended for the best texture.
- Q: Are these pineapple pops healthy for kids?
- A: Yes, they are generally a very healthy treat option for kids! They are made primarily from fruit, providing vitamins and fiber. You have full control over the ingredients, meaning you can limit or omit added sugars, unlike many store-bought popsicles. They are hydrating and refreshing, making them a much better choice than sugary drinks or candies, especially during hot weather. Just be mindful of potential allergies (like coconut if used).
Frozen Pineapple Pops Recipe
Ingredients
- 4 cups Fresh or Frozen Pineapple Chunks: (Approx. 1 medium pineapple or a 20–24 oz bag of frozen chunks) The star of the show, providing natural sweetness, tanginess, and that unmistakable tropical flavour. Using frozen chunks can help achieve a thicker consistency faster.
- ½ cup Full-Fat Coconut Milk (canned): Adds creaminess and a subtle tropical backdrop that complements the pineapple beautifully. You can substitute with light coconut milk, pineapple juice, orange juice, or even water for a more sorbet-like, icier texture.
- 2–4 Tablespoons Maple Syrup, Agave Nectar, or Honey (Optional): Adjust the sweetness based on your pineapple’s natural ripeness and your personal preference. Start with less; you can always add more. For a completely sugar-free option, omit entirely or use a sugar substitute like stevia to taste.
- 1 Tablespoon Fresh Lime Juice: Brightens the pineapple flavour and adds a zesty counterpoint to the sweetness. Lemon juice can also be used.
- Pinch of Salt: Enhances all the flavours and balances the sweetness. Don’t skip this tiny but mighty addition!
Instructions
- Prepare the Pineapple (If Using Fresh): If you’re using a fresh pineapple, peel, core, and cut it into roughly 1-inch chunks. You should have about 4 cups. If using frozen pineapple chunks, you can use them directly from the bag.
- Combine Ingredients: Place the pineapple chunks, coconut milk (or your chosen liquid), optional sweetener (start with the lower amount), fresh lime juice, and the pinch of salt into the jar of a high-speed blender.
- Blend Until Smooth: Secure the lid on the blender. Start blending on low speed, gradually increasing to high. Blend for 60-90 seconds, or until the mixture is completely smooth and creamy. Use the blender’s tamper if necessary to push the ingredients down towards the blades, especially if using mostly frozen fruit.
- Taste and Adjust: Carefully taste the blended mixture. If it’s not sweet enough for your liking, add another tablespoon or two of sweetener and blend briefly to combine. If you want more tang, add another squeeze of lime juice. The flavour will be slightly less intense once frozen, so aim for a vibrant taste at this stage.
- Fill the Popsicle Molds: Carefully pour the pineapple mixture into your popsicle molds. Leave a little space (about ¼ to ½ inch) at the top, as the mixture will expand slightly when it freezes. If your molds have slots for sticks, you can insert them now. If using traditional molds without built-in stick holders, proceed to the next step.
- Insert Popsicle Sticks (If Needed): If your molds don’t have built-in holders, freeze the pops for about 1-2 hours, or until they are partially set (slushy but firm enough to hold a stick upright). Carefully insert the popsicle sticks into the center of each pop. This ensures the sticks freeze straight.
- Freeze Solid: Place the filled popsicle molds into the freezer. Freeze for at least 4-6 hours, or preferably overnight, until the pops are completely solid. Freezing time can vary depending on your freezer’s temperature and the size of your molds.
- Unmold: Once frozen solid, briefly run the outside of the popsicle molds under warm (not hot) water for a few seconds (10-20 seconds usually does the trick). Be careful not to melt the pops! Gently pull on the popsicle sticks to release the frozen pineapple pops from the molds. If they resist, run under warm water for a few more seconds.
- Serve or Store: Enjoy your homemade frozen pineapple pops immediately! If not serving right away, wrap each pop individually in plastic wrap or place them in airtight freezer bags or containers to prevent freezer burn. Store in the freezer for up to 1-2 months for the best flavour and texture.
Nutrition
- Serving Size: one normal portion
- Calories: 120
