Of all the healthy snacks I’ve tried to introduce to my family, nothing has ever been met with the same level of pure, unadulterated joy as these Yogurt-Dipped Fruit Skewers. The first time I made them was on a sweltering summer afternoon when the kids were getting restless and the usual go-to snacks just weren’t cutting it. I wanted something refreshing, healthy, but with that “treat” factor that would make their eyes light up. Pulling a vibrant, colorful assortment of fruit from the fridge, I thought, “How can I make this more fun?” The answer was skewers and a creamy, dreamy yogurt dip. The process of threading the fruit onto the sticks became a fun activity in itself. But the real magic happened after they came out of the freezer. Handing my youngest a “fruit popsicle,” as he immediately dubbed it, was a game-changer. The cold, sweet snap of the frozen yogurt shell giving way to the juicy, fresh fruit inside was a sensory delight. They were a certified hit, devoured in minutes with requests for more. Now, these yogurt-dipped wonders are our staple for everything from after-school snacks and playdate platters to healthy party desserts. They look spectacular, taste even better, and are secretly packed with goodness. This recipe isn’t just about food; it’s about creating a moment of simple, healthy, and delicious fun.
Ingredients
- 2 cups Greek Yogurt, plain, full-fat or 2%: Using Greek yogurt is key for a thick, creamy coating that clings perfectly to the fruit. Its tangy flavor provides a beautiful contrast to the sweet fruit.
- 2-3 tablespoons Honey or Maple Syrup: This is your natural sweetener. Adjust the amount based on the sweetness of your fruit and your personal preference.
- 1 teaspoon Vanilla Extract: A small amount of vanilla adds a wonderful depth of flavor, transforming the yogurt dip into a dessert-like cream.
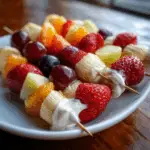
- 1 lb Strawberries: Washed, hulled, and left whole or halved if large. Their vibrant red color and classic sweetness make them a skewer superstar.
- 1 cup Blueberries: Washed and patted completely dry. These little gems add a pop of deep blue color and a burst of antioxidants.
- 1 cup Blackberries: Washed and carefully patted dry. They offer a tartness and a dramatic, dark color that looks stunning on the skewer.
- 2 Kiwis: Peeled and cut into thick, 1-inch rounds. Their bright green flesh and tiny black seeds add an exotic and beautiful touch.
- 2 Mandarin Oranges or Clementines: Peeled and separated into individual segments. Their juicy sweetness and bright orange hue are always a kid-favorite.
- 1 cup Green or Red Grapes: Washed, dried, and removed from the stem. Grapes provide a wonderful, firm texture and a satisfyingly sweet crunch.
- Wooden or Bamboo Skewers (approx. 12-15): Standard 6 to 8-inch skewers work perfectly for creating individual-sized portions.
Instructions
- Prepare Your Workstation: Line a large baking sheet or tray with parchment paper or wax paper. This is a crucial step to prevent the yogurt-dipped skewers from sticking after freezing. Make sure the baking sheet will fit flat in your freezer.
- Wash and Dry the Fruit: Gently wash all your fruit under cool running water. The most important part of this step is to dry the fruit thoroughly. Use paper towels or a clean kitchen towel to pat every piece of fruit dry. If the fruit is wet, the yogurt dip will slide right off and won’t form a proper coating.
- Prepare the Yogurt Dip: In a medium-sized mixing bowl, combine the Greek yogurt, honey or maple syrup, and vanilla extract. Whisk everything together until the mixture is completely smooth, creamy, and well-incorporated. Taste the dip and add more sweetener if desired. The ideal consistency is thick but still fluid enough for dipping.
- Assemble the Fruit Skewers: Begin threading the prepared fruit onto the wooden skewers. Get creative with your patterns! Alternate colors and shapes to make them visually appealing. A pattern like strawberry, orange segment, grape, kiwi, and blueberry creates a beautiful rainbow effect. Be sure to leave about an inch of space at both the top and bottom of the skewer to make them easier to handle during the dipping and eating process.
- Dip the Skewers: Hold a fruit skewer by the empty end and dip it into the bowl of sweetened yogurt. You can use a spoon to help coat the fruit evenly. Rotate the skewer to cover all sides of the fruit. You can choose to submerge the entire skewer for full coverage, dip only half for a stylish look, or simply drizzle the yogurt over the top for a lighter coating.
- Place on Baking Sheet: As you finish dipping each skewer, gently shake off any excess yogurt and place it on the parchment-lined baking sheet. Ensure the skewers are arranged in a single layer and are not touching each other. This prevents them from freezing together into one large clump.
- First Freeze (The Flash Freeze): Place the baking sheet with the skewers flat in the freezer. Freeze for at least 1-2 hours, or until the yogurt is completely firm to the touch. This initial “flash freeze” sets the yogurt coating perfectly.
- Final Storage (Optional): Once the yogurt coating is solid, you can transfer the skewers from the baking sheet into a freezer-safe airtight container or a large zip-top freezer bag. Place layers of parchment paper between the skewers to prevent them from sticking together. They can be stored in the freezer for a longer period this way.
Nutrition Facts
- Servings: 12-15 Skewers
- Calories per Serving: Approximately 70-90 calories (varies based on fruit and sweetener amount)
- Protein: A good source of protein, primarily from the Greek yogurt, which helps in muscle repair and keeps you feeling full and satisfied.
- Vitamin C: Abundant in fruits like strawberries, kiwis, and oranges. This essential vitamin is a powerful antioxidant that supports a healthy immune system.
- Fiber: The combination of various fruits provides a healthy dose of dietary fiber, which is crucial for digestive health and maintaining stable blood sugar levels.
- Natural Sugars: The sweetness comes primarily from the natural fructose in the fruit and a minimal amount of added honey or maple syrup, making it a healthier alternative to processed sugary treats.
- Calcium: Greek yogurt is a good source of calcium, which is vital for strong bones and teeth.
Preparation Time
This recipe is quick to assemble but requires patience for the freezing process.
- Active Preparation Time: 20-25 minutes. This includes washing and cutting the fruit, mixing the yogurt dip, and assembling the skewers.
- Freezing Time: 1-2 hours minimum. For the best results and a truly solid, frozen shell, allowing them to freeze for the full two hours is recommended.
How to Serve
These versatile Yogurt-Dipped Fruit Skewers can be presented in numerous fun and elegant ways, making them suitable for any occasion.
- For a Kids’ Birthday Party or Playdate:
- Arrange the frozen skewers on a large, colorful platter like rays of a sun.
- Create a “DIY Skewer Bar” where kids can thread their own fruit (with supervision) and then bring them to an adult for dipping.
- Serve them standing up in a jar or vase filled with uncooked rice or sugar to hold them in place, creating a stunning “fruit bouquet.”
- For a Summer BBQ or Potluck:
- Present them on a chilled platter as a refreshing, light dessert after a heavy meal.
- They are the perfect no-bake dessert that won’t heat up your kitchen.
- Place the platter on a bed of ice to keep the skewers frozen for longer, especially on a hot day.
- As an Elegant Brunch Addition:
- Lay them artfully on a white ceramic platter, garnished with fresh mint leaves for a touch of sophistication.
- The half-dipped or drizzled look works especially well for a more elegant presentation.
- Serve them alongside mimosas and pastries as a healthy and colorful counterpoint.
- For a Healthy After-School Snack:
- Keep a stash in a freezer-safe bag for a quick grab-and-go snack. They are a perfect, portion-controlled treat.
- They satisfy sugar cravings in a healthy way, preventing a post-snack energy crash.
Additional Tips
- Choose the Right Yogurt: For the thickest, most luxurious coating, full-fat or 2% plain Greek yogurt is your best friend. Regular yogurt has a higher water content and will result in a much thinner, icier, and often transparent coating. If you only have regular yogurt, you can strain it through a cheesecloth for a few hours to thicken it up.
- Perfect Your Fruit Selection: The best fruits for skewers are firm and hold their shape well. Think berries, grapes, melon chunks (cantaloupe, honeydew), pineapple chunks, and kiwi slices. Avoid fruits with very high water content like watermelon, as they can become mushy when frozen and thawed, and their excess water can make the yogurt coating crack.
- The Secret to Non-Soggy Fruit: We can’t stress this enough: dry your fruit completely! Any moisture on the fruit’s surface will create a barrier, preventing the yogurt from sticking. It will also create ice crystals under the yogurt layer. Pat each piece of fruit with a paper towel before skewering for the best possible result.
- Mastering the Dip Consistency: If your Greek yogurt dip feels too thick to work with, you can thin it out with a tiny splash of milk (a teaspoon at a time). Conversely, if it seems too runny, you can thicken it by whisking in another tablespoon of Greek yogurt or even a teaspoon of powdered sugar, which can help it set.
- Get Creative with Toppings: Right after dipping the skewers in yogurt and before freezing, sprinkle them with fun toppings for extra texture and flavor. Some fantastic ideas include:
- Toasted shredded coconut
- Finely chopped nuts (almonds, pistachios)
- Mini chocolate chips
- Colorful sprinkles (for a party!)
- Crushed granola or graham crackers
- Chia seeds or hemp hearts for a nutrient boost
- Freezing for Flawless Success: The two-stage freezing process is a professional trick. The initial flash freeze on the baking sheet prevents the skewers from clumping together. Once they are individually frozen solid, you can safely transfer them to a container or bag for long-term storage without them becoming a single frozen block.
- Make-Ahead Party Strategy: You can prep the components in advance to save time on the day of an event. Wash, cut, and store the fruit in an airtight container in the fridge. Mix the yogurt dip and keep it in a separate airtight container. When you’re ready to serve, all you need to do is assemble, dip, and flash freeze for an hour.
- Create Vibrant Rainbow Skewers: To make your skewers visually irresistible, thread the fruit in the order of the rainbow (Red, Orange, Yellow, Green, Blue, Indigo, Violet). A great combination for this is: Strawberry (Red), Mandarin Orange (Orange), Pineapple (Yellow), Kiwi/Green Grapes (Green), and Blueberries/Blackberries (Blue/Violet). This not only looks amazing but also ensures a wide variety of flavors and nutrients.
Frequently Asked Questions (FAQ)
1. Can I make these Yogurt-Dipped Fruit Skewers ahead of time?
Absolutely! They are a perfect make-ahead treat. For best results, prepare them completely, including the final flash freeze. Once the yogurt is solid, transfer them to a freezer-safe airtight container or zip-top bag, separating layers with parchment paper. They can be stored in the freezer and are ready to serve straight from frozen.
2. How long will they last in the freezer?
When stored properly in an airtight container, these skewers will last for up to one month in the freezer. After that, they are still safe to eat, but the fruit may start to develop ice crystals and lose some of its texture and flavor, a condition commonly known as freezer burn. For the best taste and texture, it’s recommended to enjoy them within 2-3 weeks.
3. My yogurt dip is too runny and slides off the fruit. How can I fix it?
This is a common issue, usually caused by using regular yogurt instead of Greek yogurt, or from not drying the fruit properly. To fix a runny dip, your best bet is to use a thicker yogurt. If you’re already using Greek yogurt, ensure it’s a high-quality, thick brand. You can also try chilling the yogurt dip in the refrigerator for 30 minutes before dipping, as this can help it thicken up slightly.
4. What are the absolute best fruits to use for these skewers to prevent them from getting mushy?
The best fruits are those that are firm and have lower water content. Top-tier choices include:
- Berries: Strawberries, blueberries, blackberries, raspberries (be gentle with them).
- Grapes: Both red and green varieties are excellent.
- Melons: Cantaloupe and honeydew, cut into thick cubes.
- Tropical Fruits: Pineapple chunks and mango chunks.
- Kiwi: Sliced into thick rounds.
They all hold their structure well during freezing and thawing.
5. Can I use regular yogurt instead of Greek yogurt?
You can, but the results will be different. Regular yogurt has a higher water content, so the coating on the fruit will be much thinner and more translucent. It will also be icier rather than creamy when frozen. If you only have regular yogurt, you can significantly improve its texture by straining it through a cheesecloth or a coffee filter set over a bowl for a few hours in the fridge to drain excess whey.
6. Are these fruit skewers suitable for toddlers?
Yes, they are a fantastic and healthy snack for toddlers, but with a few safety modifications. For very young children, it’s best to remove the fruit from the sharp skewer before serving. Also, be sure to cut larger fruits like grapes and strawberries into smaller, age-appropriate pieces to prevent any choking hazards.
7. How can I make a dairy-free or vegan version of this recipe?
It’s very easy to make this recipe vegan! Simply swap the Greek yogurt for a thick, plant-based yogurt alternative. The best options are plain, unsweetened coconut yogurt or a thick almond-based yogurt, as they have a creamy consistency similar to Greek yogurt. For the sweetener, use maple syrup or agave nectar instead of honey to ensure the recipe is fully vegan.
8. The fruit keeps sliding off the skewer when I try to assemble them. What am I doing wrong?
This usually happens for one of two reasons. First, your fruit pieces might be too small or cut too thinly. Make sure you’re cutting your fruit into substantial, thick chunks (at least 1-inch thick) so they have enough substance to be securely pierced. Second, ensure you are pushing the skewer through the core or the firmest part of the fruit piece. For example, push the skewer through the center of a strawberry, not just the edge. This provides a much more secure hold.
Yogurt-Dipped Fruit Skewers
Ingredients
- 2 cups Greek Yogurt, plain, full-fat or 2%: Using Greek yogurt is key for a thick, creamy coating that clings perfectly to the fruit. Its tangy flavor provides a beautiful contrast to the sweet fruit.
- 2–3 tablespoons Honey or Maple Syrup: This is your natural sweetener. Adjust the amount based on the sweetness of your fruit and your personal preference.
- 1 teaspoon Vanilla Extract: A small amount of vanilla adds a wonderful depth of flavor, transforming the yogurt dip into a dessert-like cream.
- 1 lb Strawberries: Washed, hulled, and left whole or halved if large. Their vibrant red color and classic sweetness make them a skewer superstar.
- 1 cup Blueberries: Washed and patted completely dry. These little gems add a pop of deep blue color and a burst of antioxidants.
- 1 cup Blackberries: Washed and carefully patted dry. They offer a tartness and a dramatic, dark color that looks stunning on the skewer.
- 2 Kiwis: Peeled and cut into thick, 1-inch rounds. Their bright green flesh and tiny black seeds add an exotic and beautiful touch.
- 2 Mandarin Oranges or Clementines: Peeled and separated into individual segments. Their juicy sweetness and bright orange hue are always a kid-favorite.
- 1 cup Green or Red Grapes: Washed, dried, and removed from the stem. Grapes provide a wonderful, firm texture and a satisfyingly sweet crunch.
- Wooden or Bamboo Skewers (approx. 12-15): Standard 6 to 8-inch skewers work perfectly for creating individual-sized portions.
Instructions
- Prepare Your Workstation: Line a large baking sheet or tray with parchment paper or wax paper. This is a crucial step to prevent the yogurt-dipped skewers from sticking after freezing. Make sure the baking sheet will fit flat in your freezer.
- Wash and Dry the Fruit: Gently wash all your fruit under cool running water. The most important part of this step is to dry the fruit thoroughly. Use paper towels or a clean kitchen towel to pat every piece of fruit dry. If the fruit is wet, the yogurt dip will slide right off and won’t form a proper coating.
- Prepare the Yogurt Dip: In a medium-sized mixing bowl, combine the Greek yogurt, honey or maple syrup, and vanilla extract. Whisk everything together until the mixture is completely smooth, creamy, and well-incorporated. Taste the dip and add more sweetener if desired. The ideal consistency is thick but still fluid enough for dipping.
- Assemble the Fruit Skewers: Begin threading the prepared fruit onto the wooden skewers. Get creative with your patterns! Alternate colors and shapes to make them visually appealing. A pattern like strawberry, orange segment, grape, kiwi, and blueberry creates a beautiful rainbow effect. Be sure to leave about an inch of space at both the top and bottom of the skewer to make them easier to handle during the dipping and eating process.
- Dip the Skewers: Hold a fruit skewer by the empty end and dip it into the bowl of sweetened yogurt. You can use a spoon to help coat the fruit evenly. Rotate the skewer to cover all sides of the fruit. You can choose to submerge the entire skewer for full coverage, dip only half for a stylish look, or simply drizzle the yogurt over the top for a lighter coating.
- Place on Baking Sheet: As you finish dipping each skewer, gently shake off any excess yogurt and place it on the parchment-lined baking sheet. Ensure the skewers are arranged in a single layer and are not touching each other. This prevents them from freezing together into one large clump.
- First Freeze (The Flash Freeze): Place the baking sheet with the skewers flat in the freezer. Freeze for at least 1-2 hours, or until the yogurt is completely firm to the touch. This initial “flash freeze” sets the yogurt coating perfectly.
- Final Storage (Optional): Once the yogurt coating is solid, you can transfer the skewers from the baking sheet into a freezer-safe airtight container or a large zip-top freezer bag. Place layers of parchment paper between the skewers to prevent them from sticking together. They can be stored in the freezer for a longer period this way.
Nutrition
- Serving Size: one normal portion
- Calories: 90
