Let me tell you, finding a dinner that gets unanimous cheers from my entire family, especially the notoriously picky eaters, feels like striking gold. For the longest time, chicken nuggets meant either a trip through the drive-thru or pulling a bag from the freezer – convenient, yes, but often leaving me wanting something… better. Healthier. Tastier. Something I could feel genuinely good about serving. That’s when my quest for the perfect homemade baked chicken nuggets recipe began. After countless trials – some too dry, some lacking flavour, some just plain soggy – I finally landed on this version. The first time I served these, the reaction was immediate and overwhelming. My kids, usually suspicious of anything “healthy,” devoured them, proclaiming them “even better than the restaurant ones!” My partner, initially skeptical about baked nuggets achieving true crispiness, was a convert after the first bite. These nuggets are genuinely crispy on the outside, incredibly juicy and tender on the inside, and packed with savoury flavour. They’ve become a non-negotiable staple in our meal rotation, perfect for busy weeknights, fun weekend lunches, or even as crowd-pleasing appetizers. Making them from scratch is surprisingly simple, allows complete control over the ingredients (goodbye mystery meat and excess sodium!), and the results are just so satisfyingly delicious. This isn’t just a baked chicken nuggets recipe; for our family, it’s the baked chicken nuggets recipe.
Ingredients
Here’s what you’ll need to create these delicious and healthier baked chicken nuggets:
- 1.5 lbs Boneless, Skinless Chicken Breasts: The star of the show. Using breasts ensures lean protein, cut into uniform 1-inch pieces for even cooking. You can also use chicken tenderloins, which are already conveniently sized.
- 1 cup All-Purpose Flour: This is the first layer of our coating, helping the egg wash adhere properly to the chicken. You can substitute with whole wheat flour for added fiber or a gluten-free blend if needed.
- 2 Large Eggs: Beaten lightly, these act as the binder, the crucial “glue” that holds the crispy breadcrumb coating onto the chicken pieces.
- 2 cups Panko Breadcrumbs: These Japanese-style breadcrumbs are the secret weapon for achieving superior crispiness compared to regular breadcrumbs. Their airy, jagged texture creates an incredibly crunchy crust when baked.
- 1 tsp Paprika: Adds a touch of warmth, beautiful colour, and subtle sweetness to the breading. Smoked paprika can also be used for a smokier flavour profile.
- 1 tsp Garlic Powder: Provides a savoury, aromatic base flavour that pairs perfectly with chicken. Ensure it’s powder, not garlic salt, to control the sodium level.
- 1 tsp Onion Powder: Complements the garlic powder, adding another layer of foundational savoury flavour to the coating.
- 1/2 tsp Black Pepper: Freshly ground black pepper offers the best flavour, adding a mild kick. Adjust to your preference.
- 1 tsp Salt: Enhances all the other flavours in the breading. Adjust according to your taste and dietary needs. Kosher salt or sea salt often provides a cleaner flavour.
- 3 tbsp Olive Oil (or Avocado Oil): Drizzling or spraying the nuggets with oil before baking is essential for achieving that golden-brown colour and crispy texture, mimicking the effect of frying without the excess fat. Melted butter can also be used for a richer flavour. Alternatively, use a high-quality cooking spray.
Instructions
Follow these simple steps for perfectly baked, crispy, and juicy chicken nuggets every time:
- Preheat and Prepare: Preheat your oven to 400°F (200°C). Line a large baking sheet with parchment paper for easy cleanup. For extra crispiness, place a wire rack over the parchment-lined baking sheet – this allows hot air to circulate underneath the nuggets. Lightly grease the parchment paper or the wire rack with cooking spray or a bit of olive oil.
- Prepare the Chicken: Pat the chicken breast pieces thoroughly dry with paper towels. This step is crucial as it helps the flour coating adhere better. If you haven’t already, cut the chicken into uniform 1-inch cubes. Consistency in size ensures even cooking.
- Set Up Dredging Stations: Prepare three shallow dishes or bowls for your dredging station. This assembly-line setup makes the coating process smooth and less messy.
- Dish 1 (Flour): Combine the 1 cup of all-purpose flour with a pinch of salt and pepper. Stir briefly.
- Dish 2 (Egg Wash): In the second dish, whisk the 2 large eggs until the yolks and whites are well combined.
- Dish 3 (Breadcrumb Mixture): In the third dish, combine the 2 cups of Panko breadcrumbs, 1 tsp paprika, 1 tsp garlic powder, 1 tsp onion powder, 1/2 tsp black pepper, and 1 tsp salt. Stir well to ensure the seasonings are evenly distributed throughout the Panko.
- Dredge the Chicken: Work with a few chicken pieces at a time to avoid overcrowding the dishes. Follow this three-step process for each piece:
- Flour First: Toss the chicken pieces lightly in the seasoned flour (Dish 1), shaking off any excess. The goal is a thin, even coating.
- Egg Wash Next: Dip the flour-coated chicken pieces into the beaten egg (Dish 2), ensuring they are fully coated. Let any excess egg drip off.
- Breadcrumb Coating Last: Press the egg-coated chicken pieces firmly into the seasoned Panko breadcrumb mixture (Dish 3), turning to coat all sides thoroughly. Ensure a generous layer of breadcrumbs adheres – this is key for crispiness.
- Arrange on Baking Sheet: Carefully place the coated chicken nuggets onto the prepared baking sheet (or wire rack if using). Ensure there is some space between each nugget. Do not overcrowd the pan, as this can lead to steaming instead of baking, resulting in soggy nuggets. Use a second baking sheet if necessary.
- Oil the Nuggets: Drizzle the 3 tablespoons of olive oil evenly over the tops of the chicken nuggets. Alternatively, generously spray them with cooking spray. This helps them brown beautifully and achieve maximum crispiness.
- Bake: Place the baking sheet in the preheated 400°F (200°C) oven. Bake for 10-12 minutes.
- Flip for Even Cooking: Carefully remove the baking sheet from the oven. Using tongs or a spatula, flip each chicken nugget over. This ensures both sides get equally crispy and golden brown. Return the baking sheet to the oven.
- Continue Baking: Bake for another 10-12 minutes, or until the nuggets are golden brown, crispy, and cooked through. The internal temperature should reach 165°F (74°C) when checked with a meat thermometer inserted into the thickest part of a nugget. Alternatively, cut one open – the juices should run clear, and the chicken should be opaque white inside.
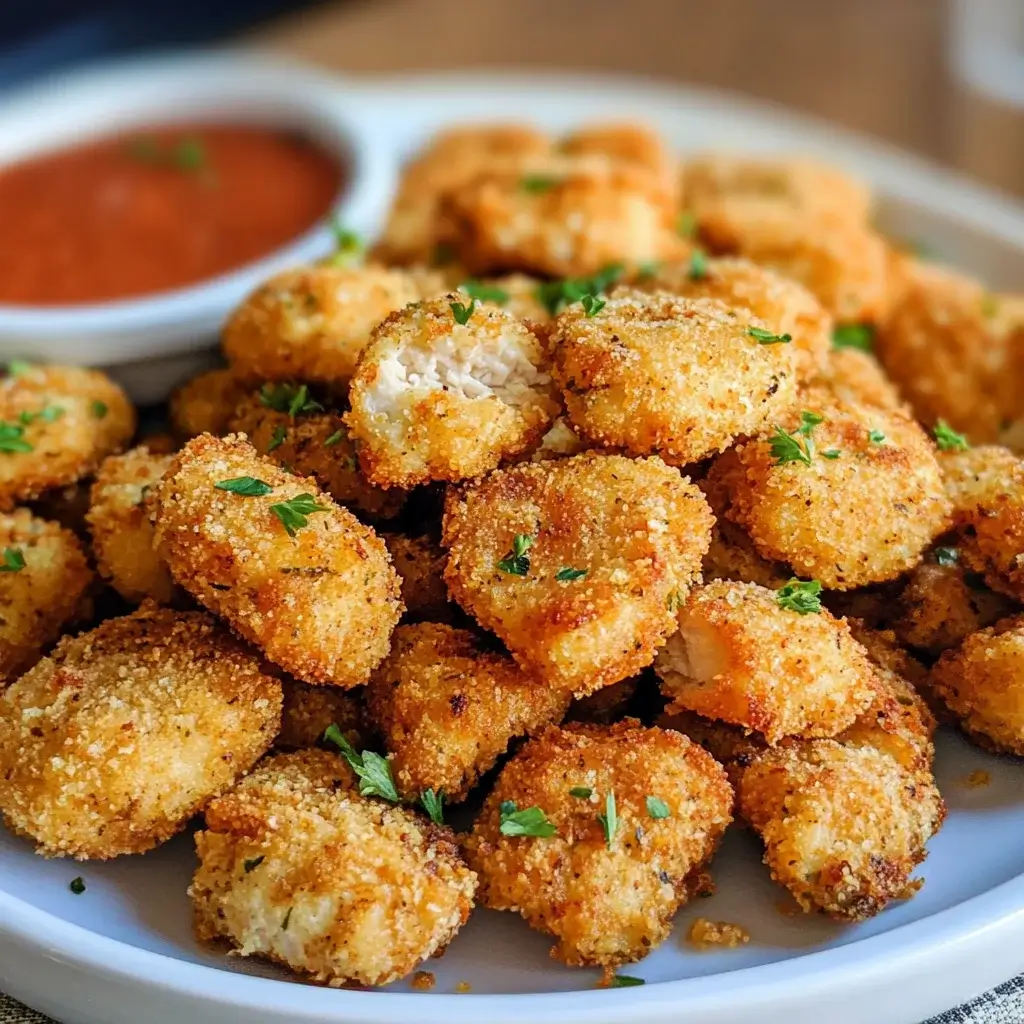
- Rest and Serve: Once cooked, remove the baking sheet from the oven. Let the baked chicken nuggets rest for a few minutes directly on the baking sheet or wire rack. This allows the juices to redistribute, resulting in a more tender nugget. Serve immediately with your favourite dipping sauces.
Nutrition Facts
(Estimates per serving, assuming the recipe yields 4 servings)
- Servings: 4
- Calories per Serving: Approximately 450-550 kcal (This can vary based on the exact size of chicken pieces and amount of oil absorbed).
- Protein: Around 40-50g. Chicken breast is an excellent source of lean protein, crucial for muscle repair, growth, and overall satiety. These nuggets provide a significant protein boost.
- Fat: Approximately 15-20g (Saturated Fat: 3-5g). Significantly lower in fat, especially unhealthy saturated and trans fats, compared to deep-fried nuggets, thanks to the baking method and controlled use of oil.
- Sodium: Approximately 600-800mg. Primarily from the added salt and potentially the breadcrumbs. This is generally lower than fast-food or frozen varieties, and can be further reduced by adjusting the added salt.
- Carbohydrates: Approximately 30-40g. Mainly from the flour and Panko breadcrumb coating. Using whole wheat flour or breadcrumbs can increase fiber content slightly.
Disclaimer: Nutritional information is an estimate only, calculated using standard databases. Actual values may vary based on specific ingredients used, portion sizes, and cooking variations.
Preparation Time
Making these homemade baked chicken nuggets is relatively quick and straightforward. Expect the active preparation time (cutting chicken, setting up dredging stations, coating the nuggets) to take about 20-25 minutes. The cooking time in the oven is approximately 20-24 minutes (including flipping). Therefore, the total time from starting prep to serving is roughly 45-50 minutes, making it a perfectly manageable recipe for a weeknight dinner.
How to Serve Baked Chicken Nuggets
These versatile baked chicken nuggets can be served in numerous delicious ways. Here are some ideas:
- Classic Combo:
- Serve hot with classic dipping sauces like ketchup, BBQ sauce, honey mustard, or ranch dressing.
- Pair with traditional sides like French fries (try baked fries for a healthier meal!), sweet potato fries, or tater tots.
- Healthier Pairings:
- Offer alongside a fresh green salad with a light vinaigrette.
- Serve with a side of steamed or roasted vegetables like broccoli, carrots, or green beans.
- Pair with healthier starches like quinoa, brown rice, or roasted potatoes.
- Kid-Friendly Meals:
- Include them in a fun lunchbox with fruit slices, veggie sticks (cucumber, bell peppers), and a small container of dip.
- Serve with mac and cheese (homemade or store-bought) for a comforting kid-approved dinner.
- Appetizer Style:
- Arrange them on a platter with a variety of dipping sauces for parties or gatherings. Think beyond the basics: try a spicy mayo, a creamy avocado dip, or a tangy yogurt-based sauce.
- Creative Uses for Leftovers:
- Chop cold leftover nuggets and add them to a green salad for a boost of protein.
- Stuff them into a pita or wrap with lettuce, tomato, and your favourite sauce for a quick lunch.
- Use them as a topping for homemade pizza.
Additional Tips for the Perfect Baked Chicken Nuggets
Elevate your homemade baked chicken nuggets from great to absolutely phenomenal with these extra tips:
- Uniform Cutting is Key: Cut the chicken breast into pieces that are as close to the same size (about 1-inch) as possible. This ensures that all the nuggets cook evenly, preventing some from becoming dry while others are still undercooked.
- Don’t Crowd the Pan: This might be the single most important tip for achieving crispiness. Give your nuggets space on the baking sheet. If they are too close together, they will steam rather than bake, resulting in a softer, potentially soggy crust. Use two baking sheets if necessary.
- Panko Power: While regular breadcrumbs work, Panko breadcrumbs are specifically designed to be lighter, airier, and create a much crispier coating when baked or fried. It’s worth seeking them out for that superior crunch. Toasting the Panko lightly in a dry skillet before using can enhance the crispiness even further.
- Season Every Layer: Don’t just season the breadcrumbs. Adding a little salt and pepper to the flour mixture (the first dredging step) builds layers of flavour right from the start. You can also add a pinch of garlic powder or onion powder to the flour.
- Utilize a Wire Rack: Placing an oven-safe wire rack on top of your parchment-lined baking sheet allows hot air to circulate completely around each nugget, including the bottom. This prevents the bottoms from getting soggy and promotes all-around crispiness.
- Don’t Skimp on the Oil (or Spray): That drizzle of olive oil or generous coating of cooking spray before baking is crucial. It helps the Panko brown beautifully and develop a fried-like crispness without needing a deep fryer. Ensure the tops are evenly coated.
- Check for Doneness Accurately: While visual cues (golden brown) and timing are helpful, the most reliable way to ensure chicken is cooked safely is by using an instant-read meat thermometer. Insert it into the thickest part of several nuggets – it should register 165°F (74°C). This guarantees juicy, perfectly cooked chicken every time.
- Customize Your Spices: This recipe provides a classic flavour profile, but feel free to get creative! Add smoked paprika for smokiness, a pinch of cayenne pepper for heat, dried herbs like thyme or oregano for an Italian flair, or even nutritional yeast for a cheesy flavour. Tailor the seasoning blend to your family’s preferences.
Frequently Asked Questions (FAQ) about Baked Chicken Nuggets
Here are answers to some common questions about making this baked chicken nuggets recipe:
- Can I use chicken thighs instead of breasts?
Absolutely! Chicken thighs have more fat, which makes them naturally more flavourful and less prone to drying out. Cut them into 1-inch pieces, just like the breasts. You might need to add a couple of extra minutes to the baking time, ensuring they reach the safe internal temperature of 165°F (74°C). - How can I make these baked chicken nuggets gluten-free?
It’s easy! Substitute the all-purpose flour with a good quality gluten-free all-purpose flour blend (one containing xanthan gum usually works best). For the breading, use certified gluten-free Panko breadcrumbs or crush gluten-free cornflakes or rice crackers for a crispy coating. Ensure all your seasonings are certified gluten-free as well. - How do I store leftover baked chicken nuggets?
Allow the nuggets to cool completely to room temperature. Then, store them in an airtight container in the refrigerator. They will stay fresh for up to 3-4 days. Storing them while still warm can create condensation, leading to sogginess. - Can I freeze these chicken nuggets?
Yes, freezing works well! You can freeze them either before or after baking.- Freezing Unbaked: Arrange the breaded, unbaked nuggets in a single layer on a baking sheet and freeze until solid (about 1-2 hours). Then transfer them to a freezer-safe bag or container. Bake directly from frozen, adding about 5-10 minutes to the total baking time.
- Freezing Baked: Let the cooked nuggets cool completely. Freeze them in a single layer on a baking sheet, then transfer to a freezer bag. They can be stored for up to 2-3 months.
- What’s the best way to reheat baked chicken nuggets?
To maintain crispiness, avoid the microwave if possible, as it tends to make them rubbery. The best methods are:- Oven: Reheat on a baking sheet at 375°F (190°C) for 10-15 minutes, or until heated through and crispy again.
- Air Fryer: Reheat at 350°F (175°C) for 5-8 minutes, shaking the basket halfway through. This method is excellent for restoring crispiness quickly.
- My baked nuggets didn’t get very crispy. What went wrong?
Several factors could be at play:- Oven Temperature: Ensure your oven was fully preheated to 400°F (200°C). An oven thermometer can verify accuracy.
- Crowded Pan: Too many nuggets on the sheet causes steaming. Use two sheets if needed.
- Not Enough Oil/Spray: The fat helps crisp the Panko. Ensure adequate coverage.
- Type of Breadcrumbs: Panko yields the best results. Regular breadcrumbs won’t be as crunchy.
- Using a Wire Rack: Elevating the nuggets allows air circulation underneath.
- Can I make this recipe in an air fryer?
Yes, this recipe adapts beautifully to the air fryer! Preheat your air fryer to 380°F (195°C). Arrange the breaded nuggets in a single layer in the air fryer basket (work in batches if necessary – don’t overcrowd). Spray the tops lightly with oil. Air fry for 8-12 minutes, flipping halfway through, until golden brown, crispy, and cooked to 165°F (74°C). Air fryer cooking times can vary, so keep an eye on them. - Are these baked chicken nuggets really healthier than fried ones?
Yes, significantly. Baking uses far less oil than deep-frying. Deep-fried nuggets absorb a large amount of oil during cooking, drastically increasing their fat (especially unhealthy fats) and calorie content. Baking achieves crispiness through high heat and a minimal amount of surface oil, resulting in a much lighter, lower-fat, and lower-calorie nugget while still delivering great taste and texture. Plus, making them at home gives you control over sodium levels and ingredient quality.

Baked Chicken Nuggets Recipe
Ingredients
Here’s what you’ll need to create these delicious and healthier baked chicken nuggets:
- 1.5 lbs Boneless, Skinless Chicken Breasts: The star of the show. Using breasts ensures lean protein, cut into uniform 1-inch pieces for even cooking. You can also use chicken tenderloins, which are already conveniently sized.
- 1 cup All-Purpose Flour: This is the first layer of our coating, helping the egg wash adhere properly to the chicken. You can substitute with whole wheat flour for added fiber or a gluten-free blend if needed.
- 2 Large Eggs: Beaten lightly, these act as the binder, the crucial “glue” that holds the crispy breadcrumb coating onto the chicken pieces.
- 2 cups Panko Breadcrumbs: These Japanese-style breadcrumbs are the secret weapon for achieving superior crispiness compared to regular breadcrumbs. Their airy, jagged texture creates an incredibly crunchy crust when baked.
- 1 tsp Paprika: Adds a touch of warmth, beautiful colour, and subtle sweetness to the breading. Smoked paprika can also be used for a smokier flavour profile.
- 1 tsp Garlic Powder: Provides a savoury, aromatic base flavour that pairs perfectly with chicken. Ensure it’s powder, not garlic salt, to control the sodium level.
- 1 tsp Onion Powder: Complements the garlic powder, adding another layer of foundational savoury flavour to the coating.
- 1/2 tsp Black Pepper: Freshly ground black pepper offers the best flavour, adding a mild kick. Adjust to your preference.
- 1 tsp Salt: Enhances all the other flavours in the breading. Adjust according to your taste and dietary needs. Kosher salt or sea salt often provides a cleaner flavour.
- 3 tbsp Olive Oil (or Avocado Oil): Drizzling or spraying the nuggets with oil before baking is essential for achieving that golden-brown colour and crispy texture, mimicking the effect of frying without the excess fat. Melted butter can also be used for a richer flavour. Alternatively, use a high-quality cooking spray.
Instructions
Follow these simple steps for perfectly baked, crispy, and juicy chicken nuggets every time:
- Preheat and Prepare: Preheat your oven to 400°F (200°C). Line a large baking sheet with parchment paper for easy cleanup. For extra crispiness, place a wire rack over the parchment-lined baking sheet – this allows hot air to circulate underneath the nuggets. Lightly grease the parchment paper or the wire rack with cooking spray or a bit of olive oil.
- Prepare the Chicken: Pat the chicken breast pieces thoroughly dry with paper towels. This step is crucial as it helps the flour coating adhere better. If you haven’t already, cut the chicken into uniform 1-inch cubes. Consistency in size ensures even cooking.
- Set Up Dredging Stations: Prepare three shallow dishes or bowls for your dredging station. This assembly-line setup makes the coating process smooth and less messy.
- Dish 1 (Flour): Combine the 1 cup of all-purpose flour with a pinch of salt and pepper. Stir briefly.
- Dish 2 (Egg Wash): In the second dish, whisk the 2 large eggs until the yolks and whites are well combined.
- Dish 3 (Breadcrumb Mixture): In the third dish, combine the 2 cups of Panko breadcrumbs, 1 tsp paprika, 1 tsp garlic powder, 1 tsp onion powder, 1/2 tsp black pepper, and 1 tsp salt. Stir well to ensure the seasonings are evenly distributed throughout the Panko.
- Dredge the Chicken: Work with a few chicken pieces at a time to avoid overcrowding the dishes. Follow this three-step process for each piece:
- Flour First: Toss the chicken pieces lightly in the seasoned flour (Dish 1), shaking off any excess. The goal is a thin, even coating.
- Egg Wash Next: Dip the flour-coated chicken pieces into the beaten egg (Dish 2), ensuring they are fully coated. Let any excess egg drip off.
- Breadcrumb Coating Last: Press the egg-coated chicken pieces firmly into the seasoned Panko breadcrumb mixture (Dish 3), turning to coat all sides thoroughly. Ensure a generous layer of breadcrumbs adheres – this is key for crispiness.
- Arrange on Baking Sheet: Carefully place the coated chicken nuggets onto the prepared baking sheet (or wire rack if using). Ensure there is some space between each nugget. Do not overcrowd the pan, as this can lead to steaming instead of baking, resulting in soggy nuggets. Use a second baking sheet if necessary.
- Oil the Nuggets: Drizzle the 3 tablespoons of olive oil evenly over the tops of the chicken nuggets. Alternatively, generously spray them with cooking spray. This helps them brown beautifully and achieve maximum crispiness.
- Bake: Place the baking sheet in the preheated 400°F (200°C) oven. Bake for 10-12 minutes.
- Flip for Even Cooking: Carefully remove the baking sheet from the oven. Using tongs or a spatula, flip each chicken nugget over. This ensures both sides get equally crispy and golden brown. Return the baking sheet to the oven.
- Continue Baking: Bake for another 10-12 minutes, or until the nuggets are golden brown, crispy, and cooked through. The internal temperature should reach 165°F (74°C) when checked with a meat thermometer inserted into the thickest part of a nugget. Alternatively, cut one open – the juices should run clear, and the chicken should be opaque white inside.
- Rest and Serve: Once cooked, remove the baking sheet from the oven. Let the baked chicken nuggets rest for a few minutes directly on the baking sheet or wire rack. This allows the juices to redistribute, resulting in a more tender nugget. Serve immediately with your favourite dipping sauces.
Nutrition
- Serving Size: one normal portion
- Calories: 550
- Sodium: 800mg
- Fat: 20g
- Carbohydrates: 40g
- Protein: 50g