Of all the recipes that have become staples in my household, the ones that stick are always the simplest. I remember a particularly hectic Saturday afternoon, juggling sports practice drop-offs, a mountain of laundry, and the looming question of what to feed a house full of hungry kids and their friends. I needed something fast, something that didn’t require turning on the oven, and something that would be devoured without a single complaint. That was the day these Chicken and Cucumber Pinwheels were born out of necessity, and they instantly became a legend in our home. The combination of creamy, savory chicken filling, the cool and refreshing crunch of fresh cucumber, and the soft tortilla holding it all together was a revelation. They look impressive arranged on a platter, yet they are deceptively simple to make. They are the perfect solution for everything from last-minute party appetizers to a wholesome and exciting lunchbox treat that my kids actually get excited about. They are, in short, the ultimate culinary lifesaver.
Ingredients for Perfect Chicken and Cucumber Pinwheels
The magic of this recipe lies in its simplicity and the freshness of its components. Each ingredient plays a crucial role in creating the perfect balance of texture and flavor. Here’s what you’ll need to create these irresistible bites.
- Cream Cheese (8 ounces, softened to room temperature): This is the rich and tangy foundation of our filling. Using full-fat cream cheese provides the best flavor and creamy texture. Softening it is key to ensuring a smooth, lump-free mixture.
- Mayonnaise (1/4 cup): Adds an extra layer of creaminess and a subtle, savory tang that complements the cream cheese and chicken perfectly.
- Sour Cream or Plain Greek Yogurt (1/4 cup): This ingredient introduces a light, tangy element that cuts through the richness of the cream cheese and mayonnaise, brightening up the entire filling. Greek yogurt is a great alternative for a slightly healthier, protein-boosted option.
- Cooked, Shredded Chicken (2 cups): The star protein of our pinwheels. A store-bought rotisserie chicken is a fantastic time-saver, but you can also use any leftover cooked chicken breasts or thighs you have on hand. Ensure it’s finely shredded for easy spreading.
- English Cucumber (1 medium, finely diced): This provides the signature fresh crunch and cool flavor. English cucumbers are ideal because they have thin skin (no peeling required) and fewer seeds, meaning less water content to make your pinwheels soggy.
- Red Onion (1/4 cup, finely minced): Adds a sharp, savory bite that contrasts beautifully with the creamy filling. Mincing it very finely ensures its flavor is distributed evenly without being overwhelming.
- Fresh Dill (2 tablespoons, chopped): This fresh herb is the secret weapon. Its bright, slightly anise-like flavor elevates the entire recipe, giving it a gourmet touch and pairing wonderfully with the cucumber.
- Garlic Powder (1/2 teaspoon): A dash of garlic powder provides a deep, savory undertone that rounds out the flavors of the filling.
- Salt and Black Pepper (to taste): Essential for seasoning. Start with 1/4 teaspoon of each and adjust according to your preference.
- Large Flour Tortillas (4-5, 10-inch “burrito size”): These are the vessel for our delicious filling. Choose large, soft, and pliable tortillas to prevent them from cracking when you roll them.
Step-by-Step Guide to Making Chicken and Cucumber Pinwheels
Follow these simple instructions to assemble your pinwheels. The process is straightforward, with the most important step being the chilling time, which ensures clean, beautiful slices.
Step 1: Prepare the Cucumber and Onion
First, prepare your vegetables. Wash and dry the English cucumber thoroughly. Dice it into very small, uniform pieces (about 1/4-inch). The smaller the dice, the easier the tortillas will be to roll tightly. Place the diced cucumber in a small bowl lined with a paper towel to absorb any excess moisture—this is a critical step to prevent a soggy filling. Next, finely mince the red onion. You want the pieces to be very small so they incorporate seamlessly into the cream cheese base.
Step 2: Create the Creamy Filling Base
In a medium-sized mixing bowl, combine the softened cream cheese, mayonnaise, and sour cream (or Greek yogurt). Using a hand mixer or a sturdy spatula, beat the ingredients together until the mixture is completely smooth, creamy, and free of any lumps. Ensuring the cream cheese is at room temperature is vital for this step.
Step 3: Combine All Filling Ingredients
To the creamy base, add the finely shredded chicken, the drained and patted-dry diced cucumber, the minced red onion, chopped fresh dill, and garlic powder. Use your spatula to gently fold and mix all the ingredients together until they are evenly distributed throughout the cream cheese mixture.
Step 4: Season and Taste
Season the chicken filling with salt and black pepper. Start with a small amount, mix it in, and then taste the filling. Adjust the seasoning as needed. You may find it needs a little more salt to bring out all the flavors or a bit more dill for extra freshness. This is your chance to perfect the taste before assembling the pinwheels.
Step 5: Assemble the Pinwheels
Lay one large flour tortilla flat on a clean work surface. Scoop about 1/4 to 1/5 of the chicken and cucumber mixture onto the tortilla (depending on if you’re using 4 or 5 tortillas). Using the back of a spoon or an offset spatula, spread the filling in a thin, even layer, leaving a small 1/2-inch border along the edge furthest from you. This empty border will help seal the roll.
Step 6: Roll the Tortillas
Starting from the edge closest to you, begin to roll the tortilla up as tightly as you can. A tight roll is the key to creating pinwheels that hold their shape. When you reach the end, the small border of exposed tortilla will help the log seal itself shut. Repeat this process with the remaining tortillas and filling.
Step 7: Chill for Firmness
Carefully wrap each rolled tortilla log tightly in plastic wrap. The plastic wrap not only keeps them fresh but also helps the rolls maintain their tight, round shape. Place the wrapped logs in the refrigerator to chill for at least 2 hours, but preferably 4 hours or even overnight. This chilling period is non-negotiable; it allows the cream cheese filling to firm up, which is essential for getting clean, defined slices without the filling squishing out.
Step 8: Slice and Serve
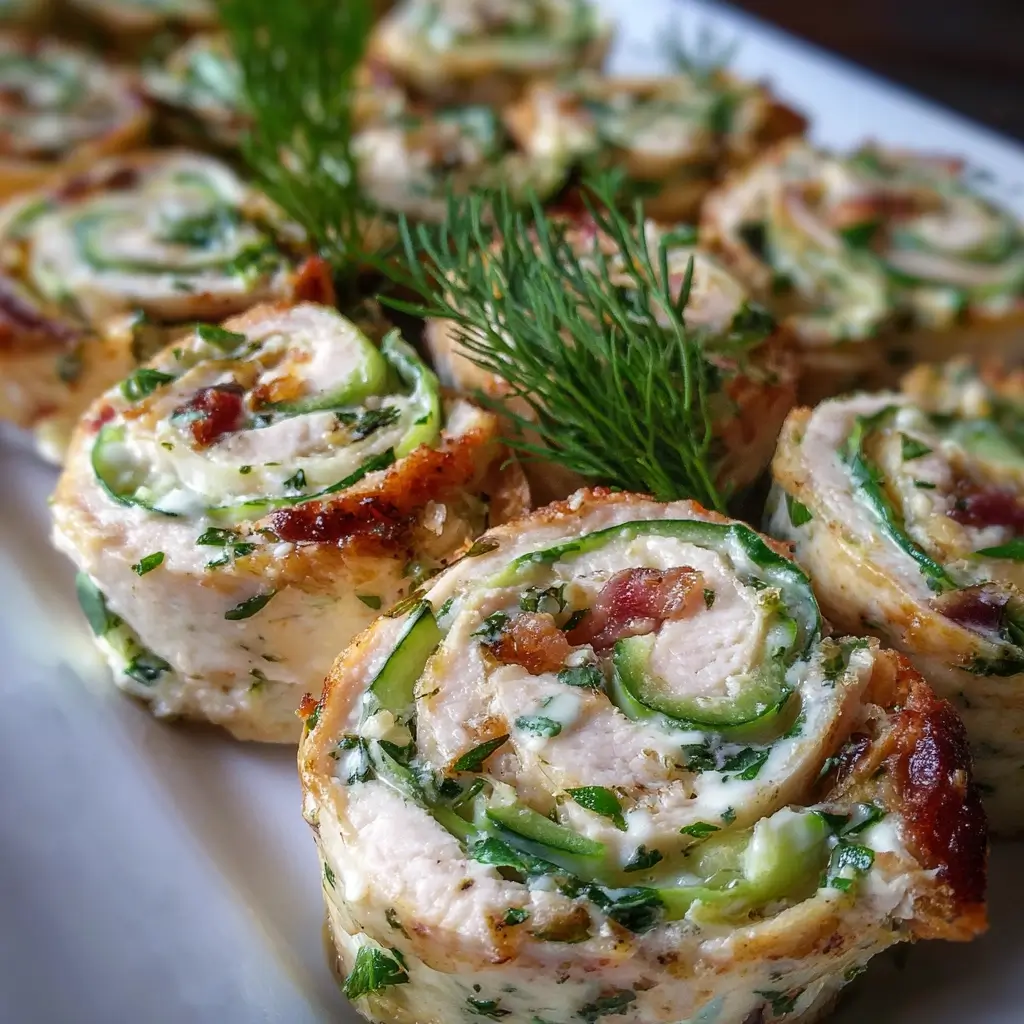
Once the logs are thoroughly chilled and firm, remove them from the refrigerator and unwrap them. Place a log on a cutting board. Using a sharp, serrated knife (like a bread knife) provides the best results. First, trim off the uneven ends of the roll and discard them (or enjoy them as a chef’s snack!). Then, carefully slice the log into 1/2 to 3/4-inch thick pinwheels. Arrange them on a platter, and they are ready to be served!
A Quick Look at the Nutrition Facts
While these pinwheels are a delightful treat, it’s helpful to have a general idea of their nutritional content. The exact values can vary based on the specific brands of ingredients used (e.g., full-fat vs. low-fat cream cheese).
Servings: This recipe makes approximately 32-40 pinwheels.
Calories per serving (estimated per 2 pinwheels): Approximately 150-180 calories.
- Protein: A good source of protein from the chicken and Greek yogurt (if used), which is essential for muscle repair and keeping you feeling full.
- Fat: The majority of the fat content comes from the cream cheese and mayonnaise. You can reduce this by opting for low-fat or neufchâtel cheese and light mayonnaise.
- Carbohydrates: Primarily from the flour tortillas. For a lower-carb option, you can seek out low-carb or keto-friendly tortillas.
- Sodium: The sodium content can be managed by using a low-sodium chicken or no-salt-added seasonings and being mindful of the salt you add.
- Vitamins and Minerals: The fresh cucumber, red onion, and dill contribute small amounts of vitamins like Vitamin K and Vitamin C.
Preparation and Chilling Time
Understanding the time commitment is key to planning. The beauty of this recipe is that the active preparation is very short, with most of the time dedicated to hands-off chilling.
- Active Preparation Time: 15-20 minutes. This includes dicing the vegetables, shredding the chicken (if not pre-shredded), and mixing the filling and rolling the tortillas.
- Chilling Time: Minimum 2 hours, recommended 4+ hours or overnight.
- Total Time: Approximately 2 hours and 20 minutes (minimum).
Creative Ways to Serve Your Chicken and Cucumber Pinwheels
These pinwheels are incredibly versatile. They can be dressed up for a fancy party or packed for a casual picnic. Here are some a few ways to serve them:
- As a Party Appetizer:
- Arrange the pinwheels cut-side up on a large, circular platter, starting from the outside and working your way in to create a beautiful spiral effect.
- Garnish the platter with fresh dill sprigs and a light dusting of paprika for a pop of color.
- Place a small bowl of dip in the center of the platter. A simple ranch dip, a zesty avocado crema, or even a spicy sriracha mayo would be delicious.
- For a Kid’s Lunchbox:
- Pack 3-4 pinwheels tightly in a bento-style lunchbox compartment so they don’t unroll.
- Pair them with complementary snacks like baby carrots, snap peas, a small container of hummus, cheese cubes, and some fresh fruit like grapes or apple slices.
- They are a complete, fun-to-eat meal that feels more special than a standard sandwich.
- As a Light Lunch or Dinner:
- Serve a generous portion of 5-6 pinwheels alongside a simple side.
- Pair with a warm bowl of soup, such as a creamy tomato bisque or a light chicken noodle soup.
- Serve with a simple green salad tossed in a lemon vinaigrette to complement the freshness of the pinwheels.
- For Picnics and Outings:
- Slice the pinwheels just before you leave to ensure they are at their freshest.
- Pack them in a sturdy, airtight container. Lay them flat in a single layer if possible, or pack them snugly side-by-side to prevent them from getting squashed.
- Keep the container in a cooler with an ice pack to ensure the creamy filling stays cool and safe to eat.
Expert Tips for Flawless Tortilla Pinwheels
To ensure your pinwheels come out perfectly every time, keep these eight expert tips in mind. They address the most common pitfalls and will help you achieve professional-looking results.
- Use a Rotisserie Chicken: This is the ultimate time-saving hack. A pre-cooked rotisserie chicken is not only convenient but also incredibly moist and flavorful. Simply pull the meat from the bones and give it a fine shred or a rough chop. It adds a depth of flavor that plain boiled chicken sometimes lacks.
- Soften the Cream Cheese Properly: Do not skip this step! Cold cream cheese is lumpy and impossible to mix into a smooth filling. The best way to soften it is to leave it on the counter for about an hour before you start. If you’re short on time, you can unwrap the block, place it on a microwave-safe plate, and microwave it in 10-second intervals until it’s soft to the touch but not melted.
- Get Your Cucumber Extra Dry: Moisture is the enemy of a crisp pinwheel. After dicing your cucumber, press it gently between layers of paper towels or a clean kitchen towel to squeeze out as much excess water as possible. This single step will make the biggest difference in preventing your tortillas from becoming soggy, especially if you’re making them ahead of time.
- Spread the Filling to the Edges (Almost): For pinwheels that are full of flavor from the center to the very last bite, be sure to spread the filling in a thin, even layer all the way to the side edges of the tortilla. However, always leave that crucial 1/2-inch border at the top edge to act as a sealant.
- Roll Tightly and Consistently: The “art” of the pinwheel is in the roll. Start with a tight first fold and continue to apply gentle, consistent pressure as you roll the tortilla away from you. This compacts the filling and ensures you get a perfect, round spiral shape that won’t fall apart when sliced.
- The Chilling Step is Non-Negotiable: I cannot stress this enough. Chilling is what transforms a soft, squishy roll into a firm log that can be sliced cleanly. A minimum of two hours is required, but four hours or even overnight is ideal. The firm, cold filling will hold its shape perfectly against the knife.
- Use a Serrated Knife for Slicing: A smooth-bladed chef’s knife can compress and squish the delicate rolls. A serrated knife, like a bread knife, saws through the tortilla and filling with minimal pressure, giving you beautiful, clean-cut pinwheels without smearing the filling. Use a gentle sawing motion rather than pressing straight down.
- Don’t Be Afraid to Customize: This recipe is a fantastic base for creativity. Feel free to experiment!
- Herbs: Swap dill for fresh chives, parsley, or cilantro.
- Veggies: Add finely diced bell peppers (any color), shredded carrots, or drained and chopped sun-dried tomatoes.
- Cheese: Mix in a 1/4 cup of shredded sharp cheddar or crumbled feta cheese for extra flavor.
- Spice: Add a pinch of cayenne pepper or a dash of your favorite hot sauce to the filling for a spicy kick.
Frequently Asked Questions About Chicken and Cucumber Pinwheels
Here are answers to some of the most common questions about making, storing, and serving these delicious tortilla roll-ups.
1. Can I make these pinwheels ahead of time?
Absolutely! This is one of the best features of this recipe. You can assemble and roll the tortilla logs up to 24 hours in advance. Wrap them tightly in plastic wrap and store them in the refrigerator. Wait to slice them until just before you plan to serve them to ensure the cut edges are fresh and don’t dry out.
2. How do I store leftover pinwheels?
Store any leftover sliced pinwheels in an airtight container in the refrigerator. It’s best to lay them flat in a single layer if possible. They will stay fresh for up to 2 days, but be aware that the tortilla may soften slightly over time as it absorbs moisture from the filling.
3. My pinwheels are falling apart when I slice them. What did I do wrong?
This is usually due to one of two reasons. First, the roll may not have been rolled tightly enough. Be sure to use firm, even pressure when rolling. Second, and more commonly, the roll was not chilled for long enough. The filling needs to be very firm and cold to hold its shape during slicing. Ensure you chill the logs for at least 2-4 hours.
4. Can I use something other than chicken?
Yes, this recipe is very adaptable. You can easily substitute the shredded chicken with an equal amount of canned tuna (drained well), canned salmon (drained), or even finely chopped deli ham. For a vegetarian version, you can use mashed chickpeas or a mixture of finely diced vegetables and extra cheese.
5. How can I make these pinwheels gluten-free?
To make this recipe gluten-free, simply substitute the regular flour tortillas with your favorite brand of gluten-free tortillas. Be sure they are large and pliable enough to roll without cracking. Also, double-check that your other ingredients, like the mayonnaise and sour cream, are certified gluten-free.
6. What are the best tortillas to use for pinwheels?
The best tortillas are large (10-inch “burrito size”), soft, and fresh. Stale or dry tortillas are prone to cracking when you roll them. Standard flour tortillas work best for their pliability. Flavored wraps, like spinach or sun-dried tomato, can also be a fun and colorful alternative.
7. How do I prevent my pinwheels from getting soggy?
The key to preventing sogginess is moisture control. First, pat the diced cucumber very dry with paper towels. Second, use a thick, creamy filling base (full-fat cream cheese works best). Third, don’t let the assembled and rolled logs sit for more than 24 hours before slicing and serving. If packing for a lunch, try to place them snugly in the container to minimize air exposure.
8. Can I freeze chicken pinwheels?
It is generally not recommended to freeze these pinwheels. The cream cheese, mayonnaise, and especially the fresh cucumber do not freeze well. Upon thawing, the cucumber will become watery and limp, and the creamy filling’s texture can become grainy and separated, resulting in a very soggy and unappetizing pinwheel. This recipe is best enjoyed fresh.

Chicken and Cucumber Pinwheels
Ingredients
The magic of this recipe lies in its simplicity and the freshness of its components. Each ingredient plays a crucial role in creating the perfect balance of texture and flavor. Here’s what you’ll need to create these irresistible bites.
- Cream Cheese (8 ounces, softened to room temperature): This is the rich and tangy foundation of our filling. Using full-fat cream cheese provides the best flavor and creamy texture. Softening it is key to ensuring a smooth, lump-free mixture.
- Mayonnaise (1/4 cup): Adds an extra layer of creaminess and a subtle, savory tang that complements the cream cheese and chicken perfectly.
- Sour Cream or Plain Greek Yogurt (1/4 cup): This ingredient introduces a light, tangy element that cuts through the richness of the cream cheese and mayonnaise, brightening up the entire filling. Greek yogurt is a great alternative for a slightly healthier, protein-boosted option.
- Cooked, Shredded Chicken (2 cups): The star protein of our pinwheels. A store-bought rotisserie chicken is a fantastic time-saver, but you can also use any leftover cooked chicken breasts or thighs you have on hand. Ensure it’s finely shredded for easy spreading.
- English Cucumber (1 medium, finely diced): This provides the signature fresh crunch and cool flavor. English cucumbers are ideal because they have thin skin (no peeling required) and fewer seeds, meaning less water content to make your pinwheels soggy.
- Red Onion (1/4 cup, finely minced): Adds a sharp, savory bite that contrasts beautifully with the creamy filling. Mincing it very finely ensures its flavor is distributed evenly without being overwhelming.
- Fresh Dill (2 tablespoons, chopped): This fresh herb is the secret weapon. Its bright, slightly anise-like flavor elevates the entire recipe, giving it a gourmet touch and pairing wonderfully with the cucumber.
- Garlic Powder (1/2 teaspoon): A dash of garlic powder provides a deep, savory undertone that rounds out the flavors of the filling.
- Salt and Black Pepper (to taste): Essential for seasoning. Start with 1/4 teaspoon of each and adjust according to your preference.
- Large Flour Tortillas (4-5, 10-inch “burrito size”): These are the vessel for our delicious filling. Choose large, soft, and pliable tortillas to prevent them from cracking when you roll them.
Instructions
Follow these simple instructions to assemble your pinwheels. The process is straightforward, with the most important step being the chilling time, which ensures clean, beautiful slices.
Step 1: Prepare the Cucumber and Onion
First, prepare your vegetables. Wash and dry the English cucumber thoroughly. Dice it into very small, uniform pieces (about 1/4-inch). The smaller the dice, the easier the tortillas will be to roll tightly. Place the diced cucumber in a small bowl lined with a paper towel to absorb any excess moisture—this is a critical step to prevent a soggy filling. Next, finely mince the red onion. You want the pieces to be very small so they incorporate seamlessly into the cream cheese base.
Step 2: Create the Creamy Filling Base
In a medium-sized mixing bowl, combine the softened cream cheese, mayonnaise, and sour cream (or Greek yogurt). Using a hand mixer or a sturdy spatula, beat the ingredients together until the mixture is completely smooth, creamy, and free of any lumps. Ensuring the cream cheese is at room temperature is vital for this step.
Step 3: Combine All Filling Ingredients
To the creamy base, add the finely shredded chicken, the drained and patted-dry diced cucumber, the minced red onion, chopped fresh dill, and garlic powder. Use your spatula to gently fold and mix all the ingredients together until they are evenly distributed throughout the cream cheese mixture.
Step 4: Season and Taste
Season the chicken filling with salt and black pepper. Start with a small amount, mix it in, and then taste the filling. Adjust the seasoning as needed. You may find it needs a little more salt to bring out all the flavors or a bit more dill for extra freshness. This is your chance to perfect the taste before assembling the pinwheels.
Step 5: Assemble the Pinwheels
Lay one large flour tortilla flat on a clean work surface. Scoop about 1/4 to 1/5 of the chicken and cucumber mixture onto the tortilla (depending on if you’re using 4 or 5 tortillas). Using the back of a spoon or an offset spatula, spread the filling in a thin, even layer, leaving a small 1/2-inch border along the edge furthest from you. This empty border will help seal the roll.
Step 6: Roll the Tortillas
Starting from the edge closest to you, begin to roll the tortilla up as tightly as you can. A tight roll is the key to creating pinwheels that hold their shape. When you reach the end, the small border of exposed tortilla will help the log seal itself shut. Repeat this process with the remaining tortillas and filling.
Step 7: Chill for Firmness
Carefully wrap each rolled tortilla log tightly in plastic wrap. The plastic wrap not only keeps them fresh but also helps the rolls maintain their tight, round shape. Place the wrapped logs in the refrigerator to chill for at least 2 hours, but preferably 4 hours or even overnight. This chilling period is non-negotiable; it allows the cream cheese filling to firm up, which is essential for getting clean, defined slices without the filling squishing out.
Step 8: Slice and Serve
Once the logs are thoroughly chilled and firm, remove them from the refrigerator and unwrap them. Place a log on a cutting board. Using a sharp, serrated knife (like a bread knife) provides the best results. First, trim off the uneven ends of the roll and discard them (or enjoy them as a chef’s snack!). Then, carefully slice the log into 1/2 to 3/4-inch thick pinwheels. Arrange them on a platter, and they are ready to be served!
Nutrition
- Serving Size: one normal portion
- Calories: 180