Of all the lunchtime ruts I’ve fallen into over the years, the search for a meal that is simultaneously fast, healthy, and genuinely exciting has been the most challenging. For a while, our household defaulted to the same tired sandwiches and leftover dinners, meals that filled a void but offered little in the way of joy. That all changed the day I threw together the first version of these Cucumber Chickpea Pita Pockets. I was looking for something fresh, something with a bit of crunch and a creamy, satisfying filling. What I ended up creating was a revelation. The kids, initially skeptical of the “bean salad,” were won over by the first bite. The combination of the cool, crisp cucumber against the hearty, mashed chickpeas, all brought together by a zesty, tangy lemon-tahini dressing, was an instant hit. It’s now our official go-to for busy weekdays, picnics in the park, and even light, no-fuss dinners. This recipe isn’t just about feeding your family; it’s about elevating the everyday meal into something you can truly look forward to. It’s proof that simple, wholesome ingredients can create a truly spectacular dish that nourishes both body and soul.
Why You’ll Love This Cucumber Chickpea Pita Pocket Recipe
Before we dive into the specific steps, let’s talk about why this recipe deserves a permanent spot in your culinary rotation. It’s more than just a sandwich; it’s a versatile, flavor-packed solution for modern, mindful eating.
- Incredibly Quick and Easy: In a world where time is a precious commodity, this recipe is a true champion. With no cooking required (unless you choose to toast your pitas), you can have a delicious and satisfying meal on the table in under 20 minutes. It’s the perfect answer to the dreaded “what’s for lunch?” question on a busy workday.
- Nutrient-Dense and Healthy: Packed with plant-based protein from chickpeas, healthy fats from tahini, and vitamins from fresh vegetables and lemon juice, this is a meal you can feel great about eating. The high fiber content will keep you feeling full and satisfied for hours, preventing that mid-afternoon energy slump. It’s a powerhouse of Mediterranean goodness.
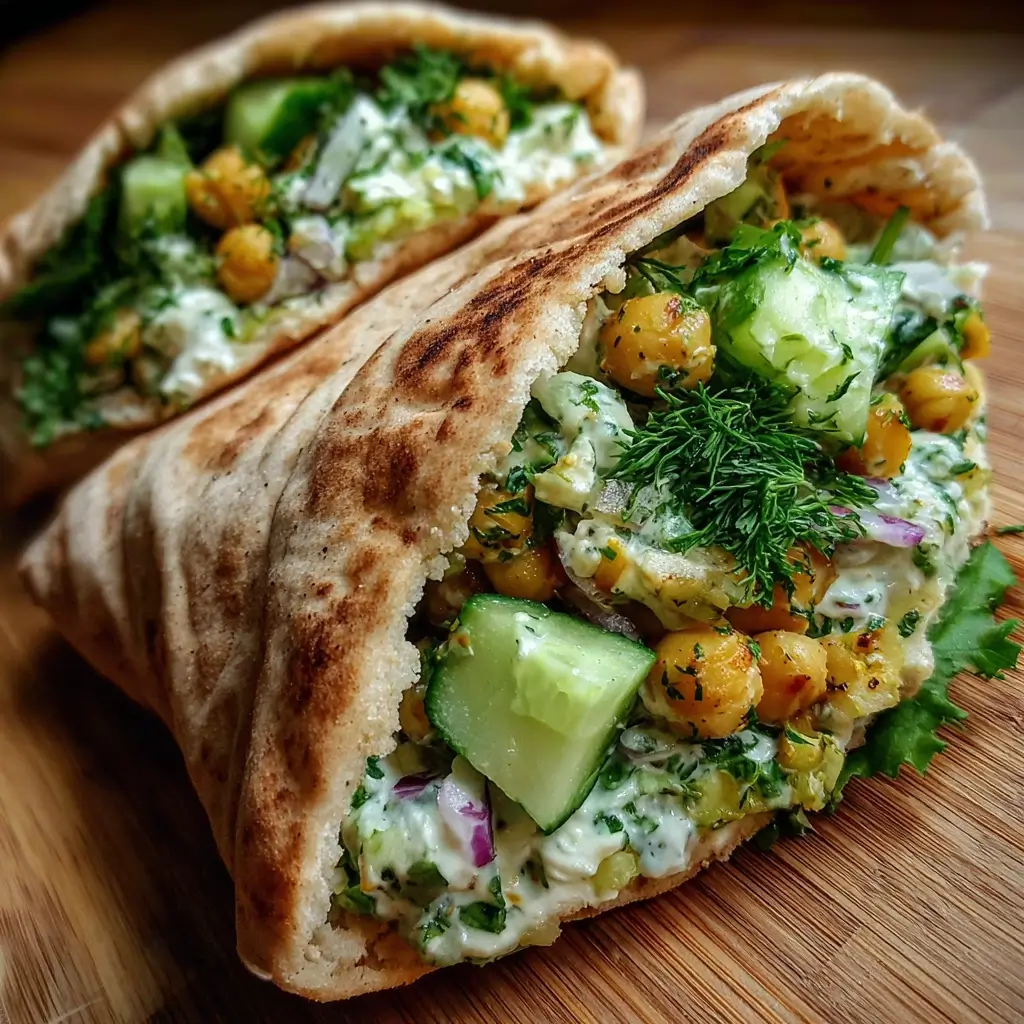
- Bursting with Fresh Flavors and Textures: This is the antithesis of a boring desk lunch. You get a delightful symphony of textures in every bite: the soft, pillowy pita, the creamy-yet-chunky chickpea filling, the crisp crunch of the cucumber and red onion, and the bright, fresh notes from the dill and parsley. The lemon-tahini dressing ties it all together with a nutty, tangy finish that awakens the palate.
- Perfect for Meal Prep: The chickpea salad filling holds up beautifully in the refrigerator. You can make a large batch at the beginning of the week and have instant lunches or snacks ready to go. This simple act of preparation can transform your week, saving you time, money, and the stress of last-minute meal decisions.
- Endlessly Customizable: Think of this recipe as a brilliant template. You can easily adapt it to suit your tastes or use up whatever you have in your refrigerator. Don’t have dill? Use mint. Want more crunch? Add some sunflower seeds. Need a bit of spice? A dash of cayenne pepper works wonders. We’ll explore more variations later, but its inherent flexibility is one of its greatest strengths.
Ingredients
Each component in this recipe is chosen to create a perfect balance of flavor, texture, and nutrition. Here’s what you’ll need to create these vibrant pita pockets.
- For the Chickpea Salad Filling:
- 2 cans (15-ounce each) chickpeas: Also known as garbanzo beans, these are the hearty, protein-packed base of our salad. Make sure to rinse and drain them well to remove excess sodium and starchy liquid from the can.
- 1 large English cucumber: Chosen for its thin skin and minimal seeds, it provides a superior, crisp crunch without adding excess water to the salad.
- 1/2 cup finely chopped red onion: Lends a sharp, zesty bite and a beautiful splash of color that contrasts with the creamy chickpeas.
- 1/2 cup chopped fresh parsley: Adds a bright, clean, and slightly peppery flavor that lightens the entire dish.
- 1/4 cup chopped fresh dill: This is the secret weapon, providing a unique, slightly tangy, and aromatic flavor that is quintessentially Mediterranean.
- 2 celery stalks, finely diced: Offers an extra layer of savory crunch and subtle vegetal flavor.
- For the Lemon Tahini Dressing:
- 1/2 cup tahini: A smooth paste made from ground sesame seeds. It’s the key to the dressing’s rich, nutty flavor and creamy consistency.
- 1/4 cup fresh lemon juice: Absolutely essential for that bright, zesty tang. Use freshly squeezed juice for the best flavor; bottled juice can’t compare.
- 1 large garlic clove, minced: Adds a pungent, savory depth to the dressing. Adjust to your personal preference.
- 2-4 tablespoons of ice-cold water: The magic ingredient for making tahini dressing smooth and creamy. The cold temperature helps it emulsify beautifully.
- 1/2 teaspoon sea salt: Enhances all the other flavors in the dressing and the salad.
- 1/4 teaspoon black pepper: For a touch of gentle spice.
- For Assembly:
- 4-6 large pita breads: Choose soft, fresh pitas with pockets. Whole wheat or white varieties both work wonderfully.
Instructions
Follow these simple, step-by-step instructions to create the perfect Cucumber Chickpea Pita Pockets. The process is straightforward and focuses on building layers of flavor and texture.
Step 1: Prepare the Chickpeas
First, open your cans of chickpeas and pour them into a colander. Rinse them thoroughly under cold running water for at least 30 seconds. This step is crucial as it washes away the aquafaba (the canning liquid) and significantly reduces the sodium content, resulting in a cleaner-tasting salad. Once rinsed, shake the colander well to drain as much water as possible. Transfer the drained chickpeas to a large mixing bowl.
Step 2: Mash for Texture
Using a potato masher or the back of a large fork, gently mash about half of the chickpeas in the bowl. You are not aiming for a smooth purée like hummus. The goal is to create a varied texture. Leaving half the chickpeas whole provides a satisfying bite, while the mashed portion creates a creamy base that helps bind the salad together, preventing it from falling out of the pita pocket.
Step 3: Add the Fresh Vegetables and Herbs
To the bowl with the mashed and whole chickpeas, add the finely diced English cucumber, finely chopped red onion, finely diced celery, chopped fresh parsley, and chopped fresh dill. Gently stir everything together with a spatula or large spoon until the vegetables and herbs are evenly distributed throughout the chickpeas. The vibrant colors will already start to look incredibly appealing.
Step 4: Prepare the Lemon Tahini Dressing
In a separate, medium-sized bowl or a liquid measuring cup, combine the tahini, fresh lemon juice, and minced garlic. At first, the mixture will seize up and become very thick – this is completely normal. Begin adding the ice-cold water, one tablespoon at a time, while whisking continuously. You will see the dressing transform, becoming lighter in color and much smoother and creamier in consistency. Continue adding water until you reach your desired drizzling consistency. It should be thick enough to coat the back of a spoon but thin enough to pour. Finally, whisk in the sea salt and black pepper. Taste and adjust the seasoning if necessary. You might want more lemon for tang, more salt for flavor, or more garlic for a pungent kick.
Step 5: Combine the Salad and Dressing
Pour about three-quarters of the prepared lemon tahini dressing over the chickpea and vegetable mixture in the large bowl. Gently fold everything together until the salad is evenly coated in the creamy dressing. It’s best to start with less dressing and add more as needed to avoid oversaturating the salad. You want it to be creamy, not soupy. You can save any leftover dressing for drizzling over the top when serving.
Step 6: Prepare the Pitas and Assemble
If you prefer your pitas warm and soft, you can heat them for a few seconds in the microwave, a dry skillet, or a toaster oven. This makes them more pliable and less likely to tear. Once warm, carefully cut each pita bread in half to create two pockets. Gently open each pita half and generously stuff it with the cucumber chickpea salad mixture. Be careful not to overfill, or the pita may split. For an extra touch of flavor, you can drizzle a little of the reserved dressing inside the stuffed pita before serving.
Nutrition Facts
This recipe is designed to be as nourishing as it is delicious. The nutritional information is an estimate and can vary based on specific ingredients used.
- Servings: This recipe makes enough filling for approximately 4-6 generous pita pockets.
- Calories per serving (1 pita pocket): Approximately 350-450 calories.
- Protein (Approx. 15g per serving): Chickpeas provide a fantastic source of plant-based protein, which is essential for muscle repair, immune function, and keeping you feeling full and satisfied.
- Fiber (Approx. 12g per serving): This recipe is packed with dietary fiber from the chickpeas, vegetables, and whole wheat pitas. Fiber aids in digestion, helps regulate blood sugar levels, and contributes to long-lasting satiety.
- Healthy Fats (Approx. 18g per serving): The primary source of fat is tahini, which is rich in monounsaturated and polyunsaturated fats. These are heart-healthy fats that can help lower bad cholesterol levels.
- Iron (Approx. 4mg per serving): Chickpeas and tahini are good sources of iron, a vital mineral for carrying oxygen in the blood and preventing fatigue. The Vitamin C from the lemon juice in the dressing actually helps your body absorb this plant-based iron more effectively.
- Vitamins and Minerals: Beyond the highlights, this meal is a good source of folate, magnesium, and B vitamins from the chickpeas, and Vitamin K and Vitamin C from the fresh herbs and vegetables.
Preparation Time
This is the ultimate quick and convenient meal, perfect for when you’re short on time but unwilling to compromise on quality.
- Total Preparation Time: 15-20 minutes
- Breakdown: The majority of the time is spent on chopping the vegetables and herbs (about 10-12 minutes). Whisking the dressing and combining the salad takes only about 5-8 minutes. There is no cooking time required, making it an exceptionally efficient recipe from start to finish.
How to Serve
While stuffing the mixture into a pita is the classic approach, this versatile chickpea salad can be served in many delicious ways. Here are a few ideas to keep your meals interesting:
- The Classic Pita Pocket:
- Warm the pitas slightly to make them soft and pliable.
- Cut them in half and stuff them with the chickpea salad.
- For extra freshness, add a few leaves of crisp romaine lettuce or baby spinach into the pocket before the filling.
- Deconstructed Salad Bowl:
- Skip the pita and serve the chickpea salad over a bed of mixed greens, quinoa, or couscous.
- Top with extra fresh vegetables like cherry tomatoes, bell peppers, or Kalamata olives.
- Drizzle with any remaining lemon tahini dressing for a wholesome and satisfying grain bowl.
- As a Hearty Wrap:
- Spoon the chickpea salad down the center of a large whole wheat tortilla or lavash bread.
- Add other fillings like sliced avocado, sprouts, or shredded carrots.
- Roll it up tightly for an easy-to-eat, portable lunch that’s perfect for on-the-go.
- On Toasted Bread or Crackers:
- Serve the chickpea salad as you would a tuna or chicken salad.
- Spoon it onto toasted sourdough, rye bread, or your favorite whole-grain crackers for a delicious open-faced sandwich or a fantastic appetizer.
- Lettuce Cups:
- For a low-carb and gluten-free option, use large, crisp lettuce leaves (like butter lettuce or iceberg) as a cup to hold the salad. It’s a light, refreshing, and crunchy alternative.
Additional Tips
Take your Cucumber Chickpea Pita Pockets from great to gourmet with these eight professional tips and tricks.
- Toast Your Pitas: For an elevated experience, brush your pitas with a little olive oil and toast them in a hot pan or toaster oven until lightly golden and slightly crisp on the outside. This not only warms them but also adds a wonderful textural contrast to the creamy filling.
- Make It Ahead, Assemble Later: The chickpea salad tastes even better after it has had some time to chill in the refrigerator, allowing the flavors to meld. For best results, store the salad in an airtight container and assemble the pitas just before serving to prevent them from becoming soggy.
- Customize Your Crunch: Feel free to add more texture to the salad. A handful of toasted sunflower seeds, pepitas (pumpkin seeds), or chopped walnuts can add a delightful crunch and extra nutrients.
- Turn Up the Heat: If you enjoy a bit of spice, add a pinch of cayenne pepper, a dash of your favorite hot sauce, or some finely diced jalapeño to the chickpea salad mixture. This can add a wonderful warming kick that complements the cool cucumber.
- Herb Variations: While dill and parsley are a classic combination, don’t be afraid to experiment. Fresh mint can lend a cool, refreshing flavor perfect for summer, while a bit of fresh oregano can give it an even more pronounced Greek or Mediterranean feel.
- Drain and Dry Your Chickpeas Well: After rinsing your chickpeas, pat them dry with a paper towel. Removing excess moisture is key to preventing a watery salad and allows the dressing to coat the chickpeas more effectively, resulting in a richer flavor.
- The Secret to Creamy Tahini: If your tahini dressing becomes too thick or tastes slightly bitter, the solution is more ice-cold water and a touch more lemon juice. The cold water helps it emulsify to a creamy state, and the acidity from the lemon balances the natural bitterness of the sesame paste.
- Don’t Salt the Cucumber: Avoid salting the cucumber separately. This would draw out its water content and make your final salad mixture watery. Add the cucumber to the mix and dress it right before you intend to serve or within a couple of hours.
Frequently Asked Questions (FAQ)
Here are answers to some common questions about making this delicious and easy recipe.
1. Can I make this recipe gluten-free?
Absolutely! The chickpea salad filling is naturally gluten-free. To make the entire meal gluten-free, simply serve it with your favorite gluten-free pita bread, use it as a filling for lettuce cups, or serve it as a salad over a bed of quinoa.
2. How long will the chickpea salad last in the refrigerator?
The prepared chickpea salad, without being assembled into pitas, can be stored in an airtight container in the refrigerator for up to 4 days. In fact, the flavors often get better on the second day. Keep in mind the cucumber may lose some of its crispness over time, but it will still be delicious.
3. Can I use dried chickpeas instead of canned?
Yes, you can. You will need to cook them first. To get the equivalent of two 15-ounce cans, you should start with about 1.5 cups of dried chickpeas. Soak them overnight, then boil them until tender (usually 1-2 hours). Allow them to cool completely before using them in the salad. While it takes more time, some people prefer the texture and flavor of freshly cooked chickpeas.
4. My tahini dressing tastes bitter. What did I do wrong?
This is a common issue with tahini. Bitterness can come from the brand of tahini itself, or it can be a result of the dressing not being properly balanced. The fix is usually twofold: first, ensure you are using enough lemon juice to cut through the richness. Second, continue whisking in ice-cold water. The water not only thins the dressing but also helps to mellow out and emulsify the tahini, reducing bitterness. A tiny pinch of sugar or a half-teaspoon of maple syrup can also help balance the flavor if needed.
5. What other vegetables can I add to the salad?
This recipe is very forgiving and welcomes additions. Finely diced bell peppers (red, yellow, or orange), grated carrots, chopped sun-dried tomatoes, or Kalamata olives would all be fantastic additions. Just be mindful of adding vegetables with very high water content, as they might make the salad soggy if prepared too far in advance.
6. Is this recipe good for meal prep?
This recipe is a meal prep superstar. You can prepare a large batch of the chickpea salad and the dressing at the start of the week. Store them in separate airtight containers in the fridge. This way, you can quickly assemble fresh pita pockets, salads, or wraps each day in just a few minutes.
7. Is this recipe vegan?
Yes, as written, this recipe is 100% vegan. It uses all plant-based ingredients, making it a perfect choice for those following a vegan diet. The creaminess comes from the mashed chickpeas and tahini, with no dairy required.
8. My pita bread keeps tearing when I try to stuff it. What’s the best way to prevent this?
This is a frustrating but fixable problem. The key is to use fresh, soft pitas and to warm them slightly before filling. A few seconds in the microwave or a warm pan makes them more flexible. When opening the pocket, be gentle. Use a knife to get the opening started and then use your fingers to carefully create space. Finally, avoid overstuffing the pocket, as this is the most common reason for tearing.

Cucumber Chickpea Pita Pockets
Ingredients
Each component in this recipe is chosen to create a perfect balance of flavor, texture, and nutrition. Here’s what you’ll need to create these vibrant pita pockets.
- For the Chickpea Salad Filling:
- 2 cans (15-ounce each) chickpeas: Also known as garbanzo beans, these are the hearty, protein-packed base of our salad. Make sure to rinse and drain them well to remove excess sodium and starchy liquid from the can.
- 1 large English cucumber: Chosen for its thin skin and minimal seeds, it provides a superior, crisp crunch without adding excess water to the salad.
- 1/2 cup finely chopped red onion: Lends a sharp, zesty bite and a beautiful splash of color that contrasts with the creamy chickpeas.
- 1/2 cup chopped fresh parsley: Adds a bright, clean, and slightly peppery flavor that lightens the entire dish.
- 1/4 cup chopped fresh dill: This is the secret weapon, providing a unique, slightly tangy, and aromatic flavor that is quintessentially Mediterranean.
- 2 celery stalks, finely diced: Offers an extra layer of savory crunch and subtle vegetal flavor.
- For the Lemon Tahini Dressing:
- 1/2 cup tahini: A smooth paste made from ground sesame seeds. It’s the key to the dressing’s rich, nutty flavor and creamy consistency.
- 1/4 cup fresh lemon juice: Absolutely essential for that bright, zesty tang. Use freshly squeezed juice for the best flavor; bottled juice can’t compare.
- 1 large garlic clove, minced: Adds a pungent, savory depth to the dressing. Adjust to your personal preference.
- 2–4 tablespoons of ice-cold water: The magic ingredient for making tahini dressing smooth and creamy. The cold temperature helps it emulsify beautifully.
- 1/2 teaspoon sea salt: Enhances all the other flavors in the dressing and the salad.
- 1/4 teaspoon black pepper: For a touch of gentle spice.
- For Assembly:
- 4–6 large pita breads: Choose soft, fresh pitas with pockets. Whole wheat or white varieties both work wonderfully.
Instructions
Follow these simple, step-by-step instructions to create the perfect Cucumber Chickpea Pita Pockets. The process is straightforward and focuses on building layers of flavor and texture.
Step 1: Prepare the Chickpeas
First, open your cans of chickpeas and pour them into a colander. Rinse them thoroughly under cold running water for at least 30 seconds. This step is crucial as it washes away the aquafaba (the canning liquid) and significantly reduces the sodium content, resulting in a cleaner-tasting salad. Once rinsed, shake the colander well to drain as much water as possible. Transfer the drained chickpeas to a large mixing bowl.
Step 2: Mash for Texture
Using a potato masher or the back of a large fork, gently mash about half of the chickpeas in the bowl. You are not aiming for a smooth purée like hummus. The goal is to create a varied texture. Leaving half the chickpeas whole provides a satisfying bite, while the mashed portion creates a creamy base that helps bind the salad together, preventing it from falling out of the pita pocket.
Step 3: Add the Fresh Vegetables and Herbs
To the bowl with the mashed and whole chickpeas, add the finely diced English cucumber, finely chopped red onion, finely diced celery, chopped fresh parsley, and chopped fresh dill. Gently stir everything together with a spatula or large spoon until the vegetables and herbs are evenly distributed throughout the chickpeas. The vibrant colors will already start to look incredibly appealing.
Step 4: Prepare the Lemon Tahini Dressing
In a separate, medium-sized bowl or a liquid measuring cup, combine the tahini, fresh lemon juice, and minced garlic. At first, the mixture will seize up and become very thick – this is completely normal. Begin adding the ice-cold water, one tablespoon at a time, while whisking continuously. You will see the dressing transform, becoming lighter in color and much smoother and creamier in consistency. Continue adding water until you reach your desired drizzling consistency. It should be thick enough to coat the back of a spoon but thin enough to pour. Finally, whisk in the sea salt and black pepper. Taste and adjust the seasoning if necessary. You might want more lemon for tang, more salt for flavor, or more garlic for a pungent kick.
Step 5: Combine the Salad and Dressing
Pour about three-quarters of the prepared lemon tahini dressing over the chickpea and vegetable mixture in the large bowl. Gently fold everything together until the salad is evenly coated in the creamy dressing. It’s best to start with less dressing and add more as needed to avoid oversaturating the salad. You want it to be creamy, not soupy. You can save any leftover dressing for drizzling over the top when serving.
Step 6: Prepare the Pitas and Assemble
If you prefer your pitas warm and soft, you can heat them for a few seconds in the microwave, a dry skillet, or a toaster oven. This makes them more pliable and less likely to tear. Once warm, carefully cut each pita bread in half to create two pockets. Gently open each pita half and generously stuff it with the cucumber chickpea salad mixture. Be careful not to overfill, or the pita may split. For an extra touch of flavor, you can drizzle a little of the reserved dressing inside the stuffed pita before serving.
Nutrition
- Serving Size: one normal portion
- Calories: 450
- Fat: 18g
- Fiber: 12g
- Protein: 15g