Easter at our house is synonymous with a few key things: egg hunts in the garden, the joyous chaos of family gatherings, and of course, a table laden with delicious treats. But among all the Easter delights, there’s one recipe that consistently steals the show and sparks the widest smiles – our Easter Bird’s Nest recipe. Honestly, these aren’t just desserts; they are little edible works of art that perfectly capture the spirit of spring. I remember the first time I made these with my kids; their eyes widened with wonder as they helped shape the chocolatey nests and carefully placed the candy eggs inside. It wasn’t just about making a dessert; it was about creating a memory, a tradition. Year after year, this recipe has become a cherished part of our Easter celebration. Even now, as teenagers, my kids still request these nests, and seeing their friends marvel at them during our Easter brunch is always a highlight. The combination of crunchy, chocolatey goodness with the vibrant colors of the candy eggs is simply irresistible. And the best part? They are incredibly easy to make, even for kitchen novices. If you’re looking for a show-stopping, crowd-pleasing, and utterly delightful Easter dessert that’s guaranteed to impress both young and old, look no further. These Easter Bird’s Nests are the answer. Get ready to add a touch of whimsical charm and a whole lot of sweetness to your Easter celebrations!
Ingredients: Your Bird’s Nest Pantry
This recipe is delightfully simple, relying on just a handful of readily available ingredients. Here’s what you’ll need to create these charming Easter treats:
- Semi-Sweet Chocolate Chips: (12 ounces) – The foundation of our nests, these provide the rich, chocolatey flavor and melt beautifully to create a smooth base. You can also use milk chocolate for a sweeter nest or dark chocolate for a more intense flavor.
- Shredded Coconut: (3 cups, unsweetened) – This is what gives our nests their signature feathery, bird’s nest texture. Unsweetened coconut allows you to control the overall sweetness of the dessert and provides a lovely subtle coconut flavor that complements the chocolate.
- Pretzels Sticks or Chow Mein Noodles (Optional): (1 cup, broken into small pieces) – For added texture and a slightly salty counterpoint to the sweetness, pretzels or chow mein noodles can be incorporated. These add a delightful crunch and make the nests even more visually interesting. If using pretzels, unsalted or lightly salted are best to avoid overpowering sweetness.
- Candy Eggs: (Approximately 1 cup) – The quintessential Easter touch! Choose your favorite candy eggs – mini chocolate eggs, jelly beans shaped like eggs, or speckled candy eggs all work wonderfully. A variety of colors adds visual appeal and Easter cheer.
- Butter or Coconut Oil (Optional): (1 tablespoon) – Adding a touch of butter or coconut oil helps the chocolate melt smoother and gives the finished nests a slightly glossy sheen. This is especially helpful if your chocolate is a bit thicker or you want a richer flavor.
- Sprinkles (Optional): – For extra festive flair, sprinkles can be added to the nests before the chocolate sets. Choose Easter-themed sprinkles or colorful jimmies to enhance the visual appeal.
Instructions: Crafting Your Edible Nests
Making Easter Bird’s Nests is as fun as it is easy! Follow these step-by-step instructions to create your own batch of delightful nests:
- Prepare Your Nest-Making Station: Line a baking sheet or large plate with parchment paper or wax paper. This will prevent the nests from sticking and make for easy removal later. Set this aside.
- Melt the Chocolate: In a microwave-safe bowl, combine the semi-sweet chocolate chips and the optional tablespoon of butter or coconut oil. Microwave in 30-second intervals, stirring well after each interval, until the chocolate is completely melted and smooth. Be careful not to overheat the chocolate, as it can burn. If you prefer, you can melt the chocolate in a double boiler over simmering water, stirring constantly until smooth.
- Combine Ingredients: Once the chocolate is melted and smooth, immediately add the shredded coconut and the optional pretzel pieces or chow mein noodles to the bowl. Stir everything together gently but thoroughly until the coconut and pretzels are evenly coated in the melted chocolate. Ensure no dry coconut or pretzels remain.
- Shape the Nests: Using a spoon or a small cookie scoop, scoop out portions of the chocolate-coconut mixture. Working quickly before the chocolate starts to set, place each portion onto the prepared baking sheet.
- Create the Nest Shape: While the chocolate mixture is still pliable, use your fingers or the back of a spoon to gently press down in the center of each portion, creating a well or indentation that resembles a bird’s nest. You can also use your fingers to shape the sides of the nests to make them more defined and nest-like. Don’t worry about perfection; slightly rustic nests are part of their charm!
- Add Sprinkles (Optional): If you are using sprinkles, now is the time to add them. Sprinkle them generously over the nests before the chocolate begins to set. They will adhere nicely to the melted chocolate.
- Chill to Set: Once the nests are shaped and sprinkled (if using), place the baking sheet in the refrigerator to chill for at least 30 minutes, or until the chocolate is completely set and firm. This chilling process is crucial for the nests to hold their shape and become easy to handle.
- Fill with Candy Eggs: Once the nests are firm, carefully remove them from the parchment paper. Place 3-5 candy eggs in the center of each nest, nestled in the indentation you created.
- Serve and Enjoy: Your Easter Bird’s Nests are now ready to serve! They can be enjoyed immediately or stored in an airtight container in the refrigerator for up to a week. Let them come to room temperature slightly before serving for the best flavor and texture.
Nutrition Facts: Sweet Treats, Balanced Bites (per serving)
While Easter Bird’s Nests are a delightful treat, it’s good to be mindful of the nutritional content, especially when enjoying them as part of a balanced diet. Here are approximate nutrition facts per serving (assuming a serving size of one medium-sized nest, using the ingredients listed above – these are estimates and can vary based on specific ingredient brands and portion sizes):
- Calories: Approximately 180-220 kcal
- Total Fat: 12-15g
- Saturated Fat: 8-10g
Important Note: These are estimated values. The exact nutritional content will depend on the specific brands of chocolate and candy eggs used, as well as the inclusion of pretzels or noodles and the size of your nests. Enjoy these treats in moderation as part of a balanced diet.
Preparation Time: Quick and Easy Easter Fun
One of the best things about Easter Bird’s Nests is how quickly and easily they come together. Here’s a breakdown of the approximate time involved:
- Prep Time: 15-20 minutes (includes gathering ingredients, melting chocolate, and mixing)
- Chill Time: 30-45 minutes (refrigeration time for setting the nests)
- Total Time: Approximately 45-65 minutes
This makes them a perfect last-minute Easter dessert option or a fun activity to do with kids as preparation is minimal and the results are impressive. You can easily involve children in melting the chocolate (with supervision!), mixing the ingredients, shaping the nests, and placing the candy eggs.
How to Serve Your Easter Bird’s Nests: A Nest for Every Occasion
Easter Bird’s Nests are incredibly versatile and can be served in a variety of ways to suit different occasions and preferences. Here are some serving suggestions to make your Easter presentation extra special:
- Individual Dessert Plates: Place a single bird’s nest on each dessert plate for an elegant and personalized touch. You can add a sprig of fresh mint or a small edible flower alongside for garnish.
- Easter Dessert Platter: Create a stunning Easter dessert platter featuring the bird’s nests alongside other Easter treats like mini cupcakes, macarons, fruit skewers, and chocolate-covered strawberries. This makes a beautiful centerpiece for your Easter table.
- Tiered Dessert Stand: Arrange the bird’s nests on a tiered dessert stand for a visually impressive display. This is perfect for parties and gatherings, allowing guests to easily grab a nest.
- Edible Centerpiece: Use a larger bowl or platter and create a cluster of bird’s nests in the center, filling them generously with candy eggs. Surround the nests with spring-themed decorations like faux flowers, moss, or small Easter figurines to create a delightful edible centerpiece.
- Party Favors: Wrap individual bird’s nests in cellophane bags tied with colorful ribbons to create charming and delicious party favors for your Easter guests.
- Easter Brunch Addition: Include bird’s nests as part of your Easter brunch spread. They are a lovely sweet treat to complement savory brunch dishes.
- Kid-Friendly Treat: Serve them as a fun and engaging snack for kids during Easter egg hunts or Easter-themed parties. Their whimsical appearance and delicious taste are sure to be a hit.
- Gift Giving: Bird’s nests make a thoughtful and homemade Easter gift. Package them in decorative boxes or tins and share them with friends, neighbors, or teachers.
Additional Tips for Bird’s Nest Perfection: Elevate Your Easter Baking
To ensure your Easter Bird’s Nests are not only delicious but also visually stunning and easy to make, here are some additional tips and tricks:
- Chocolate Choice Matters: While semi-sweet chocolate is classic, experiment with different types of chocolate. Milk chocolate will create sweeter nests, while dark chocolate offers a richer, more intense flavor. White chocolate, dyed with pastel food coloring, can also make beautiful and unique nests.
- Coconut Toasting for Enhanced Flavor: For a deeper, nuttier coconut flavor, lightly toast the shredded coconut in a dry pan over medium heat until lightly golden brown, stirring frequently to prevent burning. Let it cool completely before mixing with the chocolate.
- Vary the Texture: Experiment with different textures by adding other crunchy elements besides pretzels or chow mein noodles. Consider adding rice cereal, chopped nuts (like almonds or pecans), or even crushed cookies for a unique twist.
- Flavor Infusions: Enhance the chocolate flavor by adding a teaspoon of vanilla extract, almond extract, or even a pinch of cinnamon to the melted chocolate. You can also add a citrus zest, like orange or lemon, for a brighter flavor profile.
- Prevent Chocolate Seizing: Be careful not to overheat the chocolate when melting it, as this can cause it to seize and become grainy. Melt it in short intervals and stir frequently. If your chocolate does seize, try adding a teaspoon of vegetable oil or shortening to help smooth it out.
- Nest Shaping Techniques: For more uniform nests, use a muffin tin lined with cupcake liners. Press the chocolate mixture into the liners to create perfectly shaped nests. You can also use a small ice cream scoop to ensure consistent portion sizes.
- Candy Egg Variations: Don’t limit yourself to traditional candy eggs! Get creative with your fillings. Consider using mini peanut butter cups, chocolate truffles, jelly beans, or even small meringue kisses to fill the nests.
- Storage is Key: Store the finished bird’s nests in an airtight container in the refrigerator to maintain their firmness and prevent the chocolate from melting, especially if you live in a warmer climate. They will stay fresh for up to a week. Let them sit at room temperature for a short while before serving for optimal texture.
Frequently Asked Questions (FAQ): Your Bird’s Nest Queries Answered
Here are some frequently asked questions about making Easter Bird’s Nests, to help you troubleshoot and ensure success:
- Can I make these nests ahead of time? Yes, absolutely! Easter Bird’s Nests are a great make-ahead dessert. You can prepare the nests up to 3-4 days in advance and store them in an airtight container in the refrigerator. Fill them with candy eggs just before serving to keep the eggs looking their best.
- Can I use different types of chocolate? Yes, you can use milk chocolate, dark chocolate, white chocolate, or even flavored chocolate chips like peanut butter or mint chocolate chips. The type of chocolate you choose will affect the overall sweetness and flavor of the nests.
- What if I don’t have shredded coconut? While shredded coconut is traditional for bird’s nests, you can try substituting other shredded options like finely chopped nuts, shredded wheat cereal, or even puffed rice cereal for a different texture.
- My chocolate is seizing, what do I do? If your chocolate seizes while melting, try stirring in a teaspoon of vegetable oil or shortening. This can sometimes help to smooth it out. Be sure to melt the chocolate gently and avoid overheating it.
- How do I prevent the nests from sticking to the parchment paper? Ensure you are using good quality parchment paper or wax paper. You can also lightly grease the paper with cooking spray for extra insurance against sticking. Chilling the nests thoroughly before removing them also helps.
- Can I freeze Easter Bird’s Nests? While technically you can freeze them, it’s not recommended as the texture of the chocolate and coconut may change slightly after thawing. It’s best to make them a few days ahead and store them in the refrigerator.
- How do I make vegan Easter Bird’s Nests? To make vegan nests, use vegan chocolate chips, vegan butter or coconut oil, and ensure your candy eggs are also vegan-friendly (many dark chocolate and jelly bean options are). Double-check all ingredient labels.
- Can I make these without pretzels or chow mein noodles? Yes, the pretzels or noodles are optional. The nests will still be delicious with just chocolate and coconut. They simply add an extra layer of texture and a slightly salty flavor contrast.
With these tips, instructions, and FAQs in hand, you’re well on your way to creating a batch of Easter Bird’s Nests that will be the highlight of your Easter celebration. Enjoy the process, get creative with your variations, and most importantly, savor every sweet and delightful bite! Happy Easter baking!
Print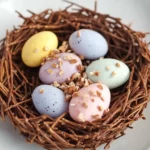
Easter Bird’s Nest Recipe
Ingredients
This recipe is delightfully simple, relying on just a handful of readily available ingredients. Here’s what you’ll need to create these charming Easter treats:
- Semi-Sweet Chocolate Chips: (12 ounces) – The foundation of our nests, these provide the rich, chocolatey flavor and melt beautifully to create a smooth base. You can also use milk chocolate for a sweeter nest or dark chocolate for a more intense flavor.
- Shredded Coconut: (3 cups, unsweetened) – This is what gives our nests their signature feathery, bird’s nest texture. Unsweetened coconut allows you to control the overall sweetness of the dessert and provides a lovely subtle coconut flavor that complements the chocolate.
- Pretzels Sticks or Chow Mein Noodles (Optional): (1 cup, broken into small pieces) – For added texture and a slightly salty counterpoint to the sweetness, pretzels or chow mein noodles can be incorporated. These add a delightful crunch and make the nests even more visually interesting. If using pretzels, unsalted or lightly salted are best to avoid overpowering sweetness.
- Candy Eggs: (Approximately 1 cup) – The quintessential Easter touch! Choose your favorite candy eggs – mini chocolate eggs, jelly beans shaped like eggs, or speckled candy eggs all work wonderfully. A variety of colors adds visual appeal and Easter cheer.
- Butter or Coconut Oil (Optional): (1 tablespoon) – Adding a touch of butter or coconut oil helps the chocolate melt smoother and gives the finished nests a slightly glossy sheen. This is especially helpful if your chocolate is a bit thicker or you want a richer flavor.
- Sprinkles (Optional): – For extra festive flair, sprinkles can be added to the nests before the chocolate sets. Choose Easter-themed sprinkles or colorful jimmies to enhance the visual appeal.
Instructions
Making Easter Bird’s Nests is as fun as it is easy! Follow these step-by-step instructions to create your own batch of delightful nests:
- Prepare Your Nest-Making Station: Line a baking sheet or large plate with parchment paper or wax paper. This will prevent the nests from sticking and make for easy removal later. Set this aside.
- Melt the Chocolate: In a microwave-safe bowl, combine the semi-sweet chocolate chips and the optional tablespoon of butter or coconut oil. Microwave in 30-second intervals, stirring well after each interval, until the chocolate is completely melted and smooth. Be careful not to overheat the chocolate, as it can burn. If you prefer, you can melt the chocolate in a double boiler over simmering water, stirring constantly until smooth.
- Combine Ingredients: Once the chocolate is melted and smooth, immediately add the shredded coconut and the optional pretzel pieces or chow mein noodles to the bowl. Stir everything together gently but thoroughly until the coconut and pretzels are evenly coated in the melted chocolate. Ensure no dry coconut or pretzels remain.
- Shape the Nests: Using a spoon or a small cookie scoop, scoop out portions of the chocolate-coconut mixture. Working quickly before the chocolate starts to set, place each portion onto the prepared baking sheet.
- Create the Nest Shape: While the chocolate mixture is still pliable, use your fingers or the back of a spoon to gently press down in the center of each portion, creating a well or indentation that resembles a bird’s nest. You can also use your fingers to shape the sides of the nests to make them more defined and nest-like. Don’t worry about perfection; slightly rustic nests are part of their charm!
- Add Sprinkles (Optional): If you are using sprinkles, now is the time to add them. Sprinkle them generously over the nests before the chocolate begins to set. They will adhere nicely to the melted chocolate.
- Chill to Set: Once the nests are shaped and sprinkled (if using), place the baking sheet in the refrigerator to chill for at least 30 minutes, or until the chocolate is completely set and firm. This chilling process is crucial for the nests to hold their shape and become easy to handle.
- Fill with Candy Eggs: Once the nests are firm, carefully remove them from the parchment paper. Place 3-5 candy eggs in the center of each nest, nestled in the indentation you created.
- Serve and Enjoy: Your Easter Bird’s Nests are now ready to serve! They can be enjoyed immediately or stored in an airtight container in the refrigerator for up to a week. Let them come to room temperature slightly before serving for the best flavor and texture.
Nutrition
- Serving Size: one normal portion
- Calories: 220
- Fat: 15g
- Saturated Fat: 10g
