The moment the summer heat really hits, my family’s craving for ice cream goes into overdrive. While I love a good scoop of classic vanilla bean, the constant requests for sugary, store-bought treats had me searching for a healthier, homemade alternative that wouldn’t feel like a compromise. That’s when the idea for these Frozen Banana Berry Sandwiches was born. I wanted something that captured the creamy delight of an ice cream sandwich but was packed with wholesome, natural ingredients. The first time I made them, I was genuinely surprised by how simple the process was. The real test, however, was my two kids and husband, who are notoriously tough critics of “healthy” desserts. I watched with bated breath as they each took their first bite. The silence was followed by wide eyes and enthusiastic “Mmmms!” My youngest declared them “banana cookies from the North Pole,” and my husband, who usually reaches for the chocolate, was amazed by the vibrant, tangy berry filling. They have since become our official family-favorite summer treat. They are our go-to for cooling down after an afternoon in the park, our guilt-free dessert after dinner, and the perfect, easy-to-make snack that even the kids can help assemble. The natural sweetness of the ripe bananas paired with the zesty, jewel-toned berry yogurt filling is a match made in heaven—creamy, refreshing, and utterly delicious.
Ingredients
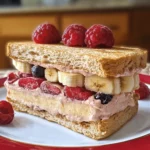
- Large Ripe Bananas (3): The star of the show! You’ll want bananas that are perfectly yellow with a few brown freckles. This level of ripeness ensures they are naturally sweet, reducing or even eliminating the need for added sweeteners. They also have the ideal firm-yet-soft texture for slicing. Two bananas will be used for the “bread” of the sandwich, and one will be blended into the filling for extra creaminess and flavor.
- Frozen Mixed Berries (1 ½ cups): A vibrant medley of strawberries, blueberries, raspberries, and blackberries. Using frozen berries is a key trick here; they instantly chill the filling, helping it to thicken to a perfect, scoopable consistency without extra freezing time. They are packed with antioxidants and give the filling its stunning magenta color and delicious, tangy flavor.
- Plain Greek Yogurt (1 cup): This is the secret to an incredibly creamy, protein-packed filling. Full-fat Greek yogurt will yield the richest, most ice-cream-like texture, but low-fat also works beautifully. Its characteristic tanginess provides a wonderful contrast to the sweet bananas and berries. For a dairy-free or vegan version, a thick, unsweetened coconut or almond-based yogurt is an excellent substitute.
- Honey or Maple Syrup (1-2 tablespoons, optional): This is purely for adjusting the sweetness to your personal preference. If your bananas are very ripe and sweet, you may not need any sweetener at all. Maple syrup is a fantastic vegan alternative that pairs beautifully with the fruit flavors. Always taste the filling before adding sweetener.
- Vanilla Extract (1 teaspoon): A small amount of pure vanilla extract works wonders to elevate and tie all the flavors together. It adds a warmth and depth to the filling, making it taste more like a gourmet dessert than a simple fruit blend.
Instructions
- Prepare the Banana Slices: Begin by preparing the “bread” for your sandwiches. Line a large baking sheet or tray with parchment paper. This is a crucial step to prevent the banana slices from sticking. Peel two of your large, ripe bananas and slice them into uniform rounds, about 1/4-inch thick. Thicker slices will be more robust and easier to handle, while thinner slices will create a more delicate sandwich. Arrange the slices in a single layer on the parchment-lined baking sheet, ensuring they don’t touch.
- Flash Freeze the Slices: Place the baking sheet with the banana slices into the freezer. Let them freeze for at least 60 minutes. This “flash freezing” step is essential. It makes the banana slices firm and solid, preventing them from turning into mush when you spread the filling on them and making the assembly process clean and easy.
- Create the Berry Filling: While the banana slices are freezing, prepare the delicious berry filling. In a food processor or a high-powered blender, combine the remaining peeled banana, the 1 ½ cups of frozen mixed berries, the 1 cup of Greek yogurt, and the 1 teaspoon of vanilla extract.
- Blend to Perfection: Pulse the mixture a few times to break up the larger frozen pieces, then blend continuously until the filling is completely smooth and creamy. Scrape down the sides of the processor or blender as needed to ensure everything is well incorporated. The mixture should have the consistency of a thick, soft-serve ice cream and a beautiful, vibrant pink or purple color.
- Taste and Sweeten (Optional): Once blended, give the filling a taste. If you feel it needs a bit more sweetness to balance the tartness of the berries and yogurt, now is the time to add the honey or maple syrup. Add one tablespoon, blend again, and taste. Adjust until it reaches your desired level of sweetness.
- Assemble the Sandwiches: Remove the frozen banana slices from the freezer. They should be firm to the touch. Flip half of the slices over so the flat side is facing up. Spoon a dollop of the berry filling—about 1 to 1 ½ tablespoons—onto the center of each flipped slice.
- Complete the Sandwiches: Gently place another banana slice on top of the filling, pressing down lightly to create a sandwich. The filling may ooze out the sides slightly; you can either leave it for a rustic look or smooth the edges with a small spatula or the back of a spoon.
- Final Freeze: Carefully place the assembled sandwiches back onto the parchment-lined baking sheet. Return the sheet to the freezer for a final freeze of at least 2-3 hours, or until the filling is completely firm and solid. This final step ensures your sandwiches won’t melt the second you take them out and gives them that perfect, refreshing bite. Once solid, they are ready to be enjoyed or transferred to an airtight container for long-term storage.
Nutrition Facts
- Servings: This recipe makes approximately 12-15 sandwiches.
- Calories per serving (approximate): 55-75 calories per sandwich.
- Potassium Power: Each sandwich is a good source of potassium, thanks to the bananas. This essential mineral helps maintain proper fluid balance, supports nerve function, and is crucial for heart health and blood pressure regulation.
- Rich in Antioxidants: The mixed berries are loaded with powerful antioxidants, such as anthocyanins, which give them their rich color. These compounds help protect your body’s cells from damage caused by free radicals, supporting overall health and wellness.
- Excellent Source of Protein: By using Greek yogurt, you’re adding a significant protein boost to what is typically a carb-heavy treat. Protein is vital for muscle repair and helps promote a feeling of fullness and satiety, making these sandwiches a surprisingly satisfying snack.
- High in Fiber: With whole fruits like bananas and berries, these sandwiches provide a good dose of dietary fiber. Fiber aids in digestion, helps stabilize blood sugar levels, and contributes to feeling full longer, preventing overeating.
- Gut-Friendly Probiotics: The Greek yogurt in the filling is a natural source of probiotics. These beneficial bacteria support a healthy gut microbiome, which is linked to improved digestion, a stronger immune system, and even better mental health.
Preparation Time
This recipe is wonderfully simple and requires minimal hands-on effort, with most of the time being inactive freezing time.
- Active Preparation Time (15-20 minutes): This includes the time spent slicing the bananas, blending the filling, and assembling the sandwiches. It’s a quick and straightforward process that’s easy to fit into a busy schedule.
- Inactive Freezing Time (3-4 hours total): This is the most crucial part of the recipe. It includes the initial 60-minute flash freeze for the banana slices and the final 2-3 hour freeze for the assembled sandwiches to become completely solid. While it requires patience, it’s entirely hands-off.
How to Serve
These Frozen Banana Berry Sandwiches are delightful on their own, but they can also be dressed up for different occasions. Here are a few creative ways to serve them:
- The Classic After-School Snack:
- Serve them straight from the freezer on a hot afternoon. They are the perfect portion-controlled, refreshing treat to cool kids (and adults!) down after school or outdoor play.
- The Elegant Dessert Platter:
- Arrange the frozen sandwiches on a chilled platter or slate board.
- Create an elegant look by drizzling them with melted dark chocolate just before serving.
- Garnish the platter with a sprinkle of fresh mint leaves and a few whole berries for a pop of color.
- The “Dipped” Masterpiece:
- Before the final freeze, melt some dark, milk, or white chocolate.
- Dip one half of each assembled sandwich into the melted chocolate.
- While the chocolate is still wet, sprinkle on toppings like chopped nuts (pistachios, almonds), shredded coconut, or colorful sprinkles.
- Place them on the parchment paper and freeze until the chocolate shell and the filling are completely solid.
- The Deconstructed Dessert Bowl:
- For a fun twist, create a “sundae” bowl.
- Place a scoop of Greek yogurt or vanilla nice cream in a bowl.
- Crumble one or two Frozen Banana Berry Sandwiches over the top.
- Add extra toppings like granola for crunch, a few fresh berry slices, and a drizzle of honey or nut butter.
- The Party-Ready Pops:
- Transform your sandwiches into easy-to-handle pops for a party.
- After assembling the sandwiches but before the final freeze, carefully insert a popsicle stick or a sturdy cake pop stick into the side of each one.
- Freeze them standing up in a styrofoam block or lying flat on the baking sheet. This makes them a fun, mess-free option for kids’ birthdays or summer barbecues.
Additional Tips
- Flash Freezing is Non-Negotiable: Don’t be tempted to skip the initial freezing of the banana slices. This step is the secret to a mess-free assembly. Frozen slices provide a solid, stable base that won’t get slippery or mushy when you spread on the filling. It makes all the difference between a beautiful sandwich and a sloppy mess.
- Master Your Yogurt Choice: The type of yogurt you use will significantly impact the final texture and flavor. For the ultimate creamy, tangy experience, use full-fat plain Greek yogurt. For a dairy-free or vegan alternative, choose a thick, creamy plant-based yogurt like coconut or soy. Avoid thin, watery yogurts, as they can make the filling too icy.
- Sweeten to Your Taste: The ripeness of your bananas will dictate how much, if any, sweetener you need. Always blend the filling first and then taste it. You might find it’s perfectly sweet on its own. If you do add sweetener, blend it in thoroughly to ensure it’s evenly distributed.
- Experiment with Berry Variations: While mixed berries are fantastic, don’t be afraid to customize the filling. For a sweeter, less tart flavor, try an all-strawberry or all-mango filling. For a deeply rich and tangy flavor, use all raspberries or blackberries. You can even mix in other frozen fruits like cherries or peaches.
- Get Creative with the “Bread”: Who says you have to stick to bananas? For a fun variation, try using thin, cored apple slices (a tart variety like Granny Smith works well) or even thinly sliced and baked sweet potato rounds (let them cool completely first). These alternatives can add a delightful crunch and a different flavor profile.
- The Art of the Perfect Slice: Uniformity is key for stable sandwiches. Use a sharp, non-serrated knife for clean cuts. Aim for slices between 1/4 and 1/2-inch thick. If they are too thin, they might break; if they are too thick, the banana-to-filling ratio might be off.
- Storage for Lasting Freshness: To prevent freezer burn and keep your sandwiches tasting fresh, proper storage is essential. Once they are fully frozen solid, transfer them to an airtight, freezer-safe container or a resealable freezer bag. Place layers of parchment paper between the sandwiches to prevent them from sticking together into one giant clump.
- If Your Filling is Too Runny: The consistency of your filling can vary depending on the power of your blender and the exact temperature of your fruit. If your filling seems too thin or runny after blending, simply pop the whole blender cup or food processor bowl into the freezer for 15-20 minutes to let it firm up before you begin assembling the sandwiches.
FAQ Section
1. Can I make these Frozen Banana Berry Sandwiches vegan?
Absolutely! This recipe is incredibly easy to adapt for a vegan diet. Simply make two swaps: use a plant-based yogurt instead of Greek yogurt (thick coconut or almond yogurt works best for creaminess) and choose maple syrup as your sweetener instead of honey. The result is just as delicious and 100% plant-based.
2. How long will these sandwiches last in the freezer?
When stored correctly, these sandwiches will keep well in the freezer for up to one month. To ensure optimal freshness and prevent freezer burn, store them in a high-quality airtight container or a heavy-duty freezer bag with as much air removed as possible. Layering them with parchment paper will also help maintain their individual shape and prevent sticking.
3. My banana slices turned a little brown. Is that okay?
Yes, it’s perfectly okay. Bananas naturally oxidize and turn brown when exposed to air, even in the freezer. This does not affect their taste or safety. While the bright yellow color is more aesthetically pleasing, a little browning on the “bread” slices is completely normal and won’t impact the enjoyment of your delicious treat.
4. What can I do if my berry filling is too thick to blend?
If your blender is struggling because the filling is too thick, it’s an easy fix. Simply add a tablespoon or two of your yogurt, milk (or plant-based milk), or even a splash of water. This will add just enough liquid to help the blades move freely and get everything blending smoothly without making the final mixture too runny.
5. Can I use fresh berries instead of frozen ones?
You can, but it will change the process slightly. Using frozen berries is recommended because they create a thick, soft-serve consistency instantly. If you use fresh berries, your filling will be much thinner. You will need to pour the filling into a separate container and freeze it for 1-2 hours, stirring occasionally, until it has thickened to a scoopable consistency before you can assemble the sandwiches.
6. Are these sandwiches healthy enough for my toddler?
Yes, they are a fantastic healthy treat for toddlers! They are made with whole fruits and yogurt and contain no refined sugar. For very young children, you may want to omit the optional honey or maple syrup entirely, as the ripe bananas provide plenty of natural sweetness. Their soft texture also makes them easy for little ones to eat.
7. I don’t own a food processor. Can I use a blender?
A high-powered blender is an excellent alternative to a food processor for this recipe. In fact, some blenders may even create a smoother, creamier filling. You may need to stop and scrape down the sides of the blender jar a few times to ensure all the ingredients are incorporated, especially if the mixture is very thick.
8. Can I add other things to the filling?
Of course! The filling is a wonderful base for creativity. You could blend in a tablespoon of smooth peanut butter or almond butter for a nutty flavor and extra protein. A scoop of protein powder could also be added for a post-workout snack. For a more decadent version, you could even fold in some mini chocolate chips after blending.
Frozen Banana Berry Sandwiches
Ingredients
- Large Ripe Bananas (3): The star of the show! You’ll want bananas that are perfectly yellow with a few brown freckles. This level of ripeness ensures they are naturally sweet, reducing or even eliminating the need for added sweeteners. They also have the ideal firm-yet-soft texture for slicing. Two bananas will be used for the “bread” of the sandwich, and one will be blended into the filling for extra creaminess and flavor.
- Frozen Mixed Berries (1 ½ cups): A vibrant medley of strawberries, blueberries, raspberries, and blackberries. Using frozen berries is a key trick here; they instantly chill the filling, helping it to thicken to a perfect, scoopable consistency without extra freezing time. They are packed with antioxidants and give the filling its stunning magenta color and delicious, tangy flavor.
- Plain Greek Yogurt (1 cup): This is the secret to an incredibly creamy, protein-packed filling. Full-fat Greek yogurt will yield the richest, most ice-cream-like texture, but low-fat also works beautifully. Its characteristic tanginess provides a wonderful contrast to the sweet bananas and berries. For a dairy-free or vegan version, a thick, unsweetened coconut or almond-based yogurt is an excellent substitute.
- Honey or Maple Syrup (1-2 tablespoons, optional): This is purely for adjusting the sweetness to your personal preference. If your bananas are very ripe and sweet, you may not need any sweetener at all. Maple syrup is a fantastic vegan alternative that pairs beautifully with the fruit flavors. Always taste the filling before adding sweetener.
- Vanilla Extract (1 teaspoon): A small amount of pure vanilla extract works wonders to elevate and tie all the flavors together. It adds a warmth and depth to the filling, making it taste more like a gourmet dessert than a simple fruit blend.
Instructions
- Prepare the Banana Slices: Begin by preparing the “bread” for your sandwiches. Line a large baking sheet or tray with parchment paper. This is a crucial step to prevent the banana slices from sticking. Peel two of your large, ripe bananas and slice them into uniform rounds, about 1/4-inch thick. Thicker slices will be more robust and easier to handle, while thinner slices will create a more delicate sandwich. Arrange the slices in a single layer on the parchment-lined baking sheet, ensuring they don’t touch.
- Flash Freeze the Slices: Place the baking sheet with the banana slices into the freezer. Let them freeze for at least 60 minutes. This “flash freezing” step is essential. It makes the banana slices firm and solid, preventing them from turning into mush when you spread the filling on them and making the assembly process clean and easy.
- Create the Berry Filling: While the banana slices are freezing, prepare the delicious berry filling. In a food processor or a high-powered blender, combine the remaining peeled banana, the 1 ½ cups of frozen mixed berries, the 1 cup of Greek yogurt, and the 1 teaspoon of vanilla extract.
- Blend to Perfection: Pulse the mixture a few times to break up the larger frozen pieces, then blend continuously until the filling is completely smooth and creamy. Scrape down the sides of the processor or blender as needed to ensure everything is well incorporated. The mixture should have the consistency of a thick, soft-serve ice cream and a beautiful, vibrant pink or purple color.
- Taste and Sweeten (Optional): Once blended, give the filling a taste. If you feel it needs a bit more sweetness to balance the tartness of the berries and yogurt, now is the time to add the honey or maple syrup. Add one tablespoon, blend again, and taste. Adjust until it reaches your desired level of sweetness.
- Assemble the Sandwiches: Remove the frozen banana slices from the freezer. They should be firm to the touch. Flip half of the slices over so the flat side is facing up. Spoon a dollop of the berry filling—about 1 to 1 ½ tablespoons—onto the center of each flipped slice.
- Complete the Sandwiches: Gently place another banana slice on top of the filling, pressing down lightly to create a sandwich. The filling may ooze out the sides slightly; you can either leave it for a rustic look or smooth the edges with a small spatula or the back of a spoon.
- Final Freeze: Carefully place the assembled sandwiches back onto the parchment-lined baking sheet. Return the sheet to the freezer for a final freeze of at least 2-3 hours, or until the filling is completely firm and solid. This final step ensures your sandwiches won’t melt the second you take them out and gives them that perfect, refreshing bite. Once solid, they are ready to be enjoyed or transferred to an airtight container for long-term storage.
Nutrition
- Serving Size: one normal portion
- Calories: 75
