Of all the culinary discoveries I’ve made as a parent, none have been as universally celebrated in my household as the Frozen Yogurt Banana Sandwich. It started on a sweltering afternoon, with the familiar chorus of “I’m bored” and “I’m hungry” echoing through the house. I needed a win—something that felt like a special treat but wouldn’t lead to a sugar crash an hour later. Scouring the kitchen, I saw the key players sitting on the counter and in the fridge: a bunch of perfectly ripe bananas and a tub of plain Greek yogurt. A lightbulb went off. Could I create a healthier, homemade version of an ice cream sandwich? The experiment that followed was nothing short of a revelation. The kids were thrilled to help, their small hands carefully placing banana slices and spooning yogurt. The real magic, however, happened after a few hours in the freezer. When I pulled them out, these little golden-white discs, especially after being dipped in a thin, crackly layer of dark chocolate, were met with wide eyes and eager grabs. The first bite was pure bliss—the snap of the chocolate, the cold, creamy, slightly tart yogurt, and the sweet, soft banana all melting together. It was an instant hit, requested week after week, and has since become our go-to solution for hot days, after-school snacks, and even simple, no-fuss party desserts. They are, without a doubt, the perfect blend of healthy, easy, and utterly delicious.
Ingredients
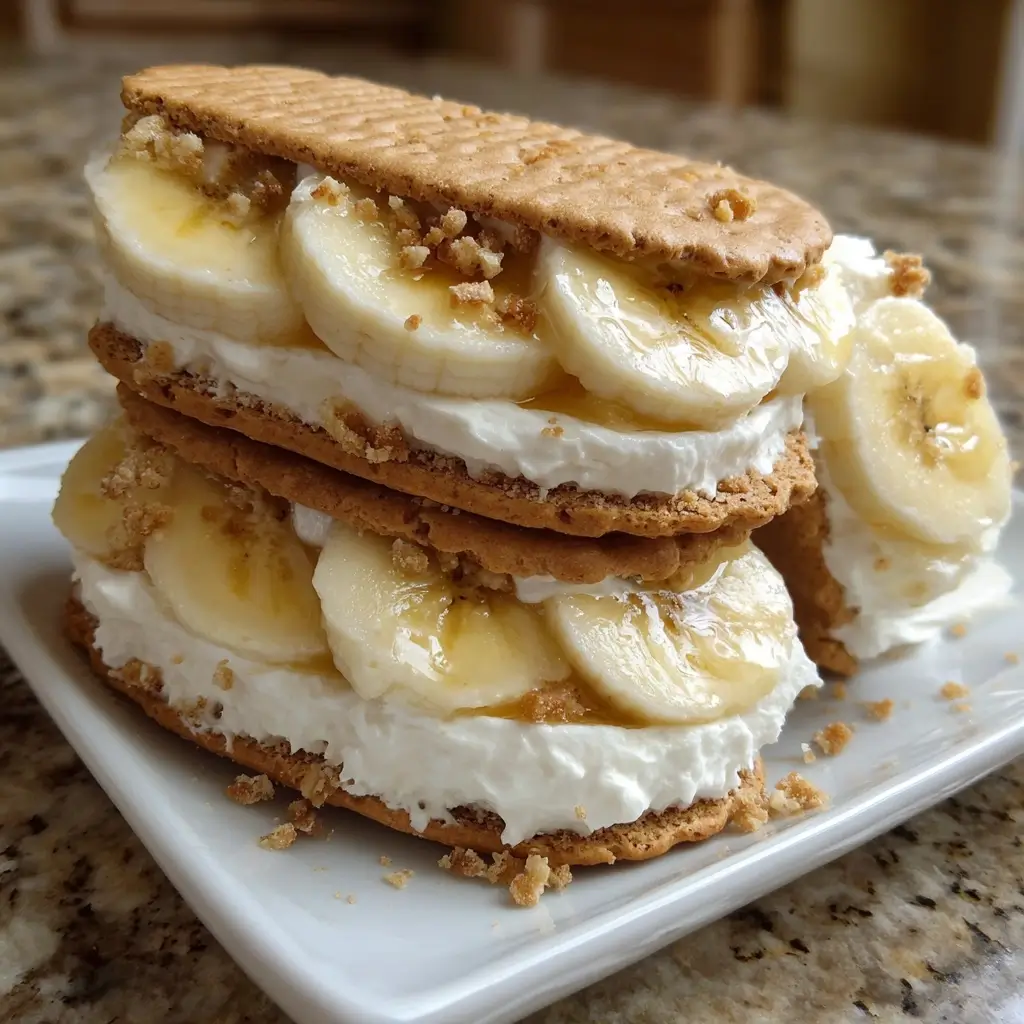
- 3 large, ripe bananas: The ideal bananas for this recipe are bright yellow with a few brown freckles. This indicates they are at their peak sweetness but still firm enough to slice neatly without turning to mush.
- 1 cup plain or vanilla Greek yogurt: Greek yogurt is the star player for the filling. Its thick, creamy consistency ensures it won’t be too runny, and it provides a wonderful tangy contrast to the sweet banana. Plain yogurt gives you full control over the sweetness, while vanilla adds a lovely aromatic base.
- 1 tablespoon honey or maple syrup (optional): If you are using plain yogurt or your bananas aren’t overly sweet, a small drizzle of honey or pure maple syrup can elevate the filling. Adjust the amount to your personal taste.
- 1 teaspoon pure vanilla extract: This small addition deeply enhances the flavor of the yogurt, giving it a classic, dessert-like quality that pairs beautifully with both the banana and chocolate.
- 1 cup dark chocolate chips or chopped dark chocolate: Using good quality dark chocolate (60-72% cacao) provides a rich, intense flavor that isn’t overly sweet, creating a perfect balance.
- 1 tablespoon coconut oil: This is the secret ingredient for a perfect chocolate shell. When melted with the chocolate, it helps it become smoother for dipping and creates that satisfying “magic shell” snap when it freezes.
- Optional toppings: A small bowl of finely chopped nuts (like almonds or pecans), shredded coconut, or colorful sprinkles for decorating.
Instructions
- Prepare Your Freezing Station: Begin by lining a large baking sheet or tray with parchment paper or wax paper. This is a crucial first step, as it will prevent the banana sandwiches from sticking and make cleanup incredibly easy. Ensure the baking sheet fits comfortably in your freezer.
- Slice the Bananas: Peel your ripe but firm bananas. Using a sharp knife, slice the bananas into uniform rounds, about ¼ to ⅓-inch thick. Consistency in thickness is key here; it ensures that each “sandwich” is balanced and freezes evenly. You should aim to get between 24 and 30 slices, which will make 12 to 15 sandwiches.
- Arrange the Banana ‘Bread’: Lay half of the banana slices in a single layer on the prepared baking sheet. These will be the bottom halves of your sandwiches. Leave a little space between each slice to prevent them from freezing together.
- Create the Creamy Yogurt Filling: In a small bowl, combine the Greek yogurt, vanilla extract, and optional honey or maple syrup. Stir gently until everything is well-combined and the mixture is smooth and creamy. Be careful not to overmix, as this can make the yogurt thinner.
- Assemble the Sandwiches: Carefully spoon a small amount of the yogurt mixture—about one to two teaspoons—onto the center of each banana slice on the baking sheet. Use the back of the spoon to gently spread it out, leaving a tiny border around the edge to prevent it from spilling over too much. Place a second banana slice on top of the yogurt, pressing down very gently to create a sandwich.
- The First Freeze: Place the entire baking sheet of assembled banana sandwiches into the freezer. Let them freeze for at least one hour. This initial freezing step is essential for firming up the sandwiches, making them solid enough to handle for the chocolate dipping stage.
- Melt the Chocolate Coating: About ten minutes before the hour is up, prepare your chocolate. In a small, microwave-safe bowl, combine the dark chocolate chips and the coconut oil. Microwave in 30-second intervals, stirring well between each one, until the chocolate is completely melted and glossy. Alternatively, you can use a double boiler. Stirring thoroughly is key to a smooth, lump-free coating.
- Dip and Decorate: Remove the baking sheet from the freezer. Working quickly, take one frozen banana sandwich at a time and dip half of it into the melted chocolate. You can also use a spoon to drizzle the chocolate over the top. Immediately after dipping, and before the chocolate sets, sprinkle on any optional toppings like chopped nuts or shredded coconut.
- The Final Freeze: Place the chocolate-dipped sandwiches back onto the parchment-lined baking sheet. Return the sheet to the freezer for another 1-2 hours, or until the chocolate is completely hard and the sandwiches are frozen solid. Once fully frozen, you can transfer them to an airtight container for long-term storage.
Nutrition Facts
- Servings: This recipe makes approximately 12-15 sandwiches.
- Calories: Approximately 90-110 calories per sandwich (will vary based on yogurt, sweetener, and chocolate used).
- Potassium: Bananas are a fantastic source of potassium, an essential mineral and electrolyte that helps regulate nerve signals, muscle contractions, and fluid balance in the body.
- Protein: Thanks to the Greek yogurt, each little sandwich provides a surprising boost of protein, which is vital for building and repairing tissues and keeping you feeling full and satisfied.
- Probiotics: Using a yogurt that contains live and active cultures introduces beneficial probiotics to your gut, which can support a healthy digestive system and overall immune function.
- Healthy Fats: The inclusion of dark chocolate and coconut oil contributes healthy fats, particularly if you use a high-cacao percentage chocolate, which is also rich in antioxidants.
- Fiber: Bananas provide dietary fiber, aiding in digestion and helping to stabilize blood sugar levels, making this a more balanced treat than a typical sugary dessert.
Preparation Time
This recipe is wonderfully quick in terms of active work, making it perfect for a spontaneous kitchen project. The total active preparation time is only about 15-20 minutes. This includes slicing the bananas, mixing the yogurt, assembling the sandwiches, and melting the chocolate. However, the majority of the time required is passive freezing time. You will need a total of 2-3 hours of freezing time to ensure the sandwiches are firm enough to hold their shape and for the chocolate shell to set perfectly hard.
How to Serve
These versatile frozen yogurt banana sandwiches can be enjoyed in many different ways, transforming from a simple snack into a delightful dessert with just a little creative presentation. Here are a few ideas:
- The Classic Grab-and-Go:
- Serve them straight from the freezer on a hot day. They are the perfect, portion-controlled treat to cool you down without any fuss.
- As a Dessert Platter for Guests:
- Arrange the frozen sandwiches beautifully on a chilled platter.
- Garnish with fresh mint leaves and a scattering of fresh berries like raspberries or blueberries to add a pop of color and complementary flavor.
- This makes for an elegant, light dessert after a barbecue or dinner party.
- A Fun Kid-Friendly Snack Board:
- Create a snack board by placing the banana sandwiches in the center.
- Surround them with other healthy, kid-approved snacks like apple slices, cheese cubes, whole-grain crackers, and a small bowl of fruit dip.
- The Elevated Dessert Experience:
- Place two or three sandwiches on a small dessert plate.
- Add a gentle drizzle of warm peanut butter, almond butter, or caramel sauce over the top just before serving.
- A small dollop of whipped cream on the side can turn this simple snack into a restaurant-worthy dessert.
- A Post-Workout Refuel:
- The combination of natural carbohydrates from the banana and protein from the Greek yogurt makes this an excellent snack to help replenish energy and aid muscle recovery after a workout.
Additional Tips
- Choose Your Bananas Wisely: The success of this recipe heavily relies on the state of your bananas. Avoid using green-tinged bananas as they will be starchy and lack sweetness. Conversely, avoid overly brown, mushy bananas, as they will be difficult to slice and will make the sandwiches fall apart. The perfect banana is yellow with a few brown spots, ensuring it’s sweet, flavorful, and still firm.
- Yogurt is Not One-Size-Fits-All: While Greek yogurt is recommended for its thickness, feel free to experiment. For a tangier flavor, use plain full-fat yogurt. For a dairy-free version, coconut milk yogurt or almond milk yogurt are fantastic substitutes; just be sure to choose a brand with a thicker consistency. You can even use flavored yogurts like strawberry or coconut to create different variations.
- Master the Chocolate Coat: For the smoothest chocolate shell, don’t overheat the chocolate. The low-and-slow method (short microwave bursts or a double boiler) is best. The coconut oil is non-negotiable for that perfect snap. If your chocolate seems too thick for dipping, you can add another half-teaspoon of coconut oil to thin it out.
- Get Wild with Toppings: The chocolate shell acts like a delicious glue. Before it sets, experiment with a wide array of toppings. Finely crushed pretzels add a salty-sweet crunch, while a dusting of freeze-dried raspberry powder adds a vibrant color and tart flavor. Toasted quinoa or puffed rice can add a unique, light crispiness.
- Flash-Freezing is Your Friend: The instruction to freeze the sandwiches on a baking sheet before transferring them is called flash-freezing. This prevents them from sticking together in a giant clump in your storage container. Don’t skip this step if you’re making a large batch to enjoy over several weeks.
- Make-Ahead and Storage Perfection: These sandwiches are an ideal make-ahead treat. Once they are fully frozen solid, transfer them to a freezer-safe, airtight container or a zip-top bag. For best results, place a small sheet of parchment paper between layers to prevent any sticking and to guard against freezer burn. They will keep beautifully for up to 3-4 weeks.
- Balance the Sweetness: Always taste your yogurt filling before assembling the sandwiches. The sweetness of your bananas and the tartness of your yogurt can vary greatly. You may need more or less honey/maple syrup than the recipe calls for. A perfectly balanced filling is the key to a delicious final product.
- Turn it Into a Family Activity: This recipe is incredibly kid-friendly. Let your children help with the safe steps. They can lay out the banana slices, spoon the yogurt (embrace the mess!), and, their favorite part, add the sprinkles or toppings to the chocolate-dipped sandwiches. It’s a wonderful way to get them involved in making healthy food choices.
FAQ Section
1. Can I make these frozen yogurt banana sandwiches dairy-free or vegan?
Absolutely! This recipe is very easy to adapt. To make it vegan and dairy-free, simply substitute the Greek yogurt with a thick, dairy-free alternative like coconut yogurt, almond yogurt, or soy yogurt. Also, ensure you use maple syrup instead of honey as your sweetener and choose a dairy-free dark chocolate for the coating. The result will be just as creamy and delicious.
2. How do I stop the bananas from turning brown?
This is a common concern with bananas, but it’s less of an issue in this recipe. The browning, or oxidation, is significantly slowed down by the freezing process. While the edges of the banana exposed to air might darken slightly, the part covered by yogurt and chocolate will be perfectly preserved. Assembling and freezing them relatively quickly after slicing is the best way to keep them looking fresh.
3. My yogurt filling was too runny and spilled everywhere. What did I do wrong?
A runny filling is almost always due to the type of yogurt used. Standard, non-Greek yogurts have a higher water content and will not hold their shape as well. For best results, use a thick-style yogurt like Greek yogurt or Icelandic skyr. If you only have regular yogurt, you can thicken it by straining it through a cheesecloth-lined sieve for about 30 minutes to an hour to remove some of the excess whey.
4. How long do these frozen banana sandwiches last in the freezer?
When stored properly, these treats have a good freezer life. After the final freeze, transfer them to a high-quality airtight container or a heavy-duty freezer bag with as much air pushed out as possible. This will protect them from freezer burn and drying out. They will maintain their best quality and flavor for up to 4 weeks.
5. Are these frozen yogurt banana sandwiches actually a healthy snack?
Yes, compared to traditional ice cream sandwiches or processed frozen novelties, they are a significantly healthier choice. They are made with whole-food ingredients: fruit, protein-rich yogurt, and antioxidant-packed dark chocolate. You control the amount of added sugar, and they provide beneficial nutrients like potassium, protein, and probiotics. They are a wonderful example of a healthy snack that feels like an indulgent treat.
6. Can I use different fruits instead of bananas?
While bananas are ideal for their soft texture when frozen, you can certainly experiment with other fruits. Thick slices of cored apple or pear could work well, offering a firmer, icier texture. Large strawberries, sliced lengthwise, would also be delicious. You could even try using two pineapple rings to create a larger, tropical-themed sandwich. Just be aware that the texture of other fruits when frozen will be different from the creamy consistency of a frozen banana.
7. My chocolate coating cracked and fell off. How can I prevent this?
This usually happens for two reasons. First, ensure your banana sandwiches are frozen completely solid before dipping. If they are even slightly soft, the temperature difference will be less extreme, and the chocolate won’t adhere as well. Second, don’t skip the coconut oil in the melted chocolate. The oil makes the chocolate more fluid and flexible, allowing it to coat the sandwich smoothly and harden without becoming overly brittle and prone to cracking.
8. What’s the best way to store the sandwiches to avoid freezer burn?
Freezer burn occurs when food is exposed to air in the freezer. The best defense is a multi-layered approach. First, make sure the sandwiches are frozen solid on the tray. Then, you can either wrap each sandwich individually in plastic wrap or parchment paper before placing them in your container, or you can carefully layer them in an airtight container with sheets of parchment paper in between each layer. Finally, ensure the container lid is on tight to create the best possible seal against air.