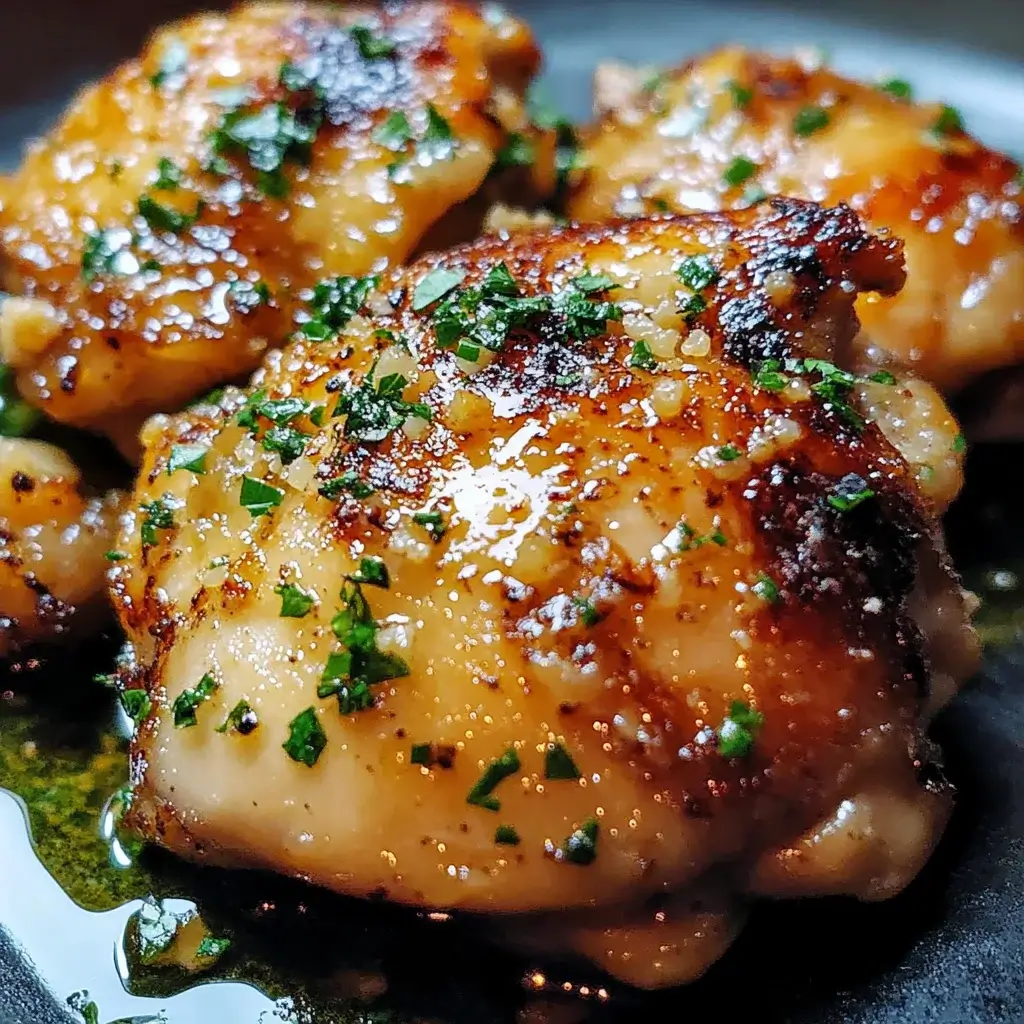
Garlic Butter Chicken Thighs have become a staple in our home for weeknight dinners, and honestly, for good reason. There’s something undeniably comforting and satisfying about the rich, savory flavors of garlic and butter enveloping perfectly cooked chicken. From the first sizzling sound in the pan to the last flavorful bite, this recipe is a winner every time. Even my pickiest eater, who usually shies away from anything beyond plain chicken nuggets, devours these thighs with enthusiasm. It’s become my go-to when I need a meal that’s both incredibly delicious and surprisingly easy to prepare, leaving me with happy faces around the dinner table and minimal fuss in the kitchen. If you’re looking for a dish that elevates simple chicken to a gourmet experience without the gourmet effort, look no further – this Garlic Butter Chicken Thighs recipe is about to become your new best friend in the kitchen.
Ingredients for Irresistible Garlic Butter Chicken Thighs
- Chicken Thighs: Approximately 2 pounds, bone-in, skin-on chicken thighs are recommended for maximum flavor and juiciness. You can also use boneless, skinless thighs, but bone-in and skin-on will yield the most succulent results.
- Butter: 1/2 cup (1 stick) of unsalted butter is the foundation of our rich sauce. It adds a luxurious texture and flavor that’s simply irreplaceable.
- Garlic: 8-10 cloves of garlic, minced. Freshly minced garlic is key to that pungent, aromatic garlic butter flavor. Don’t skimp on the garlic!
- Fresh Parsley: 1/4 cup, chopped. Fresh parsley adds a pop of color and a fresh, herbaceous counterpoint to the richness of the garlic butter.
- Dried Thyme: 1 teaspoon. Thyme provides a warm, earthy note that complements both garlic and chicken beautifully.
- Dried Rosemary: 1/2 teaspoon. Rosemary adds a piney, aromatic depth that enhances the overall flavor profile.
- Paprika: 1 teaspoon. Paprika, preferably smoked paprika, adds a subtle smoky sweetness and a beautiful reddish hue to the chicken.
- Salt: 1.5 teaspoons, or to taste. Salt enhances all the flavors and is crucial for seasoning the chicken properly.
- Black Pepper: 1 teaspoon, freshly ground, or to taste. Freshly ground black pepper adds a pungent spice that balances the richness of the butter and garlic.
- Olive Oil: 2 tablespoons. Olive oil helps to prevent the butter from burning and adds a healthy fat to the dish.
- Lemon Juice: 1 tablespoon (optional). A squeeze of fresh lemon juice at the end brightens the dish and adds a touch of acidity to cut through the richness.
Step-by-Step Instructions for Perfect Garlic Butter Chicken Thighs
- Prepare the Chicken: Pat the chicken thighs dry with paper towels. This is a crucial step for achieving crispy skin. Season generously on both sides with salt, pepper, paprika, dried thyme, and dried rosemary. Make sure to rub the spices into the chicken for even distribution and maximum flavor penetration. Allow the chicken to sit at room temperature for about 15-20 minutes while you prepare the other ingredients. This helps the chicken cook more evenly.
- Melt Butter and Olive Oil: In a large, oven-safe skillet (cast iron is ideal for even heat distribution and searing), melt the butter and olive oil together over medium-high heat. Ensure the skillet is large enough to comfortably fit all the chicken thighs in a single layer without overcrowding. Overcrowding can lead to steaming instead of searing.
- Sear the Chicken Thighs: Once the butter is melted and the skillet is hot, carefully place the chicken thighs skin-side down in the skillet. Sear for 5-7 minutes, or until the skin is golden brown and crispy. Resist the urge to move the chicken around too much during this stage; allowing it to sear undisturbed is key to achieving that perfect crispy skin. You want a deep golden-brown color.
- Flip and Sear the Other Side: Flip the chicken thighs and sear the other side for an additional 3-5 minutes, until lightly browned. The chicken doesn’t need to be cooked through at this point, as it will continue to cook in the oven. The goal here is to develop flavor and color on both sides.
- Add Garlic and Cook: Reduce the heat to medium-low. Add the minced garlic to the skillet around the chicken thighs. Cook for 1-2 minutes, stirring frequently, until the garlic is fragrant and lightly golden. Be careful not to burn the garlic, as burnt garlic can become bitter. Cooking the garlic in the butter after searing the chicken will infuse the butter with incredible garlic flavor.
- Bake in the Oven: Transfer the skillet to a preheated oven at 400°F (200°C). Bake for 20-25 minutes, or until the chicken is cooked through and the internal temperature reaches 165°F (74°C). Use a meat thermometer to check the temperature at the thickest part of the thigh, avoiding the bone. Baking in the oven ensures the chicken cooks evenly and remains juicy.
- Garnish and Serve: Remove the skillet from the oven and let the chicken rest for 5 minutes before serving. This allows the juices to redistribute, resulting in more tender and flavorful chicken. Garnish with fresh chopped parsley and a squeeze of fresh lemon juice (optional) before serving. Spoon the flavorful garlic butter sauce from the skillet over the chicken thighs before serving.
Nutrition Facts for Garlic Butter Chicken Thighs (Per Serving)
- Serving Size: 1 Chicken Thigh (approximately)
- Calories: 450-550 kcal (estimated, can vary based on thigh size and fat content)
- Protein: 35-40g
- Fat: 30-40g
- Saturated Fat: 15-20g
(Note: Nutritional values are approximate and can vary based on specific ingredients, portion sizes, and cooking methods. These values are estimates for one bone-in, skin-on chicken thigh prepared with the recipe ingredients as listed. For precise nutritional information, use a nutrition calculator with specific ingredient brands and weights.)
Preparation Time for Garlic Butter Chicken Thighs: Quick and Flavorful
This recipe is a winner for busy weeknights because it’s relatively quick to prepare without sacrificing flavor. The active preparation time, including seasoning the chicken and mincing the garlic, is about 15-20 minutes. The cooking time in the skillet and oven takes approximately 30-35 minutes. Therefore, from start to finish, you can have delicious, restaurant-quality Garlic Butter Chicken Thighs on the table in under an hour – perfect for a satisfying and flavorful family dinner without spending hours in the kitchen.
How to Serve Garlic Butter Chicken Thighs for a Complete Meal
Garlic Butter Chicken Thighs are incredibly versatile and pair well with a variety of side dishes. Here are some delicious serving suggestions to create a complete and balanced meal:
- Creamy and Comforting:
- Mashed Potatoes: Classic and always a crowd-pleaser, mashed potatoes soak up the delicious garlic butter sauce perfectly.
- Creamy Polenta: Similar to mashed potatoes, creamy polenta provides a comforting base to complement the rich chicken.
- Mac and Cheese: For an indulgent meal, serve with your favorite mac and cheese recipe.
- Fresh and Healthy:
- Roasted Vegetables: Roasted broccoli, asparagus, Brussels sprouts, or green beans offer a healthy and flavorful side. The roasting process brings out the natural sweetness of the vegetables.
- Steamed Greens: Steamed spinach, kale, or green beans provide a lighter, healthier option.
- Salad: A fresh garden salad with a light vinaigrette provides a refreshing contrast to the richness of the chicken.
- Grains and Starches:
- Rice: White rice, brown rice, or wild rice are all excellent choices to absorb the garlic butter sauce.
- Quinoa: A healthy and protein-rich grain that pairs well with the chicken.
- Pasta: Serve over buttered noodles or pasta tossed with a light sauce to complement the chicken.
- Bread for Sopping Up Sauce:
- Crusty Bread: A loaf of crusty bread or baguette is essential for soaking up every last bit of the flavorful garlic butter sauce.
- Garlic Bread: For an extra garlicky experience, serve with homemade garlic bread.
Additional Tips for Perfect Garlic Butter Chicken Thighs Every Time
- Use Bone-In, Skin-On Thighs for Maximum Flavor and Juiciness: While boneless, skinless thighs are convenient, bone-in, skin-on thighs are far superior for flavor and moisture retention. The bone and skin contribute to a richer, more succulent final product.
- Don’t Overcrowd the Pan When Searing: Overcrowding the skillet will lower the temperature and cause the chicken to steam instead of sear. Work in batches if necessary to ensure each thigh has enough space to brown properly.
- Pat the Chicken Dry Before Seasoning: Patting the chicken thighs dry with paper towels is crucial for achieving crispy skin. Moisture on the surface of the skin will prevent it from browning effectively.
- Season Generously: Don’t be shy with the salt, pepper, and spices. Proper seasoning is key to bringing out the best flavors in the chicken and garlic butter sauce. Season both sides of the chicken thighs thoroughly.
- Use Freshly Minced Garlic: Freshly minced garlic provides a much more pungent and aromatic flavor compared to pre-minced garlic from a jar. The flavor difference is significant in this recipe, where garlic is a star ingredient.
- Monitor the Garlic While Cooking: Garlic can burn easily, especially in butter. Keep a close eye on the garlic while it’s cooking and reduce the heat if it starts to brown too quickly. Burnt garlic will taste bitter and ruin the sauce.
- Use an Oven-Safe Skillet: Using an oven-safe skillet, like cast iron, allows you to sear the chicken on the stovetop and then seamlessly transfer it to the oven to finish cooking. This reduces dishes and simplifies the cooking process.
- Let the Chicken Rest Before Serving: Allowing the chicken to rest for 5-10 minutes after removing it from the oven is crucial for juicy and tender results. Resting allows the juices to redistribute throughout the meat, preventing them from running out when you slice into it.
Frequently Asked Questions (FAQ) About Garlic Butter Chicken Thighs
Q1: Can I use boneless, skinless chicken thighs for this recipe?
A: Yes, you can use boneless, skinless chicken thighs. However, bone-in, skin-on thighs will result in a more flavorful and juicy dish. If using boneless, skinless thighs, reduce the baking time slightly as they cook faster.
Q2: Can I make this recipe ahead of time?
A: While best served fresh, you can prepare the chicken thighs ahead of time and reheat them. Store cooked chicken thighs in an airtight container in the refrigerator for up to 3 days. Reheat in the oven or skillet until heated through, being careful not to dry them out.
Q3: What if I don’t have an oven-safe skillet?
A: If you don’t have an oven-safe skillet, you can sear the chicken in a regular skillet and then transfer it to a baking dish to finish cooking in the oven.
Q4: Can I add vegetables to cook with the chicken?
A: Yes, you can add vegetables like sliced onions, bell peppers, or mushrooms to the skillet along with the garlic. Add them after searing the chicken and before baking. They will roast alongside the chicken and absorb the delicious garlic butter flavors.
Q5: Can I use chicken breasts instead of thighs?
A: While chicken thighs are recommended for their flavor and moisture, you can use chicken breasts. However, chicken breasts tend to dry out more easily, so be sure not to overcook them. Reduce the cooking time and monitor the internal temperature carefully.
Q6: What can I do with leftover garlic butter sauce?
A: Leftover garlic butter sauce is liquid gold! You can drizzle it over rice, pasta, roasted vegetables, or even use it as a dipping sauce for bread. Store leftover sauce in an airtight container in the refrigerator for up to 3 days.
Q7: Can I freeze Garlic Butter Chicken Thighs?
A: Cooked Garlic Butter Chicken Thighs can be frozen, but the texture of the skin may change slightly upon thawing. Freeze in an airtight container for up to 2-3 months. Thaw overnight in the refrigerator and reheat thoroughly before serving.
Q8: Is this recipe spicy?
A: This recipe is not inherently spicy. The paprika adds a mild sweetness and smokiness. If you prefer a spicier dish, you can add a pinch of red pepper flakes along with the other spices or a dash of hot sauce to the garlic butter sauce.
Garlic Butter Chicken Thighs
Ingredients
- Chicken Thighs: Approximately 2 pounds, bone-in, skin-on chicken thighs are recommended for maximum flavor and juiciness. You can also use boneless, skinless thighs, but bone-in and skin-on will yield the most succulent results.
- Butter: 1/2 cup (1 stick) of unsalted butter is the foundation of our rich sauce. It adds a luxurious texture and flavor that’s simply irreplaceable.
- Garlic: 8-10 cloves of garlic, minced. Freshly minced garlic is key to that pungent, aromatic garlic butter flavor. Don’t skimp on the garlic!
- Fresh Parsley: 1/4 cup, chopped. Fresh parsley adds a pop of color and a fresh, herbaceous counterpoint to the richness of the garlic butter.
- Dried Thyme: 1 teaspoon. Thyme provides a warm, earthy note that complements both garlic and chicken beautifully.
- Dried Rosemary: 1/2 teaspoon. Rosemary adds a piney, aromatic depth that enhances the overall flavor profile.
- Paprika: 1 teaspoon. Paprika, preferably smoked paprika, adds a subtle smoky sweetness and a beautiful reddish hue to the chicken.
- Salt: 1.5 teaspoons, or to taste. Salt enhances all the flavors and is crucial for seasoning the chicken properly.
- Black Pepper: 1 teaspoon, freshly ground, or to taste. Freshly ground black pepper adds a pungent spice that balances the richness of the butter and garlic.
- Olive Oil: 2 tablespoons. Olive oil helps to prevent the butter from burning and adds a healthy fat to the dish.
- Lemon Juice: 1 tablespoon (optional). A squeeze of fresh lemon juice at the end brightens the dish and adds a touch of acidity to cut through the richness.
Instructions
- Prepare the Chicken: Pat the chicken thighs dry with paper towels. This is a crucial step for achieving crispy skin. Season generously on both sides with salt, pepper, paprika, dried thyme, and dried rosemary. Make sure to rub the spices into the chicken for even distribution and maximum flavor penetration. Allow the chicken to sit at room temperature for about 15-20 minutes while you prepare the other ingredients. This helps the chicken cook more evenly.
- Melt Butter and Olive Oil: In a large, oven-safe skillet (cast iron is ideal for even heat distribution and searing), melt the butter and olive oil together over medium-high heat. Ensure the skillet is large enough to comfortably fit all the chicken thighs in a single layer without overcrowding. Overcrowding can lead to steaming instead of searing.
- Sear the Chicken Thighs: Once the butter is melted and the skillet is hot, carefully place the chicken thighs skin-side down in the skillet. Sear for 5-7 minutes, or until the skin is golden brown and crispy. Resist the urge to move the chicken around too much during this stage; allowing it to sear undisturbed is key to achieving that perfect crispy skin. You want a deep golden-brown color.
- Flip and Sear the Other Side: Flip the chicken thighs and sear the other side for an additional 3-5 minutes, until lightly browned. The chicken doesn’t need to be cooked through at this point, as it will continue to cook in the oven. The goal here is to develop flavor and color on both sides.
- Add Garlic and Cook: Reduce the heat to medium-low. Add the minced garlic to the skillet around the chicken thighs. Cook for 1-2 minutes, stirring frequently, until the garlic is fragrant and lightly golden. Be careful not to burn the garlic, as burnt garlic can become bitter. Cooking the garlic in the butter after searing the chicken will infuse the butter with incredible garlic flavor.
- Bake in the Oven: Transfer the skillet to a preheated oven at 400°F (200°C). Bake for 20-25 minutes, or until the chicken is cooked through and the internal temperature reaches 165°F (74°C). Use a meat thermometer to check the temperature at the thickest part of the thigh, avoiding the bone. Baking in the oven ensures the chicken cooks evenly and remains juicy.
- Garnish and Serve: Remove the skillet from the oven and let the chicken rest for 5 minutes before serving. This allows the juices to redistribute, resulting in more tender and flavorful chicken. Garnish with fresh chopped parsley and a squeeze of fresh lemon juice (optional) before serving. Spoon the flavorful garlic butter sauce from the skillet over the chicken thighs before serving.
Nutrition
- Serving Size: one normal portion
- Calories: 550
- Fat: 40g
- Saturated Fat: 20g
- Protein: 40g