Oh, friends, let me tell you about this Graham Cracker Chocolate Bark. It’s not just a recipe; it’s a game-changer in the dessert department. Honestly, I stumbled upon this recipe when I needed something quick, easy, and crowd-pleasing for a last-minute family gathering. Let’s just say it was a resounding success! From the moment I pulled it out of the fridge, the kids were practically buzzing with excitement, and even the adults, usually more reserved about sweets, couldn’t resist breaking off pieces. The combination of the crisp graham crackers, the rich, decadent chocolate, and the fun toppings is simply irresistible. It’s the kind of dessert that disappears in minutes, leaving everyone wanting more. And the best part? It’s ridiculously simple to make. Seriously, if you can melt chocolate and spread it, you can make this bark. Get ready to become a dessert hero – this Graham Cracker Chocolate Bark is about to become your new go-to treat!
Ingredients
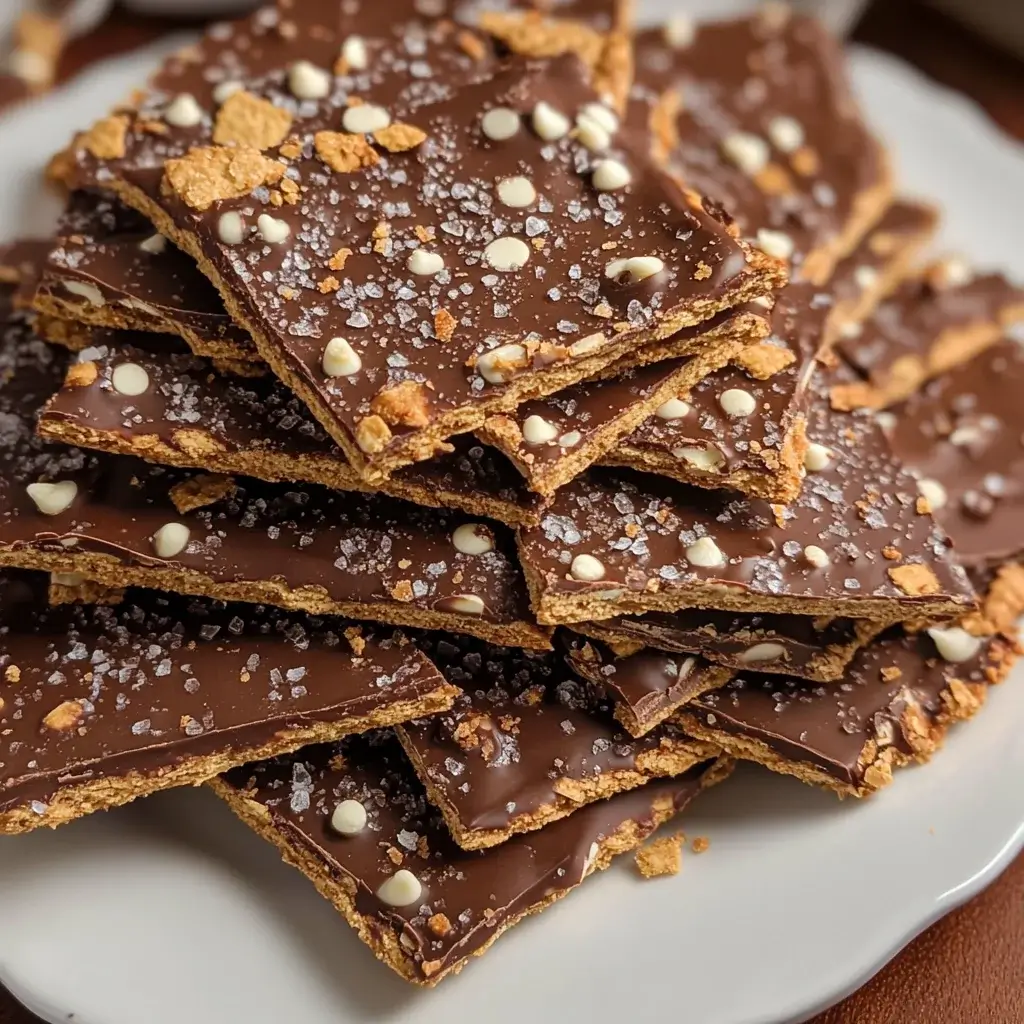
Here’s what you’ll need to create this delightful Graham Cracker Chocolate Bark. Simple, pantry-friendly ingredients that come together to make something truly special.
- Graham Crackers: (About 9-12 full sheets) – These form the crunchy, delicious base of our bark. Look for whole graham cracker sheets, not the pre-broken squares. The honey flavor adds a subtle sweetness that complements the chocolate beautifully.
- Chocolate Chips: (12 ounces) – The star of the show! You can use semi-sweet, dark, milk, or even white chocolate chips, depending on your preference. For a richer flavor, opt for a good quality chocolate. Mixing different types of chocolate can also create a more complex flavor profile.
- Toppings (Optional but Highly Recommended): (As desired) – This is where you can really get creative! Think chopped nuts (like pecans, walnuts, or almonds), sprinkles, dried fruit (cranberries, cherries, raisins), pretzels, mini marshmallows, toffee bits, sea salt flakes, or even crushed candy canes for a festive touch. Let your imagination run wild!
Instructions
Making this Graham Cracker Chocolate Bark is so easy, it’s practically foolproof. Follow these simple steps, and you’ll have a delicious treat ready in no time.
- Prepare Your Baking Sheet: Line a baking sheet (approximately 9×13 inches) with parchment paper or wax paper. This will prevent the bark from sticking and make it easy to remove once it’s set. Make sure the paper is large enough to overhang the edges slightly, which will act as handles when you lift the bark out.
- Arrange the Graham Crackers: Place the graham crackers in a single layer on the prepared baking sheet. You may need to break them into pieces to fit snugly and cover the entire surface of the baking sheet without too many gaps. Don’t worry about perfect placement; a little bit of space is fine, as the chocolate will fill in the cracks.
- Melt the Chocolate: There are a couple of ways to melt your chocolate.
- Microwave Method: Place the chocolate chips in a microwave-safe bowl. Microwave in 30-second intervals, stirring after each interval, until the chocolate is smooth and completely melted. Be careful not to overheat the chocolate, as it can burn. Stirring frequently is key to even melting and preventing burning.
- Double Boiler Method: Fill a saucepan with about an inch of water and bring it to a simmer. Place a heatproof bowl (glass or metal) over the saucepan, making sure the bottom of the bowl doesn’t touch the water. Add the chocolate chips to the bowl and stir gently until melted and smooth. This method is gentler and less likely to burn the chocolate, giving you more control.
- Pour and Spread the Chocolate: Once the chocolate is melted and smooth, pour it evenly over the graham crackers on the baking sheet. Use a spatula or the back of a spoon to spread the chocolate to cover the graham crackers completely. Work quickly, as the chocolate will start to set as it cools. Ensure an even layer of chocolate for the best texture and appearance.
- Add Your Toppings (Now is the Time!): While the chocolate is still wet, sprinkle your desired toppings evenly over the melted chocolate. Press them lightly into the chocolate so they adhere well. This is where you can get creative and customize your bark to your liking. Consider creating sections with different toppings for variety.
- Chill to Set: Place the baking sheet in the refrigerator to chill and set the chocolate bark. This usually takes about 30 minutes to an hour, or until the chocolate is firm to the touch. Chilling ensures the bark is crisp and easy to break into pieces. Don’t rush this step; proper chilling is essential for the right texture.
- Break into Pieces: Once the chocolate is completely set, remove the baking sheet from the refrigerator. Lift the parchment paper or wax paper from the baking sheet. Break the bark into irregular pieces. You can do this by hand for a rustic look, or use a large knife to score lines and then break along those lines for more uniform pieces.
- Serve and Enjoy!: Your Graham Cracker Chocolate Bark is now ready to be served. Store any leftover bark in an airtight container at room temperature or in the refrigerator for longer storage. Enjoy the delicious crunch and chocolatey goodness!
Nutrition Facts
(Note: Nutritional information is an estimate and can vary based on specific ingredients and toppings used.)
Servings: Approximately 24 pieces (depending on how you break the bark)
Calories Per Serving (estimated, without toppings): 120 calories
Per Serving (Estimated Values):
- Total Fat: 7g
- Saturated Fat: 4g
These values are approximate and will change based on the type of chocolate and toppings used. Adding nuts, for example, will increase the fat and protein content, while using dark chocolate might slightly lower the sugar content compared to milk chocolate. Always refer to the nutrition labels of your specific ingredients for the most accurate information.
Preparation Time
This recipe is wonderfully quick and easy, perfect for when you need a dessert in a hurry.
- Prep Time: 15 minutes (This includes gathering ingredients, lining the baking sheet, and arranging graham crackers).
- Chill Time: 30 minutes – 1 hour (Time for the chocolate to set in the refrigerator).
- Total Time: 45 minutes – 1 hour 15 minutes (From start to finish, including chilling time).
The active cooking time is minimal, making this an ideal recipe for busy weeknights or when you have limited time to spend in the kitchen. Most of the time is hands-off chilling time, allowing you to focus on other things while your delicious treat sets.
How to Serve
Graham Cracker Chocolate Bark is incredibly versatile and can be served in many delightful ways. Here are some ideas to inspire you:
- Classic Dessert: Serve the bark as a simple and satisfying dessert after dinner or lunch. It pairs perfectly with a scoop of vanilla ice cream or a dollop of whipped cream for an extra indulgent treat.
- Party Platter Addition: Include chocolate bark on a dessert platter alongside cookies, brownies, and other sweet treats. Its unique texture and flavor will add variety to your spread.
- Edible Gifts: Package pieces of chocolate bark in cellophane bags or decorative boxes tied with ribbon to create lovely homemade gifts. It’s a thoughtful and delicious present for friends, family, or neighbors, especially during the holidays.
- Coffee or Tea Accompaniment: Serve a piece of chocolate bark with a cup of coffee, tea, or hot chocolate for a delightful afternoon snack or a cozy evening treat. The chocolate and graham cracker flavors complement warm beverages beautifully.
- Ice Cream Topping: Crumble pieces of chocolate bark and sprinkle them over ice cream or frozen yogurt for added texture and flavor. It’s a fantastic way to elevate a simple bowl of ice cream.
- Lunchbox Treat: Pack a piece of chocolate bark in lunchboxes as a special treat. It’s a fun and satisfying sweet that kids and adults alike will enjoy.
- Holiday Treat: Customize your bark with festive toppings for holidays like Christmas (candy canes, red and green sprinkles), Halloween (candy corn, Halloween-themed sprinkles), or Valentine’s Day (pink and red sprinkles, heart-shaped candies).
- Potluck Contribution: Bring a platter of Graham Cracker Chocolate Bark to your next potluck or gathering. It’s easy to transport, always a crowd-pleaser, and requires no utensils to serve.
Additional Tips for Perfect Graham Cracker Chocolate Bark
Want to take your Graham Cracker Chocolate Bark to the next level? Here are some helpful tips to ensure success every time:
- Use Good Quality Chocolate: While you can use any type of chocolate chips, using good quality chocolate will significantly enhance the flavor of your bark. Consider using chocolate bars and chopping them, or opt for higher-quality chocolate chips for a richer, more decadent taste.
- Don’t Overheat the Chocolate: Be careful not to overheat the chocolate when melting it, especially in the microwave. Overheated chocolate can become grainy and seize. Melt in short intervals and stir frequently to ensure smooth, melted chocolate.
- Toast Your Nuts (Optional but Recommended): If using nuts as toppings, consider toasting them lightly before adding them to the bark. Toasting nuts brings out their flavor and adds a nice crunch. You can toast them in a dry pan on the stovetop or in the oven until fragrant.
- Get Creative with Toppings: Don’t be afraid to experiment with different toppings! Consider using a combination of sweet and salty toppings for a more complex flavor profile. Pretzels, sea salt, toffee bits, and even potato chips can add a delicious salty crunch.
- Make it Festive: Customize your bark for different holidays or occasions by using themed sprinkles, candies, or colors. Red and green for Christmas, pastel colors for Easter, orange and black for Halloween – the possibilities are endless!
- Adjust Sweetness Level: If you prefer a less sweet bark, use dark chocolate or semi-sweet chocolate instead of milk chocolate. You can also add a pinch of sea salt to the melted chocolate to balance the sweetness.
- Store it Properly: Store leftover chocolate bark in an airtight container at room temperature for up to a week, or in the refrigerator for up to two weeks. For best texture, avoid storing it in humid conditions, as the chocolate can become sticky.
- Make it Ahead: Graham Cracker Chocolate Bark is a great make-ahead dessert. You can prepare it a day or two in advance and store it in an airtight container until you’re ready to serve. This makes it perfect for parties or busy schedules.
FAQ About Graham Cracker Chocolate Bark
Got questions about making Graham Cracker Chocolate Bark? Here are answers to some frequently asked questions:
Q1: Can I use different types of chocolate?
A: Absolutely! You can use semi-sweet, dark, milk, white chocolate, or even a combination of different chocolates. Experiment with your favorites to find your perfect flavor combination. You can also use melting wafers or candy melts if preferred.
Q2: Can I make this bark vegan?
A: Yes, you can easily make this bark vegan! Just use vegan chocolate chips and ensure your toppings are also vegan-friendly. Many dark chocolate chips are naturally vegan.
Q3: What if I don’t have graham crackers? Can I use something else?
A: While graham crackers provide a classic flavor and texture, you could experiment with other crackers like Ritz crackers (for a sweet and salty bark), saltines, or even digestive biscuits. Keep in mind that the flavor profile will change depending on the base you use.
Q4: How do I prevent the chocolate from seizing when melting it?
A: The key to preventing chocolate from seizing is to avoid overheating it and to prevent any water from getting into the melting chocolate. Melt the chocolate in short intervals, stirring frequently, and use a dry bowl and utensils. If using the double boiler method, ensure the bottom of the bowl doesn’t touch the simmering water.
Q5: Can I freeze Graham Cracker Chocolate Bark?
A: Yes, you can freeze chocolate bark. Place the bark pieces in a freezer-safe container or bag, separating layers with parchment paper to prevent sticking. It can be frozen for up to 2-3 months. Let it thaw at room temperature for a few minutes before serving.
Q6: What are some good topping ideas for kids?
A: Kids love colorful and fun toppings! Consider using sprinkles, mini marshmallows, M&Ms, mini chocolate chips, gummy bears (if you like), crushed Oreos, or colorful candies. Let them help decorate for a fun activity!
Q7: How long does Graham Cracker Chocolate Bark last?
A: Stored properly in an airtight container at room temperature, Graham Cracker Chocolate Bark will last for about a week. In the refrigerator, it can last up to two weeks. Freezing extends its shelf life to 2-3 months.
Q8: Can I make this recipe in advance for a party?
A: Yes, absolutely! This is a perfect make-ahead dessert. You can make the bark a day or two in advance and store it in an airtight container until your party. This makes party prep much easier and stress-free.

Graham Cracker Chocolate Bark
Ingredients
Here’s what you’ll need to create this delightful Graham Cracker Chocolate Bark. Simple, pantry-friendly ingredients that come together to make something truly special.
- Graham Crackers: (About 9-12 full sheets) – These form the crunchy, delicious base of our bark. Look for whole graham cracker sheets, not the pre-broken squares. The honey flavor adds a subtle sweetness that complements the chocolate beautifully.
- Chocolate Chips: (12 ounces) – The star of the show! You can use semi-sweet, dark, milk, or even white chocolate chips, depending on your preference. For a richer flavor, opt for a good quality chocolate. Mixing different types of chocolate can also create a more complex flavor profile.
- Toppings (Optional but Highly Recommended): (As desired) – This is where you can really get creative! Think chopped nuts (like pecans, walnuts, or almonds), sprinkles, dried fruit (cranberries, cherries, raisins), pretzels, mini marshmallows, toffee bits, sea salt flakes, or even crushed candy canes for a festive touch. Let your imagination run wild!
Instructions
Making this Graham Cracker Chocolate Bark is so easy, it’s practically foolproof. Follow these simple steps, and you’ll have a delicious treat ready in no time.
- Prepare Your Baking Sheet: Line a baking sheet (approximately 9×13 inches) with parchment paper or wax paper. This will prevent the bark from sticking and make it easy to remove once it’s set. Make sure the paper is large enough to overhang the edges slightly, which will act as handles when you lift the bark out.
- Arrange the Graham Crackers: Place the graham crackers in a single layer on the prepared baking sheet. You may need to break them into pieces to fit snugly and cover the entire surface of the baking sheet without too many gaps. Don’t worry about perfect placement; a little bit of space is fine, as the chocolate will fill in the cracks.
- Melt the Chocolate: There are a couple of ways to melt your chocolate.
- Microwave Method: Place the chocolate chips in a microwave-safe bowl. Microwave in 30-second intervals, stirring after each interval, until the chocolate is smooth and completely melted. Be careful not to overheat the chocolate, as it can burn. Stirring frequently is key to even melting and preventing burning.
- Double Boiler Method: Fill a saucepan with about an inch of water and bring it to a simmer. Place a heatproof bowl (glass or metal) over the saucepan, making sure the bottom of the bowl doesn’t touch the water. Add the chocolate chips to the bowl and stir gently until melted and smooth. This method is gentler and less likely to burn the chocolate, giving you more control.
- Pour and Spread the Chocolate: Once the chocolate is melted and smooth, pour it evenly over the graham crackers on the baking sheet. Use a spatula or the back of a spoon to spread the chocolate to cover the graham crackers completely. Work quickly, as the chocolate will start to set as it cools. Ensure an even layer of chocolate for the best texture and appearance.
- Add Your Toppings (Now is the Time!): While the chocolate is still wet, sprinkle your desired toppings evenly over the melted chocolate. Press them lightly into the chocolate so they adhere well. This is where you can get creative and customize your bark to your liking. Consider creating sections with different toppings for variety.
- Chill to Set: Place the baking sheet in the refrigerator to chill and set the chocolate bark. This usually takes about 30 minutes to an hour, or until the chocolate is firm to the touch. Chilling ensures the bark is crisp and easy to break into pieces. Don’t rush this step; proper chilling is essential for the right texture.
- Break into Pieces: Once the chocolate is completely set, remove the baking sheet from the refrigerator. Lift the parchment paper or wax paper from the baking sheet. Break the bark into irregular pieces. You can do this by hand for a rustic look, or use a large knife to score lines and then break along those lines for more uniform pieces.
- Serve and Enjoy!: Your Graham Cracker Chocolate Bark is now ready to be served. Store any leftover bark in an airtight container at room temperature or in the refrigerator for longer storage. Enjoy the delicious crunch and chocolatey goodness!
Nutrition
- Serving Size: one normal portion
- Calories: 120
- Fat: 7g
- Saturated Fat: 4g