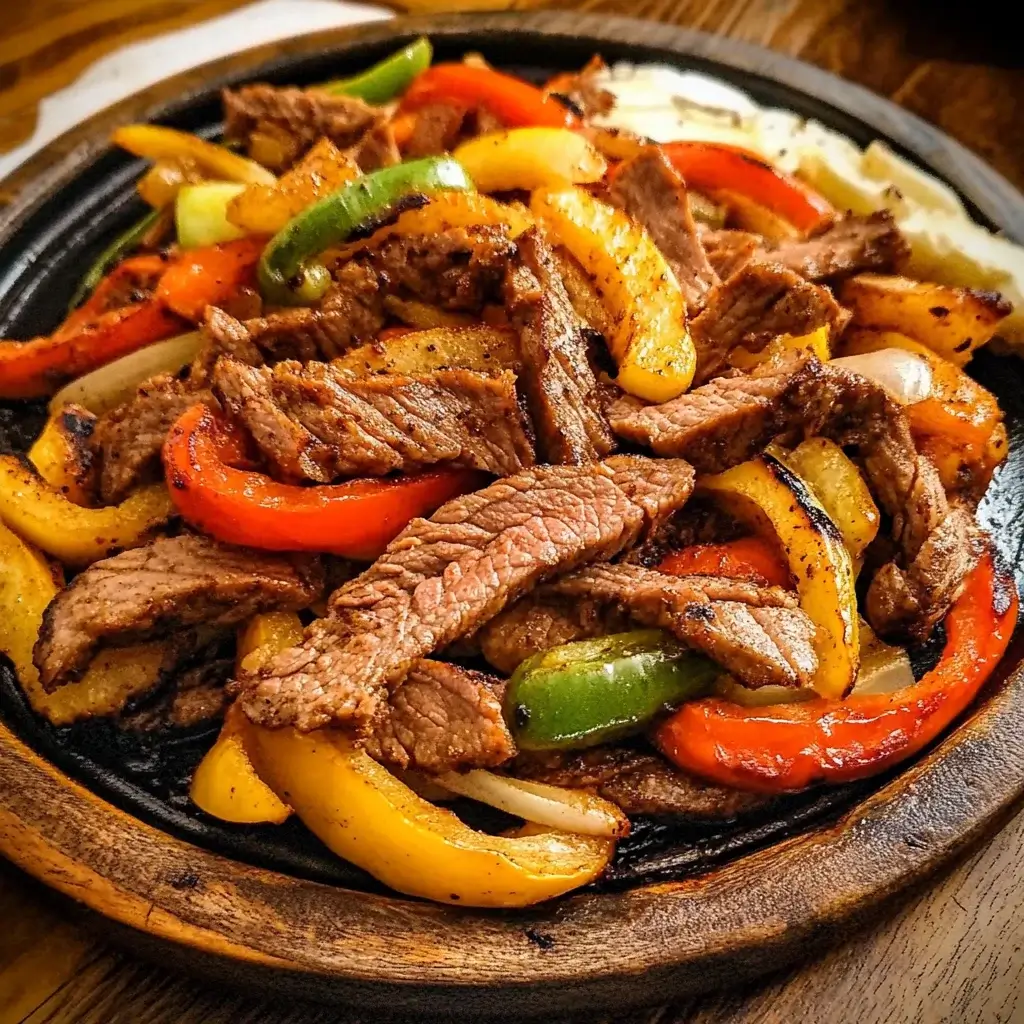
There are some recipes that just click with my family, becoming instant classics requested week after week, and these Grilled Beef Fajita Packs rocketed to the top of that list faster than almost anything I’ve ever made. The first time I tried them, I was looking for an easy weeknight meal that felt a little special, something that could utilize the grill without requiring constant babysitting. Foil pack meals always intrigued me with their promise of minimal cleanup, and combining that concept with the smoky, savory flavors of fajitas seemed like a guaranteed win. I wasn’t wrong! From the moment the aroma started wafting off the grill – that incredible blend of sizzling steak, charring peppers and onions, and zesty lime – everyone started migrating towards the backyard. Even my pickiest eater, who usually eyes bell peppers with deep suspicion, was intrigued by the colorful packets. The reveal, carefully opening the steaming foil to expose the tender beef and perfectly cooked vegetables bathed in their own juices, was met with audible “wows.” Serving them was a breeze; we just opened the packs, grabbed some warm tortillas and toppings, and assembled our own perfect fajitas right at the picnic table. The beef was incredibly tender, infused with the smoky char from the grill and the bright fajita spices, while the vegetables were soft but still had a slight bite. Best of all? Cleanup was practically non-existent. Just ball up the foil and toss it! These Grilled Beef Fajita Packs have become our go-to for busy weeknights, backyard BBQs, and even camping trips. They offer maximum flavor impact with minimal fuss, delivering that restaurant-style fajita experience right in your own home, infused with the irreplaceable magic of the grill. It’s a versatile, crowd-pleasing meal that genuinely makes cooking (and cleaning) feel effortless, leaving more time for enjoying good food and good company.
Ingredients
Here’s what you’ll need to assemble these flavorful Grilled Beef Fajita Packs:
- 1.5 lbs Flank Steak or Skirt Steak: These cuts are ideal for fajitas, known for their robust beefy flavor and ability to remain tender when sliced thinly against the grain. Sirloin steak can also work in a pinch.
- 1 Large Red Onion: Sliced into ½-inch thick strips. Adds a pungent sweetness that mellows beautifully on the grill.
- 1 Large Green Bell Pepper: Stemmed, seeded, and sliced into ½-inch thick strips. Provides a classic, slightly grassy fajita flavor and vibrant color.
- 1 Large Red Bell Pepper: Stemmed, seeded, and sliced into ½-inch thick strips. Offers a sweeter counterpoint to the green pepper and adds another pop of color.
- 1 Large Yellow or Orange Bell Pepper: Stemmed, seeded, and sliced into ½-inch thick strips. Adds sweetness and visual appeal, creating a rainbow of veggies.
- 3 Tablespoons Olive Oil or Avocado Oil: Used to coat the beef and vegetables, promoting even cooking, preventing sticking, and adding healthy fats.
- 1 Packet (about 1 oz or 3 Tablespoons) Fajita Seasoning: Choose your favorite store-bought brand or use a homemade blend for controlled sodium and spice levels. This provides the signature chili powder, cumin, paprika, and garlic notes.
- 2-3 Cloves Garlic: Minced. Adds an essential aromatic depth to the marinade and overall flavor profile. Fresh garlic is highly recommended over powder here.
- Juice of 1 Large Lime: Adds crucial acidity that helps tenderize the beef slightly and brightens all the flavors, cutting through the richness.
- ¼ cup Chopped Fresh Cilantro (Optional): Adds a fresh, herbaceous note that complements the smoky and spicy flavors. Add it before grilling or sprinkle on fresh before serving.
- Heavy-Duty Aluminum Foil: Essential for creating durable packs that won’t easily tear or leak on the grill. Standard foil may require double layering.
- Salt and Freshly Ground Black Pepper: To taste. Even with seasoned fajita mix, adjusting salt and pepper to your preference is key.
Instructions
Follow these steps to create delicious Grilled Beef Fajita Packs:
- Prepare the Steak: Pat the flank or skirt steak dry with paper towels. This helps it sear better later. Locate the grain (the direction the muscle fibers run). Slice the steak against the grain into thin strips, about ¼-inch thick. Slicing against the grain is crucial for tenderness; it shortens the long muscle fibers, making the meat much easier to chew. Place the sliced steak into a large mixing bowl.
- Prepare the Vegetables: Wash the bell peppers and onion thoroughly. Remove the stems and seeds from the peppers. Slice the peppers and the red onion into uniform strips, about ½-inch thick. Uniformity is key here – it ensures all the vegetables cook evenly within the foil packs. Add the sliced vegetables to the bowl with the steak.
- Season the Mixture: Drizzle the olive oil (or avocado oil) over the steak and vegetables in the bowl. Add the minced garlic, the fajita seasoning packet (or your homemade blend), the fresh lime juice, and the optional chopped cilantro (if using before grilling). Season generously with salt and freshly ground black pepper to your taste.
- Mix Thoroughly: Using clean hands or a large spoon, toss everything together until the steak strips and vegetable slices are evenly coated with the oil, seasoning, lime juice, and garlic. Ensure every piece gets some love! You can let this mixture marinate at room temperature for about 15-20 minutes while you prepare the foil and preheat the grill, or cover and refrigerate for 30 minutes up to 2 hours for deeper flavor penetration. Avoid marinating much longer with lime juice, as the acid can start to negatively affect the texture of the beef.
- Prepare the Foil Sheets: Tear off four large sheets of heavy-duty aluminum foil, each approximately 18 inches long. If using regular foil, you may want to double-layer each sheet for extra durability to prevent leaks or tears on the grill grates. Lay the foil sheets out flat on your counter or work surface, shiny side down (while debated, the dull side is technically non-stick, though the difference is minimal).
- Assemble the Fajita Packs: Divide the seasoned beef and vegetable mixture evenly among the four foil sheets, placing the mixture in the center of each sheet. Aim for a roughly equal ratio of beef-to-vegetables in each pack. Try not to overfill the packs; you need space for steam to circulate, which is essential for cooking.
- Seal the Foil Packs: To seal each pack, bring the two long sides of the foil sheet together above the filling. Fold the edges over several times (at least two or three tight folds) to create a tight seal along the top. Then, fold or roll the remaining two shorter ends inwards several times, creating a completely sealed packet. Ensure the seals are snug to trap the steam inside – this is what cooks the contents and keeps them moist. The finished pack should look like a rectangular pouch.
- Preheat the Grill: Preheat your outdoor grill (gas or charcoal) to medium-high heat, around 400-450°F (200-230°C). Clean the grill grates if necessary. You want a hot grill to get a good sizzle and slight char on the outside of the foil packs, which adds flavor.
- Grill the Packs: Carefully place the sealed foil packs directly onto the preheated grill grates. Close the grill lid. Cook for approximately 15-20 minutes, flipping the packs over once halfway through the cooking time (around the 8-10 minute mark). Cooking time can vary depending on the heat of your grill, the thickness of your steak slices, and how cooked you like your vegetables.
- Check for Doneness: After about 15 minutes, carefully remove one pack from the grill using tongs (it will be very hot!). Place it on a heat-safe surface. Cautiously open the foil pack, being extremely careful to avoid the escaping steam, which can cause burns. Check if the steak is cooked through to your liking (it should no longer be pink inside unless you prefer medium-rare, which might require slightly less cooking time) and if the vegetables are tender-crisp or softer, according to your preference.
- Continue Cooking if Needed: If the steak or vegetables aren’t quite done, reseal the pack tightly and return it (and the others) to the grill for another 3-5 minutes. Check again.
- Rest the Packs: Once cooked through, remove all the foil packs from the grill using tongs. Let them rest for about 5 minutes before opening. This allows the juices within the packs to redistribute, resulting in more flavorful and moist fajitas.
- Serve: Carefully open the foil packs (again, watch out for steam!). You can serve the fajitas directly from the foil packs for a rustic feel and easy cleanup, or transfer the contents to a platter. Serve immediately with your favorite fajita accompaniments.
Nutrition Facts
- Servings: This recipe makes approximately 4 servings (1 foil pack per serving).
- Calories per Serving: Roughly 450-550 kcal (This is an estimate and can vary based on the specific cut of steak, amount of oil used, and fajita seasoning ingredients).
- Protein: High (Approx. 30-40g per serving) – Primarily from the beef steak, essential for muscle building and satiety.
- Sodium: Variable (Can be high depending on store-bought seasoning) – Fajita seasoning packets are often high in sodium. Using a low-sodium version or making your own blend allows for better control.
(Disclaimer: Nutritional information is an estimate calculated using standard databases. Actual values may vary based on specific ingredients, brands, and preparation methods used.)
Preparation Time
- Prep Time: Approximately 20-25 minutes. This includes slicing the steak and vegetables, mincing the garlic, and mixing everything together with the seasonings.
- Marinating Time (Optional but Recommended): 15 minutes (at room temperature) up to 2 hours (refrigerated). Allowing even a short marinating time significantly enhances the flavor.
- Assembly Time: Approximately 5-10 minutes. Dividing the mixture and sealing the foil packs.
- Cook Time: Approximately 15-25 minutes on the grill.
- Total Time: Approximately 40 minutes (excluding longer marinating time) to 1 hour. These fajita packs offer a relatively quick path to a flavorful, hot meal, especially considering the minimal active cooking attention required once they hit the grill.
How to Serve
Serving these Grilled Beef Fajita Packs is part of the fun! Here are several ways to enjoy them:
- Straight from the Pack:
- For a casual, rustic experience (especially great for camping or backyard BBQs), simply place the hot foil pack on a plate (to catch any drips).
- Carefully open the top seal (watch for steam!).
- Eat directly from the foil using a fork, or use tongs to transfer portions onto tortillas.
- Classic Fajita Style:
- Warm flour or corn tortillas on the grill for the last minute or two of cooking, or warm them separately.
- Open the foil packs and spoon the beef and vegetable mixture onto the warm tortillas.
- Build-Your-Own Fajita Bar:
- Empty the contents of the foil packs onto a large serving platter or into a serving bowl.
- Arrange small bowls with various toppings alongside the platter. This allows everyone to customize their fajitas.
- Essential Toppings:
- Warm Tortillas (Flour, Corn, or Low-Carb options)
- Sour Cream or Plain Greek Yogurt
- Guacamole or Sliced Avocado
- Salsa (Pico de Gallo, Roasted Tomato, or Corn Salsa)
- Shredded Cheese (Cheddar, Monterey Jack, or a Mexican Blend)
- Extra Chopped Fresh Cilantro
- Lime Wedges (for squeezing over the top)
- Pickled or Fresh Jalapeños (for those who like extra heat)
- Serve Over Rice or Grains:
- Spoon the fajita mixture over a bed of fluffy Cilantro Lime Rice, Spanish Rice, or even quinoa for a heartier meal or a gluten-free option.
- Fajita Salad Bowl:
- Serve the warm beef and veggie mixture over a bed of crisp romaine lettuce or mixed greens.
- Add your favorite fajita toppings like salsa, guacamole, cheese, and a dollop of sour cream. Crushed tortilla chips add a nice crunch.
- With Side Dishes:
- Pair the fajitas with classic Mexican side dishes like:
- Refried Beans or Black Beans
- Grilled Corn on the Cob (Elote style is fantastic!)
- A simple side salad with a zesty vinaigrette.
- Pair the fajitas with classic Mexican side dishes like:
Additional Tips
Here are 8 extra tips to ensure your Grilled Beef Fajita Packs are absolutely perfect:
- Don’t Skip Slicing Against the Grain: This is arguably the most important tip for tender beef fajitas, especially with cuts like flank or skirt steak. Identify the direction the muscle fibers run and slice perpendicular to them. It dramatically changes the texture.
- Uniform Vegetable Slices Matter: While it seems fussy, cutting your peppers and onions into roughly the same thickness ensures they cook evenly inside the pack. If some pieces are much thicker than others, you might end up with some mushy veggies and some undercooked ones. Aim for around ½-inch thick strips.
- Use Heavy-Duty Foil (Seriously!): Standard aluminum foil is much more prone to tearing, especially when being flipped on grill grates or when filled with juicy ingredients. Heavy-duty foil provides the necessary strength to hold everything together and prevent leaks, ensuring the contents steam properly. If you only have regular foil, use two layers per pack.
- Master the Seal: A tight seal is crucial for the foil pack method to work. The trapped steam is what cooks the ingredients and keeps them moist. Make sure your folds along the top and sides are crimped down securely. You don’t want precious steam (and flavor) escaping.
- Don’t Crowd the Grill: Place the foil packs on the grill with some space between them. If they are packed too tightly together, airflow is restricted, and they won’t cook as evenly or get that desirable slight char on the foil exterior. Cook in batches if necessary.
- Manage Your Grill Heat: Aim for consistent medium-high heat. Too high, and the outside might scorch before the inside cooks. Too low, and things will take longer to cook and might not develop as much flavor or tenderness (especially the beef). If using charcoal, arrange coals for even heat.
- Make-Ahead Magic: These packs are fantastic for meal prep or entertaining. Assemble the packs completely (fill and seal them), then store them flat in the refrigerator for up to 24 hours before grilling. This makes dinner incredibly fast on a busy night or allows you to prep for a BBQ ahead of time. Let them sit at room temperature for about 20-30 minutes before grilling if they’ve been chilled.
- Resting Isn’t Just for Roasts: Letting the foil packs rest for 5 minutes after removing them from the grill allows the juices inside (released from the meat and veggies during cooking) to settle and redistribute back into the meat. Opening them immediately might let more flavorful juice run out.
Frequently Asked Questions (FAQ)
1. Can I use chicken or shrimp instead of beef?
Absolutely! This recipe is very versatile.
- For Chicken: Use boneless, skinless chicken breasts or thighs sliced into thin strips or bite-sized pieces. Cooking time will be similar to beef, perhaps slightly less – ensure chicken is cooked through (165°F internal temperature).
- For Shrimp: Use large, peeled, and deveined shrimp. Add the shrimp to the packs during the last 5-7 minutes of grilling, as they cook very quickly. You can grill the veggie packs first for about 10-12 minutes, then carefully open them, add the seasoned shrimp, reseal, and finish cooking.
2. Can I make these Beef Fajita Packs in the oven instead of on the grill?
Yes, you can! Preheat your oven to 400°F (200°C). Place the sealed foil packs on a baking sheet (this catches any potential drips and makes handling easier). Bake for 20-25 minutes, or until the steak is cooked through and the vegetables are tender. You won’t get the smoky char from the grill, but they will still be delicious and steamy. You could potentially broil them (carefully opened) for the last minute or two to get some browning.
3. What if I don’t have a packet of fajita seasoning?
No problem! You can easily make your own fajita seasoning blend. A common mix includes:
- 1 tablespoon chili powder
- 1 teaspoon ground cumin
- 1 teaspoon paprika (smoked paprika adds a nice touch)
- ½ teaspoon garlic powder
- ½ teaspoon onion powder
- ¼ teaspoon cayenne pepper (optional, adjust for heat)
- ½ teaspoon dried oregano
- Salt and black pepper to taste
Combine these spices and use about 3 tablespoons for this recipe.
4. Are these fajita packs spicy? How can I adjust the heat level?
The spiciness depends heavily on your fajita seasoning packet (some are mild, some are spicier) and whether you add extra heat sources.
- To Increase Heat: Add ½ – 1 minced jalapeño (with seeds for more heat) or a pinch of red pepper flakes to the mixture before sealing the packs. Serve with hot sauce on the side.
- To Decrease Heat: Use a mild fajita seasoning blend, omit any cayenne pepper from homemade blends, and ensure your bell peppers are sweet varieties (red, yellow, orange) rather than potentially spicier ones like poblanos (though poblanos are delicious if you like mild heat).
5. Can I add other vegetables to the foil packs?
Definitely! Feel free to customize with other sturdy vegetables that cook in a similar timeframe. Good options include:
- Sliced Zucchini or Yellow Squash
- Mushrooms (sliced or quartered)
- Corn Kernels (fresh or frozen)
- Halved Cherry Tomatoes (add during the last 10 minutes)
Avoid vegetables that cook very quickly (like spinach) or very slowly (like potatoes or carrots, unless pre-cooked or very thinly sliced).
6. How do I store and reheat leftover Grilled Beef Fajita Packs?
Store leftovers in an airtight container in the refrigerator for up to 3 days. You can store them directly in their foil packs if they are still well-sealed, but transferring to a container is often better.
- Reheating: The best way to reheat is often back in the foil! You can place the sealed pack (or re-wrap leftovers in fresh foil) in a 350°F (175°C) oven or on a cooler part of the grill for 10-15 minutes until heated through. Alternatively, you can gently reheat the mixture in a skillet over medium heat with a splash of water or oil, or microwave in short bursts, stirring in between (microwaving might make the steak slightly tougher).
7. Are these Grilled Beef Fajita Packs good for camping or meal prepping?
Yes, they are exceptionally well-suited for both!
- Camping: Assemble the packs at home, store them in a cooler, and they are ready to throw on a campfire grill or portable camping grill. Minimal prep and cleanup at the campsite!
- Meal Prepping: Prepare multiple packs on Sunday for easy weeknight dinners. Just grab a pack from the fridge and grill (or bake) when ready to eat. Serve with pre-cooked rice or have tortillas ready to go.
8. My vegetables were too soft/mushy, or my beef wasn’t cooked through. What went wrong?
This usually comes down to cooking time, heat consistency, or ingredient size.
- Mushy Veggies: You likely cooked the packs for too long, or perhaps sliced the vegetables too thinly. Next time, try slightly thicker slices or reduce the cooking time by a few minutes. Also, ensure your grill heat wasn’t too low, extending the cook time unnecessarily.
- Undercooked Beef: This could be due to insufficient cooking time, grill heat being too low, or slicing the beef strips too thick. Ensure your grill is properly preheated to medium-high, check for doneness carefully, and remember that thicker beef strips naturally take longer to cook. Slicing the beef thinly (around ¼ inch) helps it cook quickly and evenly alongside the vegetables.

Grilled Beef Fajita Packs
Ingredients
Here’s what you’ll need to assemble these flavorful Grilled Beef Fajita Packs:
- 1.5 lbs Flank Steak or Skirt Steak: These cuts are ideal for fajitas, known for their robust beefy flavor and ability to remain tender when sliced thinly against the grain. Sirloin steak can also work in a pinch.
- 1 Large Red Onion: Sliced into ½-inch thick strips. Adds a pungent sweetness that mellows beautifully on the grill.
- 1 Large Green Bell Pepper: Stemmed, seeded, and sliced into ½-inch thick strips. Provides a classic, slightly grassy fajita flavor and vibrant color.
- 1 Large Red Bell Pepper: Stemmed, seeded, and sliced into ½-inch thick strips. Offers a sweeter counterpoint to the green pepper and adds another pop of color.
- 1 Large Yellow or Orange Bell Pepper: Stemmed, seeded, and sliced into ½-inch thick strips. Adds sweetness and visual appeal, creating a rainbow of veggies.
- 3 Tablespoons Olive Oil or Avocado Oil: Used to coat the beef and vegetables, promoting even cooking, preventing sticking, and adding healthy fats.
- 1 Packet (about 1 oz or 3 Tablespoons) Fajita Seasoning: Choose your favorite store-bought brand or use a homemade blend for controlled sodium and spice levels. This provides the signature chili powder, cumin, paprika, and garlic notes.
- 2–3 Cloves Garlic: Minced. Adds an essential aromatic depth to the marinade and overall flavor profile. Fresh garlic is highly recommended over powder here.
- Juice of 1 Large Lime: Adds crucial acidity that helps tenderize the beef slightly and brightens all the flavors, cutting through the richness.
- ¼ cup Chopped Fresh Cilantro (Optional): Adds a fresh, herbaceous note that complements the smoky and spicy flavors. Add it before grilling or sprinkle on fresh before serving.
- Heavy-Duty Aluminum Foil: Essential for creating durable packs that won’t easily tear or leak on the grill. Standard foil may require double layering.
- Salt and Freshly Ground Black Pepper: To taste. Even with seasoned fajita mix, adjusting salt and pepper to your preference is key.
Instructions
Follow these steps to create delicious Grilled Beef Fajita Packs:
- Prepare the Steak: Pat the flank or skirt steak dry with paper towels. This helps it sear better later. Locate the grain (the direction the muscle fibers run). Slice the steak against the grain into thin strips, about ¼-inch thick. Slicing against the grain is crucial for tenderness; it shortens the long muscle fibers, making the meat much easier to chew. Place the sliced steak into a large mixing bowl.
- Prepare the Vegetables: Wash the bell peppers and onion thoroughly. Remove the stems and seeds from the peppers. Slice the peppers and the red onion into uniform strips, about ½-inch thick. Uniformity is key here – it ensures all the vegetables cook evenly within the foil packs. Add the sliced vegetables to the bowl with the steak.
- Season the Mixture: Drizzle the olive oil (or avocado oil) over the steak and vegetables in the bowl. Add the minced garlic, the fajita seasoning packet (or your homemade blend), the fresh lime juice, and the optional chopped cilantro (if using before grilling). Season generously with salt and freshly ground black pepper to your taste.
- Mix Thoroughly: Using clean hands or a large spoon, toss everything together until the steak strips and vegetable slices are evenly coated with the oil, seasoning, lime juice, and garlic. Ensure every piece gets some love! You can let this mixture marinate at room temperature for about 15-20 minutes while you prepare the foil and preheat the grill, or cover and refrigerate for 30 minutes up to 2 hours for deeper flavor penetration. Avoid marinating much longer with lime juice, as the acid can start to negatively affect the texture of the beef.
- Prepare the Foil Sheets: Tear off four large sheets of heavy-duty aluminum foil, each approximately 18 inches long. If using regular foil, you may want to double-layer each sheet for extra durability to prevent leaks or tears on the grill grates. Lay the foil sheets out flat on your counter or work surface, shiny side down (while debated, the dull side is technically non-stick, though the difference is minimal).
- Assemble the Fajita Packs: Divide the seasoned beef and vegetable mixture evenly among the four foil sheets, placing the mixture in the center of each sheet. Aim for a roughly equal ratio of beef-to-vegetables in each pack. Try not to overfill the packs; you need space for steam to circulate, which is essential for cooking.
- Seal the Foil Packs: To seal each pack, bring the two long sides of the foil sheet together above the filling. Fold the edges over several times (at least two or three tight folds) to create a tight seal along the top. Then, fold or roll the remaining two shorter ends inwards several times, creating a completely sealed packet. Ensure the seals are snug to trap the steam inside – this is what cooks the contents and keeps them moist. The finished pack should look like a rectangular pouch.
- Preheat the Grill: Preheat your outdoor grill (gas or charcoal) to medium-high heat, around 400-450°F (200-230°C). Clean the grill grates if necessary. You want a hot grill to get a good sizzle and slight char on the outside of the foil packs, which adds flavor.
- Grill the Packs: Carefully place the sealed foil packs directly onto the preheated grill grates. Close the grill lid. Cook for approximately 15-20 minutes, flipping the packs over once halfway through the cooking time (around the 8-10 minute mark). Cooking time can vary depending on the heat of your grill, the thickness of your steak slices, and how cooked you like your vegetables.
- Check for Doneness: After about 15 minutes, carefully remove one pack from the grill using tongs (it will be very hot!). Place it on a heat-safe surface. Cautiously open the foil pack, being extremely careful to avoid the escaping steam, which can cause burns. Check if the steak is cooked through to your liking (it should no longer be pink inside unless you prefer medium-rare, which might require slightly less cooking time) and if the vegetables are tender-crisp or softer, according to your preference.
- Continue Cooking if Needed: If the steak or vegetables aren’t quite done, reseal the pack tightly and return it (and the others) to the grill for another 3-5 minutes. Check again.
- Rest the Packs: Once cooked through, remove all the foil packs from the grill using tongs. Let them rest for about 5 minutes before opening. This allows the juices within the packs to redistribute, resulting in more flavorful and moist fajitas.
- Serve: Carefully open the foil packs (again, watch out for steam!). You can serve the fajitas directly from the foil packs for a rustic feel and easy cleanup, or transfer the contents to a platter. Serve immediately with your favorite fajita accompaniments.
Nutrition
- Serving Size: one normal portion
- Calories: 550
- Protein: 40g