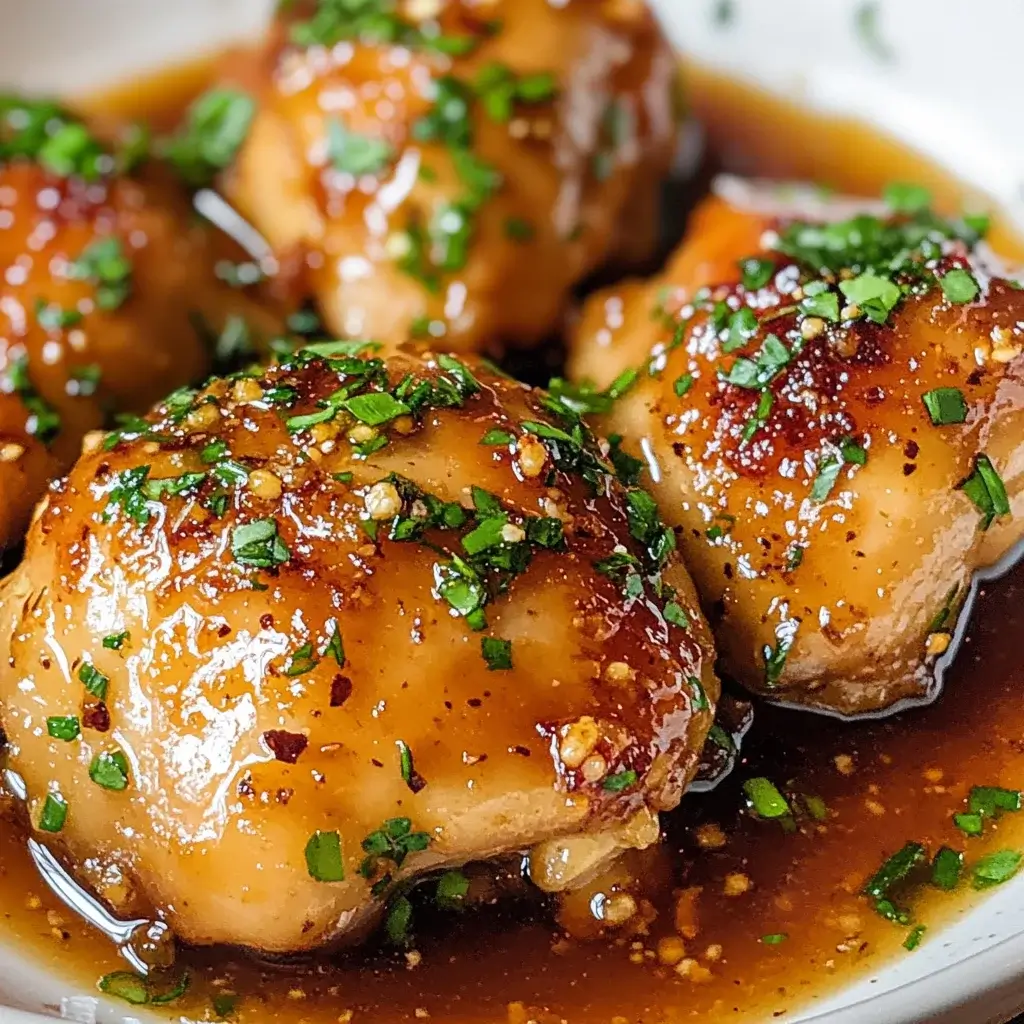
If there’s one recipe that has consistently won over my family, transforming even the pickiest eaters into enthusiastic fans, it’s this Honey Garlic Chicken Thighs dish. The first time I made it, the aroma alone had everyone drifting into the kitchen, asking when dinner would be ready. The sight of those glistening, golden-brown chicken thighs, perfectly coated in a sticky, sweet, and savory sauce, was enough to make mouths water. And the taste? Absolutely divine. The chicken is incredibly tender and juicy, practically falling off the bone, while the honey garlic sauce strikes that perfect balance of flavors – the sweetness of honey, the umami punch of soy sauce, the aromatic depth of garlic and ginger, all coming together in a symphony of deliciousness. It’s become our go-to for busy weeknights because it’s surprisingly simple to whip up, yet it feels like a special occasion meal. Even my kids, who can be quite critical, now request “that sticky chicken” regularly. It’s a foolproof recipe that delivers restaurant-quality results with minimal effort, making it a true hero in my culinary arsenal.
Ingredients
- 8 Bone-in, Skin-on Chicken Thighs (about 2.5 – 3 lbs): Chosen for their rich flavor and ability to stay moist during cooking; the skin crisps up beautifully.
- 1 tablespoon Olive Oil (or Avocado Oil): Used for searing the chicken, creating a flavorful crust.
- 1/2 cup Honey: The star sweetener, providing a beautiful glaze and caramelization. Raw, unfiltered honey often has a more complex flavor.
- 1/2 cup Low-Sodium Soy Sauce (or Tamari for gluten-free): Adds savory depth and umami. Low-sodium helps control the saltiness.
- 4-6 cloves Garlic, minced (about 2 tablespoons): Provides a pungent, aromatic base for the sauce. Freshly minced is best.
- 1 tablespoon Fresh Ginger, grated (or 1 teaspoon ground ginger): Adds a warm, zesty kick that complements the garlic and honey.
- 1 tablespoon Rice Vinegar (or Apple Cider Vinegar): Adds a touch of acidity to balance the sweetness of the honey.
- 1 teaspoon Sesame Oil (optional, but recommended): Lends a nutty, aromatic finish to the sauce.
- 1/4 teaspoon Black Pepper, freshly ground: For a touch of spice and to enhance other flavors.
- 1/2 teaspoon Red Pepper Flakes (optional): For those who like a little heat. Adjust to your preference.
- 1 tablespoon Cornstarch (mixed with 2 tablespoons cold water to make a slurry – optional): For thickening the sauce if desired.
- Fresh Parsley or Green Onions, chopped (for garnish): Adds a pop of color and fresh flavor upon serving.
Instructions
- Prepare the Chicken: Pat the chicken thighs thoroughly dry with paper towels. This is crucial for achieving crispy skin. Season generously on all sides with salt and freshly ground black pepper.
- Sear the Chicken (Optional but Recommended for Crispy Skin):
- Heat the olive oil in a large, oven-safe skillet (cast iron is ideal) over medium-high heat.
- Once the oil is shimmering, carefully place the chicken thighs skin-side down in the hot skillet. Do not overcrowd the pan; cook in batches if necessary.
- Sear for 4-5 minutes per side, or until the skin is golden brown and crispy.
- Remove the chicken from the skillet and set aside on a plate. If you used a non-oven-safe skillet, transfer the seared chicken to a 9×13 inch baking dish.
- Prepare the Honey Garlic Sauce:
- In a medium bowl, whisk together the honey, soy sauce (or tamari), minced garlic, grated ginger, rice vinegar, sesame oil (if using), and red pepper flakes (if using).
- Combine and Bake (Oven Method – Most Common):
- Preheat your oven to 400°F (200°C).
- If you seared the chicken in an oven-safe skillet, you can pour off any excess fat (leave about 1 tablespoon for flavor). Return the chicken to the skillet, arranging it in a single layer.
- If using a baking dish, arrange the seared (or unseared, if skipping that step) chicken thighs in a single layer.
- Pour the prepared honey garlic sauce evenly over the chicken thighs, ensuring each piece is well-coated.
- Transfer the skillet or baking dish to the preheated oven.
- Bake for 25-35 minutes, basting the chicken with the pan sauces every 10-15 minutes. Basting helps to build up that beautiful glaze and keeps the chicken moist.
- The chicken is done when the internal temperature reaches 165-175°F (74-79°C) in the thickest part of the thigh (avoiding the bone), and the juices run clear. The skin should be beautifully caramelized.
- Thicken the Sauce (Optional):
- If you prefer a thicker sauce, remove the chicken from the skillet/baking dish and keep it warm.
- Pour the pan sauces into a small saucepan. Bring to a simmer over medium heat.
- Whisk in the cornstarch slurry and continue to simmer, whisking constantly, for 1-2 minutes, or until the sauce has thickened to your desired consistency.
- Rest and Serve:
- Allow the chicken to rest for 5-10 minutes before serving. This allows the juices to redistribute, resulting in more tender and flavorful meat.
- Drizzle any remaining sauce (thickened or not) over the chicken.
- Garnish with freshly chopped parsley or green onions, if desired.
Nutrition Facts
- Servings: 4-6 (assuming 1-2 thighs per person)
- Calories per serving: Approximately 380-450 kcal (this is an estimate and can vary based on thigh size and exact ingredients)
- Protein: High (around 30-35g per serving) – Essential for muscle repair, growth, and overall body function.
- Fat: Moderate to High (around 20-25g per serving, with saturated fat) – Chicken thighs, especially skin-on, are higher in fat, which contributes to flavor and satiety.
- Carbohydrates: Moderate (around 15-20g per serving) – Primarily from the honey, contributing to the sauce’s sweetness.
- Sodium: Moderate (can be high depending on soy sauce) – Using low-sodium soy sauce helps manage intake.
(Disclaimer: Nutritional information is an estimate and can vary significantly based on specific ingredients, portion sizes, and preparation methods used. For precise nutritional data, using a nutrition calculator with your exact ingredients is recommended.)
Preparation Time
- Prep Time: Approximately 15-20 minutes (includes patting dry chicken, seasoning, and whisking together the sauce ingredients).
- Cook Time: Approximately 30-45 minutes (includes searing time, if done, and baking time).
- Total Time: Approximately 45-65 minutes. This makes it a fantastic option for a relatively quick and incredibly flavorful weeknight dinner or a relaxed weekend meal. The hands-on time is minimal, with much of it being passive cooking time in the oven.
How to Serve
These Honey Garlic Chicken Thighs are incredibly versatile and pair well with a variety of side dishes to create a complete and satisfying meal. Here are some popular and delicious serving suggestions:
- With Grains:
- Steamed White Rice: The classic choice. Fluffy white rice is perfect for soaking up that luscious honey garlic sauce. Jasmine or Basmati rice works wonderfully.
- Brown Rice: A healthier, fiber-rich alternative that offers a nuttier flavor.
- Quinoa: A protein-packed, gluten-free grain that pairs well with the savory-sweet chicken.
- Fried Rice: Use leftover rice to make a quick vegetable fried rice as a more substantial side.
- With Vegetables:
- Steamed or Roasted Broccoli: The slight bitterness of broccoli cuts through the richness of the chicken beautifully. Roasting brings out its sweetness.
- Roasted Asparagus: Simple, elegant, and quick to cook alongside the chicken.
- Sautéed Green Beans: Tossed with a little garlic and sesame oil, they complement the Asian-inspired flavors.
- Stir-fried Mixed Vegetables: Bell peppers, snow peas, carrots, and bok choy make a colorful and nutritious addition.
- A Simple Green Salad: A light, crisp salad with a vinaigrette dressing can balance the richness of the dish.
- With Noodles:
- Lo Mein Noodles or Egg Noodles: Toss plain cooked noodles with a bit of the extra sauce for a satisfying meal.
- Soba Noodles: Japanese buckwheat noodles offer a nice textural contrast.
- With Potatoes:
- Mashed Potatoes: Creamy mashed potatoes are a comforting pairing, especially with the sauce drizzled over.
- Roasted Potatoes: Baby potatoes or diced larger potatoes, roasted until crispy.
- Garnishes:
- Toasted Sesame Seeds: Adds a nutty crunch and visual appeal.
- Chopped Green Onions (Scallions): Provides a fresh, mild oniony bite.
- Fresh Cilantro or Parsley: Adds a burst of fresh herbaceous flavor.
- Presentation:
- Serve family-style on a large platter, with the chicken nestled amongst the side dishes.
- Plate individually, arranging a chicken thigh alongside a portion of rice and vegetables, with extra sauce drizzled on top.
Additional Tips
- Don’t Skip Drying the Chicken: Patting the chicken thighs thoroughly dry with paper towels is a small step that makes a big difference, especially if you’re searing them. Dry skin crisps up much better and allows for a beautiful golden-brown color.
- Marinate for Deeper Flavor: While the recipe is delicious as is, if you have extra time (30 minutes to a few hours), you can marinate the chicken thighs in about 1/3 of the honey garlic sauce before cooking. This allows the flavors to penetrate the meat more deeply. Remember to discard the marinade that raw chicken was in and use fresh sauce for basting and serving.
- Achieve Crispier Skin: For guaranteed crispy skin, start by searing the chicken skin-side down in a hot skillet before baking, as outlined in the instructions. Also, ensure the chicken isn’t too crowded in the baking dish, allowing hot air to circulate. Broiling for the last 2-3 minutes (watching carefully to prevent burning) can also enhance crispiness.
- Use a Meat Thermometer: The most reliable way to ensure your chicken is perfectly cooked (safe to eat and still juicy) is to use an instant-read meat thermometer. Insert it into the thickest part of the thigh, avoiding the bone. The internal temperature should reach 165-175°F (74-79°C). Dark meat like thighs is more forgiving and can go a bit higher without drying out, often becoming more tender.
- Sauce Consistency Control: If your sauce isn’t as thick as you’d like after baking, you can easily thicken it. Remove the chicken, pour the pan juices into a small saucepan, bring to a simmer, and whisk in a cornstarch slurry (1 tablespoon cornstarch mixed with 2 tablespoons cold water). Simmer until thickened. Conversely, if it’s too thick, whisk in a tablespoon or two of hot water or chicken broth.
- Ingredient Flexibility:
- Sweetener: While honey is key, in a pinch, maple syrup could be substituted for a different flavor profile, or a mix of honey and brown sugar.
- Acid: If you don’t have rice vinegar, apple cider vinegar or even a squeeze of fresh lemon or lime juice can work.
- Garlic/Ginger: Fresh is always best for potency and flavor, but in a pinch, you can use 1 teaspoon of garlic powder for every large clove and 1/4 teaspoon of ground ginger for every teaspoon of fresh.
- Batch Cooking and Meal Prep: This recipe is excellent for meal prep. Cook a larger batch and store portions in airtight containers with rice and vegetables for easy lunches or dinners throughout the week. The flavors often meld and become even better the next day.
- Don’t Overcrowd the Pan/Dish: Whether searing on the stovetop or baking in the oven, give the chicken thighs some space. Overcrowding lowers the temperature, leading to steaming rather than searing or proper roasting, which can result in less crispy skin and uneven cooking. Cook in batches if necessary.
FAQ Section
Q1: Can I use boneless, skinless chicken thighs for this recipe?
A1: Yes, absolutely! Boneless, skinless chicken thighs will cook faster, typically in about 20-25 minutes in a 400°F (200°C) oven. Since there’s no skin to crisp, the searing step is less critical but can still add flavor. Monitor the internal temperature closely to avoid overcooking; they are done when they reach 165°F (74°C). They will be incredibly tender and soak up the sauce beautifully.
Q2: Can I make this Honey Garlic Chicken recipe with chicken breasts?
A2: Yes, you can use chicken breasts, but they are leaner and more prone to drying out. Pound them to an even thickness (about 3/4 inch) for more consistent cooking. Sear them briefly, then bake for a shorter time, about 15-25 minutes, depending on thickness, or until the internal temperature reaches 165°F (74°C). Basting frequently is even more important with chicken breasts. Slicing them before serving can help them absorb more sauce.
Q3: How can I make this recipe gluten-free?
A3: It’s very easy to make this recipe gluten-free. The primary source of gluten is typically soy sauce. Simply substitute the regular soy sauce with an equal amount of gluten-free tamari or coconut aminos. Ensure your cornstarch (if using for thickening) is also certified gluten-free, though most pure cornstarch is.
Q4: My sauce didn’t get thick and sticky. What went wrong?
A4: Several factors can affect sauce thickness.
* Not enough reduction: The sauce thickens as it reduces during baking. If there was a lot of liquid released from the chicken, it might need more time or a dedicated reduction step.
* Oven temperature: If your oven runs cool, it might not reduce effectively.
* Solution: You can easily thicken the sauce after cooking. Remove the chicken, pour the pan juices into a small saucepan, and simmer over medium heat until it reduces and thickens. For a quicker fix, whisk in a cornstarch slurry (1 tbsp cornstarch + 2 tbsp cold water) while simmering until it reaches your desired consistency.
Q5: How do I store and reheat leftover Honey Garlic Chicken Thighs?
A5: Store leftovers in an airtight container in the refrigerator for up to 3-4 days. To reheat, you can use:
* Oven: Place chicken in an oven-safe dish, add a splash of water or chicken broth to prevent drying, cover with foil, and reheat at 325°F (160°C) until warmed through (about 15-20 minutes). Uncover for the last few minutes to help re-crisp the skin slightly.
* Microwave: Reheat in short intervals, covered, until warm. The skin won’t be as crispy.
* Stovetop: Slice the chicken and gently reheat in a skillet with a bit of the leftover sauce over medium-low heat.
Q6: Can I freeze these Honey Garlic Chicken Thighs?
A6: Yes, this dish freezes well. Allow the chicken and sauce to cool completely. Store in freezer-safe airtight containers or heavy-duty freezer bags for up to 2-3 months. Thaw overnight in the refrigerator before reheating using one of the methods mentioned above. The sauce might be slightly thinner upon thawing, but the flavor will still be great.
Q7: Can I prepare any parts of this recipe ahead of time?
A7: Absolutely! To save time:
* Sauce: The honey garlic sauce can be mixed together and stored in an airtight container in the refrigerator for up to 3-4 days.
* Chicken Prep: You can season the chicken thighs and store them covered in the refrigerator a day ahead.
* Marinating: As mentioned in the tips, you can marinate the chicken in some of the sauce for a few hours or overnight.
This makes assembly on cooking day much quicker.
Q8: What if I don’t have fresh ginger or garlic? Can I use powdered?
A8: Fresh ginger and garlic offer the best, most vibrant flavor. However, if you’re in a pinch, you can substitute with powdered versions. A general rule of thumb is:
* Garlic: For every 1 clove of fresh garlic, use about 1/4 teaspoon of garlic powder. So for 4-6 cloves, use 1 to 1 1/2 teaspoons of garlic powder.
* Ginger: For every 1 tablespoon of fresh grated ginger, use about 1/4 to 1/2 teaspoon of ground ginger.
Add the powdered spices to the sauce mixture. Taste and adjust if needed, as powdered versions can sometimes have a slightly different flavor profile.

Honey Garlic Chicken Thighs
Ingredients
- 8 Bone-in, Skin-on Chicken Thighs (about 2.5 – 3 lbs): Chosen for their rich flavor and ability to stay moist during cooking; the skin crisps up beautifully.
- 1 tablespoon Olive Oil (or Avocado Oil): Used for searing the chicken, creating a flavorful crust.
- 1/2 cup Honey: The star sweetener, providing a beautiful glaze and caramelization. Raw, unfiltered honey often has a more complex flavor.
- 1/2 cup Low-Sodium Soy Sauce (or Tamari for gluten-free): Adds savory depth and umami. Low-sodium helps control the saltiness.
- 4–6 cloves Garlic, minced (about 2 tablespoons): Provides a pungent, aromatic base for the sauce. Freshly minced is best.
- 1 tablespoon Fresh Ginger, grated (or 1 teaspoon ground ginger): Adds a warm, zesty kick that complements the garlic and honey.
- 1 tablespoon Rice Vinegar (or Apple Cider Vinegar): Adds a touch of acidity to balance the sweetness of the honey.
- 1 teaspoon Sesame Oil (optional, but recommended): Lends a nutty, aromatic finish to the sauce.
- 1/4 teaspoon Black Pepper, freshly ground: For a touch of spice and to enhance other flavors.
- 1/2 teaspoon Red Pepper Flakes (optional): For those who like a little heat. Adjust to your preference.
- 1 tablespoon Cornstarch (mixed with 2 tablespoons cold water to make a slurry – optional): For thickening the sauce if desired.
- Fresh Parsley or Green Onions, chopped (for garnish): Adds a pop of color and fresh flavor upon serving.
Instructions
- Prepare the Chicken: Pat the chicken thighs thoroughly dry with paper towels. This is crucial for achieving crispy skin. Season generously on all sides with salt and freshly ground black pepper.
- Sear the Chicken (Optional but Recommended for Crispy Skin):
- Heat the olive oil in a large, oven-safe skillet (cast iron is ideal) over medium-high heat.
- Once the oil is shimmering, carefully place the chicken thighs skin-side down in the hot skillet. Do not overcrowd the pan; cook in batches if necessary.
- Sear for 4-5 minutes per side, or until the skin is golden brown and crispy.
- Remove the chicken from the skillet and set aside on a plate. If you used a non-oven-safe skillet, transfer the seared chicken to a 9×13 inch baking dish.
- Prepare the Honey Garlic Sauce:
- In a medium bowl, whisk together the honey, soy sauce (or tamari), minced garlic, grated ginger, rice vinegar, sesame oil (if using), and red pepper flakes (if using).
- Combine and Bake (Oven Method – Most Common):
- Preheat your oven to 400°F (200°C).
- If you seared the chicken in an oven-safe skillet, you can pour off any excess fat (leave about 1 tablespoon for flavor). Return the chicken to the skillet, arranging it in a single layer.
- If using a baking dish, arrange the seared (or unseared, if skipping that step) chicken thighs in a single layer.
- Pour the prepared honey garlic sauce evenly over the chicken thighs, ensuring each piece is well-coated.
- Transfer the skillet or baking dish to the preheated oven.
- Bake for 25-35 minutes, basting the chicken with the pan sauces every 10-15 minutes. Basting helps to build up that beautiful glaze and keeps the chicken moist.
- The chicken is done when the internal temperature reaches 165-175°F (74-79°C) in the thickest part of the thigh (avoiding the bone), and the juices run clear. The skin should be beautifully caramelized.
- Thicken the Sauce (Optional):
- If you prefer a thicker sauce, remove the chicken from the skillet/baking dish and keep it warm.
- Pour the pan sauces into a small saucepan. Bring to a simmer over medium heat.
- Whisk in the cornstarch slurry and continue to simmer, whisking constantly, for 1-2 minutes, or until the sauce has thickened to your desired consistency.
- Rest and Serve:
- Allow the chicken to rest for 5-10 minutes before serving. This allows the juices to redistribute, resulting in more tender and flavorful meat.
- Drizzle any remaining sauce (thickened or not) over the chicken.
- Garnish with freshly chopped parsley or green onions, if desired.
Nutrition
- Serving Size: one normal portion
- Calories: 450
- Fat: 25g
- Carbohydrates: 20g
- Protein: 35g