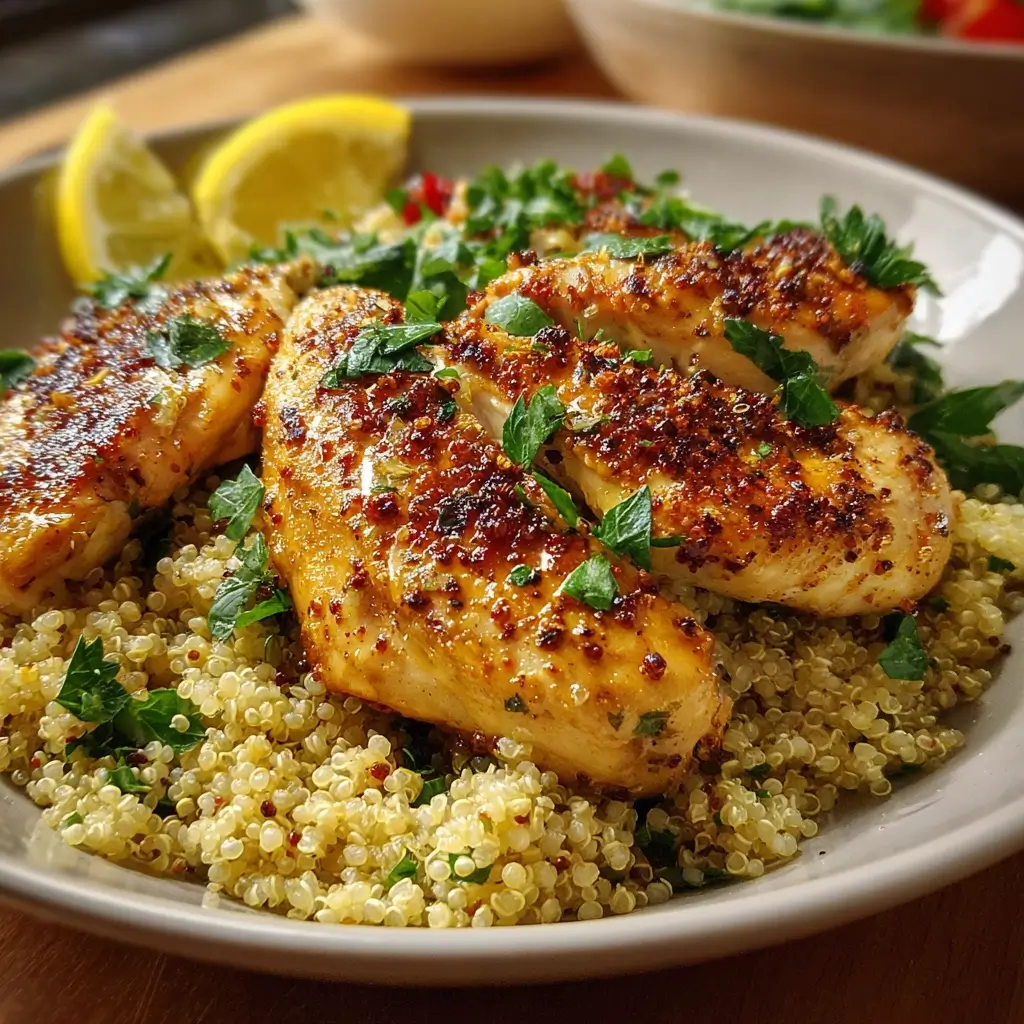
Of all the recipes in my regular rotation, this Lemon Garlic Chicken with Quinoa holds a special place. I remember the first time I made it on a whim, searching for something that was both healthy and satisfying, a meal that wouldn’t leave us feeling heavy but would still feel like a treat. The aroma that filled the kitchen was the first sign of success—a bright, zesty perfume of lemon mingling with the deep, savory scent of garlic sizzling in the pan. My husband, typically a man of few words when it comes to food, looked up from his first bite and said, “This is a keeper.” Even my notoriously picky daughter, who usually scrutinizes anything green, happily ate the tender asparagus and asked for more of the “lemony chicken.” It was a victory. This dish has since become our go-to for busy weeknights when we crave flavor without the fuss, and for quiet Sunday evenings when we want something elegant yet simple. It’s a perfect harmony of textures and tastes: the fluffy, nutty quinoa provides a wholesome base for the incredibly juicy, tender chicken, all brought to life by a vibrant pan sauce that’s good enough to drink. It’s more than just a recipe; it’s the taste of a reliable, delicious, and feel-good meal that brings my family together every single time.
Ingredients
Here is everything you will need to create this bright and flavorful meal. Using fresh, high-quality ingredients will make a significant difference in the final taste and texture.
- For the Quinoa:
- 1 cup uncooked white quinoa: Be sure to rinse it thoroughly under cold running water. This crucial step removes the natural outer coating, called saponin, which can impart a bitter or soapy taste.
- 2 cups low-sodium chicken or vegetable broth: Using broth instead of water infuses the quinoa with a rich, savory flavor from the very beginning, creating a more delicious foundation for the dish.
- 1 tablespoon olive oil: A small amount to toast the quinoa slightly before adding the liquid, which enhances its nutty flavor profile.
- Pinch of salt: To season the quinoa as it cooks.
- For the Lemon Garlic Chicken:
- 4 (6-ounce) boneless, skinless chicken breasts: Aim for breasts that are relatively uniform in thickness. If one end is much thicker, you can pound it gently to ensure even cooking.
- 2 tablespoons extra virgin olive oil: This is used for searing the chicken, creating a beautiful golden-brown crust and locking in the juices.
- 4 cloves garlic, minced: Freshly minced garlic provides the best aromatic and pungent flavor. This is a key component of the marinade and sauce.
- 1 large lemon: You will use both the zest and the juice. The zest provides a fragrant, oily aroma, while the juice adds the bright, acidic tang that tenderizes the chicken.
- 1 teaspoon dried oregano: This herb adds a classic Mediterranean warmth and earthiness that pairs beautifully with lemon and garlic.
- 1/2 teaspoon paprika: Use sweet, not smoked, paprika to add a lovely color to the chicken and a mild, sweet pepper flavor.
- 1/2 teaspoon salt: For seasoning the chicken. You can adjust this to your personal preference.
- 1/4 teaspoon black pepper: Freshly ground black pepper offers the most potent and complex flavor.
- For the Pan Sauce and Vegetables:
- 1 bunch asparagus (about 1 pound): Look for spears that are firm and bright green. Trim off the tough, woody ends before cooking.
- 2 additional cloves garlic, thinly sliced: Adding more garlic during the final cooking stage layers the flavor, creating a more complex and aromatic sauce.
- 1/2 cup low-sodium chicken broth: This is the primary liquid for deglazing the pan and creating the delicious, light sauce.
- 2 tablespoons fresh parsley, chopped: Added at the end for a burst of fresh, herbaceous color and flavor.
Instructions
Follow these detailed steps to build layers of flavor, resulting in a perfectly cooked, restaurant-quality meal right in your own kitchen.
Step 1: Cook the Quinoa
First, prepare the quinoa as it can cook while you work on the chicken. Place a fine-mesh sieve in your sink and pour the uncooked quinoa into it. Rinse thoroughly under cold water for at least 30-60 seconds, using your fingers to move the grains around. This step is essential to remove the bitter saponin. Once rinsed, shake the sieve to remove as much excess water as possible. Heat 1 tablespoon of olive oil in a medium saucepan over medium heat. Add the rinsed quinoa and toast for about 1-2 minutes, stirring constantly, until it becomes fragrant and makes a faint popping sound. This deepens its nutty flavor. Carefully pour in the 2 cups of chicken or vegetable broth and add a pinch of salt. Bring the mixture to a boil, then immediately reduce the heat to the lowest setting, cover the saucepan with a tight-fitting lid, and let it simmer for 15 minutes. After 15 minutes, turn off the heat but leave the saucepan on the burner, still covered, for another 5-10 minutes. This allows the quinoa to steam and absorb any remaining moisture without becoming mushy. Finally, remove the lid and fluff the quinoa gently with a fork. Set it aside, covered, to keep warm.
Step 2: Prepare the Chicken and Marinade
While the quinoa is simmering, prepare your chicken. Pat the chicken breasts completely dry with paper towels. This is a critical step for achieving a perfect, golden-brown sear; excess moisture will steam the chicken instead of searing it. In a small bowl, combine the marinade ingredients: 2 tablespoons of olive oil, the minced garlic (4 cloves), the zest of one entire lemon, the juice of half the lemon, the dried oregano, paprika, salt, and black pepper. Whisk everything together until well combined. Place the dried chicken breasts in a large bowl or a resealable plastic bag. Pour the marinade over the chicken and use your hands or tongs to ensure each breast is evenly coated on all sides. You can let the chicken marinate for at least 15 minutes at room temperature while you prep the other ingredients, or for up to 4 hours in the refrigerator for a deeper flavor. If marinating for longer, be sure to take it out of the fridge about 20-30 minutes before cooking to let it come to room temperature.
Step 3: Sear the Chicken
Heat a large, heavy-bottomed skillet (cast iron or stainless steel works best) over medium-high heat. You want the pan to be hot before adding the chicken. To test if it’s ready, you can flick a drop of water onto the surface; it should sizzle and evaporate instantly. Add the marinated chicken breasts to the hot skillet, making sure not to overcrowd the pan (cook in two batches if necessary). Let the chicken sear, undisturbed, for 5-7 minutes on the first side. Resisting the urge to move it allows a deep, flavorful brown crust to form. You’ll know it’s ready to flip when it releases easily from the pan. Flip the chicken and sear for another 5-7 minutes on the second side, or until it is cooked through and the internal temperature reaches 165°F (74°C) on a meat thermometer. Once cooked, transfer the chicken to a clean plate or cutting board and let it rest.
Step 4: Cook Vegetables and Create the Pan Sauce
Do not wipe out the skillet. The browned bits (or fond) left in the pan from the chicken are packed with flavor and are the secret to an incredible pan sauce. Reduce the heat to medium. Add the trimmed asparagus spears to the skillet in a single layer. Sauté for 3-5 minutes, tossing occasionally, until they are tender-crisp and lightly charred in spots. Push the asparagus to one side of the pan. To the other side, add the thinly sliced garlic (2 cloves) and cook for just 30-60 seconds until fragrant, being careful not to let it burn.
Step 5: Deglaze and Combine
Pour the 1/2 cup of chicken broth and the juice from the remaining half of the lemon into the hot skillet. As the liquid sizzles, use a wooden spoon or spatula to scrape up all the browned bits from the bottom of the pan. This process, known as deglazing, incorporates all that concentrated flavor into your sauce. Bring the sauce to a gentle simmer and let it cook for 2-3 minutes to reduce slightly and thicken. Return the rested chicken breasts (and any juices that have accumulated on the plate) back into the skillet. Spoon some of the pan sauce over the chicken and vegetables.
Step 6: Finish and Serve
Turn off the heat. Sprinkle the entire dish with the freshly chopped parsley for a burst of color and fresh flavor. Your Lemon Garlic Chicken with Quinoa and Asparagus is now ready to be served immediately, while everything is warm and the sauce is at its peak.
Nutrition Facts
This meal is designed to be balanced and nourishing. The nutritional values are an approximation and can vary based on specific ingredient sizes and types.
- Servings: 4
- Calories Per Serving: Approximately 620 kcal. This represents a well-rounded and substantial meal, providing ample energy without feeling overly heavy.
- Protein: 45g. A high-protein content primarily from the chicken breast makes this dish incredibly satisfying and essential for muscle maintenance, repair, and overall body function.
- Carbohydrates: 48g. Sourced mainly from the quinoa, these are complex carbohydrates that provide sustained energy. Quinoa is also a complete protein, adding to the meal’s nutritional powerhouse status.
- Fiber: 8g. The combination of quinoa and asparagus provides a significant amount of dietary fiber, which is crucial for digestive health, blood sugar regulation, and promoting a feeling of fullness.
- Healthy Fats: 28g. The majority of the fat content comes from olive oil, a monounsaturated fat known for its heart-health benefits.
Preparation Time
This recipe is perfectly suited for a weeknight, as it comes together relatively quickly without sacrificing any flavor.
- Total Time: Approximately 45-50 minutes
- Preparation Time: 15 minutes (This includes rinsing the quinoa, preparing the marinade, and trimming the vegetables.)
- Cook Time: 30-35 minutes (This accounts for cooking the quinoa, searing the chicken, and finishing the dish in the pan.)
The workflow is designed for efficiency. You can easily prep the chicken and vegetables while the quinoa simmers, making the most of your time in the kitchen.
How to Serve
Presentation can elevate this simple dish into something truly special. Here are a few ways to serve your Lemon Garlic Chicken with Quinoa:
- The Classic Plated Meal:
- Start by creating a generous bed of the fluffy, cooked quinoa on each plate.
- Slice the rested chicken breast into thick, diagonal strips and arrange them elegantly over the top of the quinoa.
- Place a portion of the tender-crisp asparagus spears alongside the chicken.
- Finally, spoon a generous amount of the glistening pan sauce over both the chicken and the quinoa, allowing it to soak into the grain.
- The Deconstructed Bowl:
- For a modern, customizable approach, serve this as a grain bowl.
- Start with a base of quinoa in a wide, shallow bowl.
- Arrange the sliced chicken and asparagus in distinct sections over the quinoa.
- Consider adding other fresh elements like halved cherry tomatoes, crumbled feta cheese, or a handful of arugula for extra color and texture.
- Drizzle the pan sauce over the entire bowl just before serving.
- Family-Style Platter:
- For a more communal and impressive dining experience, arrange everything on a large platter.
- Spread the cooked quinoa across the bottom of the platter.
- Arrange the whole, seared chicken breasts and asparagus spears artfully on top.
- Drizzle with the pan sauce and garnish liberally with extra fresh parsley and a few fresh lemon wedges for squeezing. This allows everyone to serve themselves.
- Garnish for an Extra Touch:
- Fresh Lemon Wedges: Always have extra lemon wedges on the side for those who love an extra citrusy kick.
- Crumbled Feta or Goat Cheese: The salty, tangy flavor of feta or the creamy texture of goat cheese is a fantastic contrast to the lemon and garlic.
- Red Pepper Flakes: A light sprinkle adds a gentle, warming heat for those who enjoy a bit of spice.
- Toasted Pine Nuts: For an added layer of texture and a rich, buttery crunch.
Additional Tips
Unlock the full potential of this recipe with these eight professional tips for guaranteed success.
- Don’t Skip Rinsing the Quinoa: This cannot be overstated. Quinoa’s natural coating, saponin, is a defense mechanism for the plant but can make the cooked grain taste bitter and soapy. A thorough rinse in a fine-mesh sieve under cold water is non-negotiable for fluffy, clean-tasting quinoa.
- Achieve the Perfect Chicken Sear: The secret to juicy chicken is a great sear, which creates a flavorful crust via the Maillard reaction. Ensure your pan is sufficiently hot before adding the chicken, and make sure the chicken itself is patted completely dry. Once in the pan, leave it alone until it’s ready to flip; moving it too much will prevent a good crust from forming.
- Fresh is Always Best: While you can use bottled lemon juice and pre-minced garlic in a pinch, the flavor difference when using fresh ingredients is immense. Freshly squeezed lemon juice is brighter and more complex, and freshly minced garlic is far more aromatic and pungent than its jarred counterpart. The zest from a fresh lemon is impossible to replicate.
- Master Your Meal Prep: This recipe is a meal-prepper’s dream. To keep everything fresh, store the components separately in airtight containers in the refrigerator. Keep the cooked quinoa, the sliced chicken, and the asparagus in their own containers. You can portion out the pan sauce into small containers as well. This prevents the quinoa from becoming soggy and allows you to assemble a fresh-tasting bowl for lunch in seconds.
- Use a Meat Thermometer: The line between perfectly cooked, juicy chicken and dry, tough chicken is very thin. The most reliable way to avoid overcooking is to use an instant-read meat thermometer. Insert it into the thickest part of the breast; it’s done when it registers 165°F (74°C).
- Customize Your Vegetables: Asparagus is a classic pairing, but this recipe is incredibly versatile. Feel free to substitute it with other vegetables that cook well in a skillet. Broccoli florets, green beans, sliced bell peppers, zucchini rounds, or even halved cherry tomatoes (added in the last few minutes of cooking) all work wonderfully.
- Let the Chicken Rest: After the chicken is cooked, letting it rest on a cutting board for 5-10 minutes before slicing is crucial. This allows the muscle fibers to relax and the juices to redistribute throughout the meat. If you slice it immediately, all that delicious moisture will spill out onto the board, resulting in drier chicken.
- Embrace the Fond: “Fond” is the culinary term for the browned and caramelized bits stuck to the bottom of the pan after searing meat. This is concentrated flavor gold. When you deglaze the pan with broth and lemon juice, be sure to scrape every last bit of it up. This is what transforms a simple liquid into a deeply flavorful, savory pan sauce.
FAQ Section
Here are answers to some of the most common questions about making this Lemon Garlic Chicken with Quinoa recipe.
1. Can I use chicken thighs instead of chicken breasts?
Absolutely! Chicken thighs are a great alternative and are often more forgiving as their higher fat content keeps them moist. Use boneless, skinless chicken thighs and cook them for a similar amount of time, about 6-8 minutes per side, ensuring the internal temperature reaches 165°F (74°C). The cooking time might be slightly longer depending on their thickness.
2. Is this recipe gluten-free?
Yes, this recipe is naturally gluten-free. Quinoa is a gluten-free seed, and all other ingredients listed (chicken, vegetables, herbs, olive oil) do not contain gluten. Just be sure to double-check that your chicken broth is certified gluten-free if you have a severe intolerance or celiac disease.
3. What if I don’t have fresh parsley? Can I use dried?
Yes, you can substitute dried parsley if you don’t have fresh on hand. The general rule of thumb for converting fresh to dried herbs is to use one-third the amount. So, for 2 tablespoons of fresh parsley, you would use about 2 teaspoons of dried parsley. Add the dried parsley to the sauce along with the oregano to give it time to rehydrate and release its flavor.
4. How should I store and reheat leftovers?
Store leftovers in an airtight container in the refrigerator for up to 3-4 days. For the best results when reheating, place the chicken, quinoa, and vegetables in a skillet over medium-low heat with a splash of water or chicken broth to create steam and prevent it from drying out. You can also microwave it, but be careful not to overcook the chicken.
5. Can I marinate the chicken for longer, like overnight?
You can, but with a slight caution. Because this marinade contains a significant amount of lemon juice (which is acidic), marinating for too long (e.g., more than 8 hours) can start to break down the proteins in the chicken, leading to a slightly mushy or mealy texture on the exterior. For optimal results, a marinade time of 30 minutes to 4 hours is ideal.
6. My quinoa turned out mushy. What went wrong?
Mushy quinoa is usually the result of one of three things: too much liquid, not rinsing it properly, or overcooking. Ensure you stick to a 1:2 ratio of quinoa to liquid (1 cup quinoa to 2 cups broth). Make sure you are simmering on the absolute lowest heat setting. Finally, don’t skip the 5-10 minute resting period off the heat; this is when the final bits of steam are absorbed, creating that perfect fluffy texture.
7. Could I cook the chicken on an outdoor grill instead?
Yes, this recipe is fantastic for grilling! Marinate the chicken as directed. Preheat your grill to medium-high heat (about 400-450°F or 200-230°C). Grill the chicken for 5-7 minutes per side, with the lid closed, until grill marks appear and the internal temperature reaches 165°F (74°C). While the chicken cooks, you can cook the quinoa on the stovetop and sauté the vegetables and make the pan sauce inside.
8. What other grains can I use if I don’t have quinoa?
This dish is very flexible when it comes to the grain base. You could easily substitute the quinoa with any of the following, adjusting the cooking liquid and time according to package directions:
- Brown Rice: A nutty and chewy alternative.
- Farro: An ancient grain with a delightful chew and nutty flavor.
- Barley: Hearty and satisfying, with a texture similar to farro.
- Couscous (especially pearl/Israeli couscous): For a quicker option, couscous cooks in minutes and would absorb the pan sauce beautifully.

Lemon Garlic Chicken with Quinoa
Ingredients
Here is everything you will need to create this bright and flavorful meal. Using fresh, high-quality ingredients will make a significant difference in the final taste and texture.
- For the Quinoa:
- 1 cup uncooked white quinoa: Be sure to rinse it thoroughly under cold running water. This crucial step removes the natural outer coating, called saponin, which can impart a bitter or soapy taste.
- 2 cups low-sodium chicken or vegetable broth: Using broth instead of water infuses the quinoa with a rich, savory flavor from the very beginning, creating a more delicious foundation for the dish.
- 1 tablespoon olive oil: A small amount to toast the quinoa slightly before adding the liquid, which enhances its nutty flavor profile.
- Pinch of salt: To season the quinoa as it cooks.
- For the Lemon Garlic Chicken:
- 4 (6-ounce) boneless, skinless chicken breasts: Aim for breasts that are relatively uniform in thickness. If one end is much thicker, you can pound it gently to ensure even cooking.
- 2 tablespoons extra virgin olive oil: This is used for searing the chicken, creating a beautiful golden-brown crust and locking in the juices.
- 4 cloves garlic, minced: Freshly minced garlic provides the best aromatic and pungent flavor. This is a key component of the marinade and sauce.
- 1 large lemon: You will use both the zest and the juice. The zest provides a fragrant, oily aroma, while the juice adds the bright, acidic tang that tenderizes the chicken.
- 1 teaspoon dried oregano: This herb adds a classic Mediterranean warmth and earthiness that pairs beautifully with lemon and garlic.
- 1/2 teaspoon paprika: Use sweet, not smoked, paprika to add a lovely color to the chicken and a mild, sweet pepper flavor.
- 1/2 teaspoon salt: For seasoning the chicken. You can adjust this to your personal preference.
- 1/4 teaspoon black pepper: Freshly ground black pepper offers the most potent and complex flavor.
- For the Pan Sauce and Vegetables:
- 1 bunch asparagus (about 1 pound): Look for spears that are firm and bright green. Trim off the tough, woody ends before cooking.
- 2 additional cloves garlic, thinly sliced: Adding more garlic during the final cooking stage layers the flavor, creating a more complex and aromatic sauce.
- 1/2 cup low-sodium chicken broth: This is the primary liquid for deglazing the pan and creating the delicious, light sauce.
- 2 tablespoons fresh parsley, chopped: Added at the end for a burst of fresh, herbaceous color and flavor.
Instructions
Follow these detailed steps to build layers of flavor, resulting in a perfectly cooked, restaurant-quality meal right in your own kitchen.
Step 1: Cook the Quinoa
First, prepare the quinoa as it can cook while you work on the chicken. Place a fine-mesh sieve in your sink and pour the uncooked quinoa into it. Rinse thoroughly under cold water for at least 30-60 seconds, using your fingers to move the grains around. This step is essential to remove the bitter saponin. Once rinsed, shake the sieve to remove as much excess water as possible. Heat 1 tablespoon of olive oil in a medium saucepan over medium heat. Add the rinsed quinoa and toast for about 1-2 minutes, stirring constantly, until it becomes fragrant and makes a faint popping sound. This deepens its nutty flavor. Carefully pour in the 2 cups of chicken or vegetable broth and add a pinch of salt. Bring the mixture to a boil, then immediately reduce the heat to the lowest setting, cover the saucepan with a tight-fitting lid, and let it simmer for 15 minutes. After 15 minutes, turn off the heat but leave the saucepan on the burner, still covered, for another 5-10 minutes. This allows the quinoa to steam and absorb any remaining moisture without becoming mushy. Finally, remove the lid and fluff the quinoa gently with a fork. Set it aside, covered, to keep warm.
Step 2: Prepare the Chicken and Marinade
While the quinoa is simmering, prepare your chicken. Pat the chicken breasts completely dry with paper towels. This is a critical step for achieving a perfect, golden-brown sear; excess moisture will steam the chicken instead of searing it. In a small bowl, combine the marinade ingredients: 2 tablespoons of olive oil, the minced garlic (4 cloves), the zest of one entire lemon, the juice of half the lemon, the dried oregano, paprika, salt, and black pepper. Whisk everything together until well combined. Place the dried chicken breasts in a large bowl or a resealable plastic bag. Pour the marinade over the chicken and use your hands or tongs to ensure each breast is evenly coated on all sides. You can let the chicken marinate for at least 15 minutes at room temperature while you prep the other ingredients, or for up to 4 hours in the refrigerator for a deeper flavor. If marinating for longer, be sure to take it out of the fridge about 20-30 minutes before cooking to let it come to room temperature.
Step 3: Sear the Chicken
Heat a large, heavy-bottomed skillet (cast iron or stainless steel works best) over medium-high heat. You want the pan to be hot before adding the chicken. To test if it’s ready, you can flick a drop of water onto the surface; it should sizzle and evaporate instantly. Add the marinated chicken breasts to the hot skillet, making sure not to overcrowd the pan (cook in two batches if necessary). Let the chicken sear, undisturbed, for 5-7 minutes on the first side. Resisting the urge to move it allows a deep, flavorful brown crust to form. You’ll know it’s ready to flip when it releases easily from the pan. Flip the chicken and sear for another 5-7 minutes on the second side, or until it is cooked through and the internal temperature reaches 165°F (74°C) on a meat thermometer. Once cooked, transfer the chicken to a clean plate or cutting board and let it rest.
Step 4: Cook Vegetables and Create the Pan Sauce
Do not wipe out the skillet. The browned bits (or fond) left in the pan from the chicken are packed with flavor and are the secret to an incredible pan sauce. Reduce the heat to medium. Add the trimmed asparagus spears to the skillet in a single layer. Sauté for 3-5 minutes, tossing occasionally, until they are tender-crisp and lightly charred in spots. Push the asparagus to one side of the pan. To the other side, add the thinly sliced garlic (2 cloves) and cook for just 30-60 seconds until fragrant, being careful not to let it burn.
Step 5: Deglaze and Combine
Pour the 1/2 cup of chicken broth and the juice from the remaining half of the lemon into the hot skillet. As the liquid sizzles, use a wooden spoon or spatula to scrape up all the browned bits from the bottom of the pan. This process, known as deglazing, incorporates all that concentrated flavor into your sauce. Bring the sauce to a gentle simmer and let it cook for 2-3 minutes to reduce slightly and thicken. Return the rested chicken breasts (and any juices that have accumulated on the plate) back into the skillet. Spoon some of the pan sauce over the chicken and vegetables.
Step 6: Finish and Serve
Turn off the heat. Sprinkle the entire dish with the freshly chopped parsley for a burst of color and fresh flavor. Your Lemon Garlic Chicken with Quinoa and Asparagus is now ready to be served immediately, while everything is warm and the sauce is at its peak.
Nutrition
- Serving Size: one normal portion
- Calories: 620
- Fat: 28g
- Carbohydrates: 48g
- Fiber: 8g
- Protein: 45g