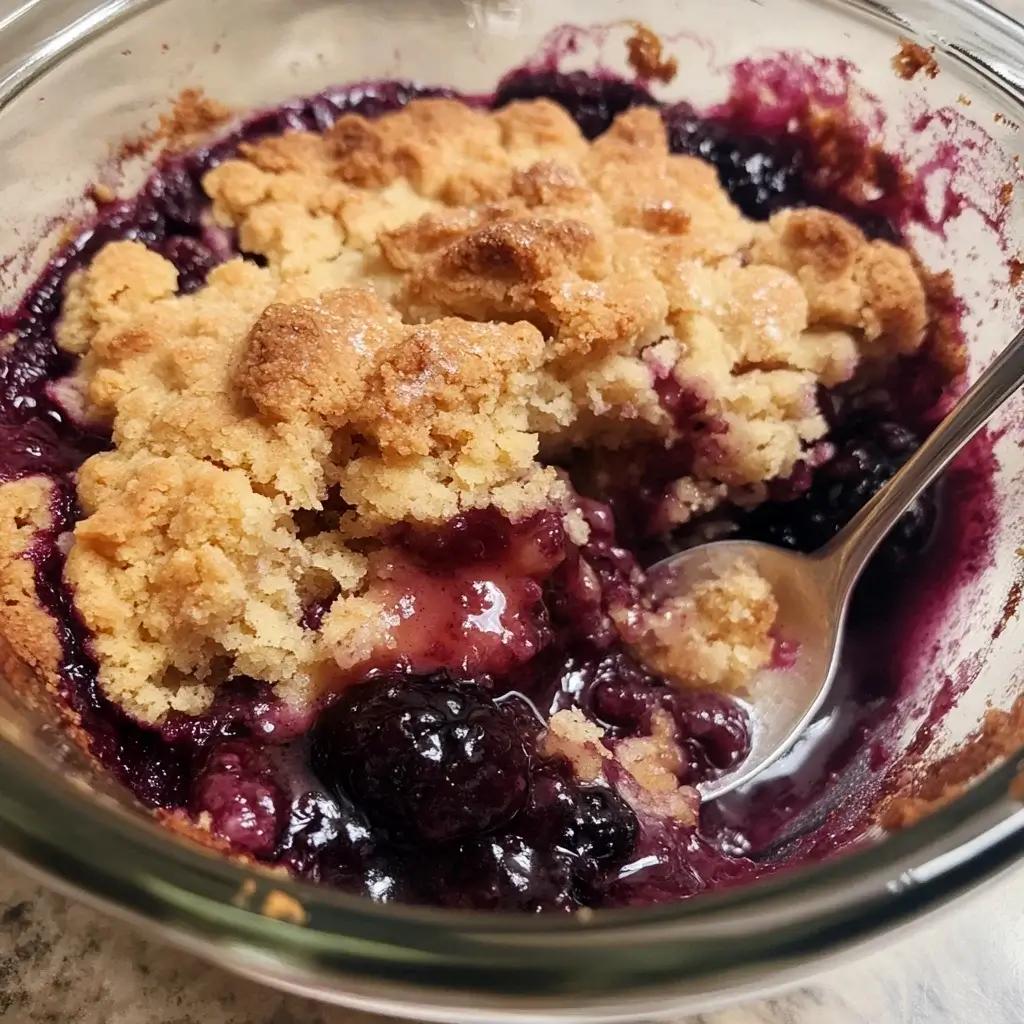
It was one of those Tuesday nights – the kind where dinner felt like a monumental effort, and the thought of baking a proper dessert seemed downright impossible. Yet, the craving for something sweet, warm, and comforting lingered. My kids were lobbying hard for anything with berries, and frankly, so was I. Rifling through the freezer, I found a bag of mixed berries, a remnant from a summer smoothie kick. Then, a lightbulb moment: the microwave. Could I possibly whip up a decent berry cobbler in the microwave? Skepticism warred with desperation. I remembered a basic formula I’d seen ages ago and decided to give it a shot, tweaking it based on what I had. The result? Astonishingly good. In less than 15 minutes from start to finish, we were digging into individual bowls of bubbling, sweet berries topped with a soft, cakey biscuit crust. The kids, initially dubious about a “nuked” dessert, were instant converts. It wasn’t just edible; it was genuinely delicious – the perfect answer to a weeknight sweet tooth emergency. This Microwave Berry Cobbler has since become a staple in our house for its sheer speed and surprisingly satisfying results. It proves that sometimes, the quickest path can lead to unexpectedly delightful destinations, especially when berries and a warm topping are involved.
Ingredients
Here’s what you’ll need to whip up this speedy dessert. The ingredients are simple and likely ones you already have on hand, especially if you keep frozen berries stocked!
For the Berry Filling:
- 2 cups Mixed Berries (Fresh or Frozen): The star of the show! Use any combination you like – strawberries, blueberries, raspberries, blackberries. If using frozen, no need to thaw completely, just rinse slightly.
- 2-4 tablespoons Granulated Sugar: Adjust based on the sweetness of your berries and your personal preference. Start with less; you can always add more sweetness with toppings.
- 1 tablespoon Cornstarch (or All-Purpose Flour): This is crucial for thickening the berry juices as they cook, preventing a watery filling.
- 1 teaspoon Lemon Juice (Optional, but Recommended): Brightens the flavour of the berries and balances the sweetness.
- Pinch of Salt: Enhances all the other flavours.
For the Cobbler Topping:
- ½ cup All-Purpose Flour: The structural base of our quick biscuit-style topping.
- ¼ cup Granulated Sugar: Provides sweetness to the topping, balancing the tartness of the berries.
- 1 teaspoon Baking Powder: The leavening agent that gives the topping its light, slightly cakey texture. Make sure it’s fresh for the best rise.
- Pinch of Salt: Balances the sweetness in the topping.
- ¼ cup Milk (Any Kind): Adds moisture and helps bring the dough together. Dairy or non-dairy milk works fine.
- 2 tablespoons Unsalted Butter, Melted: Adds richness, flavour, and tenderness to the topping.
Instructions
Follow these simple steps to create your delicious Microwave Berry Cobbler in minutes. The process is incredibly straightforward!
- Prepare the Berry Filling: In a microwave-safe bowl or individual ramekins (ensure they are deep enough to prevent bubbling over), combine the mixed berries, 2-4 tablespoons of granulated sugar (adjust to taste), cornstarch (or flour), optional lemon juice, and a pinch of salt. Gently stir everything together until the berries are evenly coated. If using larger berries like strawberries, consider halving or quartering them for more even cooking.
- Microwave the Filling (First Cook): Place the bowl or ramekins containing the berry mixture into the microwave. Cook on HIGH power for 2-3 minutes. The exact time will depend on your microwave’s wattage and whether you’re using fresh or frozen berries. The goal here is to slightly heat the berries and activate the cornstarch, starting the thickening process. You should see the mixture starting to bubble slightly around the edges. Carefully remove from the microwave (it will be hot!).
- Prepare the Cobbler Topping: While the berries are having their first cook (or just after), quickly mix the topping. In a separate small bowl, whisk together the all-purpose flour, ¼ cup granulated sugar, baking powder, and a pinch of salt. Ensure there are no lumps, especially from the baking powder.
- Add Wet Ingredients to Topping: Pour the melted butter and milk into the dry topping ingredients. Stir gently with a fork or small spatula just until combined. Be careful not to overmix; a few lumps are perfectly okay. Overmixing can result in a tough topping. The batter should be thick but scoopable.
- Assemble the Cobbler: Give the berry mixture in the microwave-safe dish(es) another quick stir. Drop spoonfuls of the cobbler topping batter evenly over the hot berry mixture. Don’t worry about covering every single bit of the berries; gaps are good and allow steam to escape, plus they look rustic and inviting. Spread it slightly if needed, but avoid pressing it down into the berries too much.
- Microwave the Cobbler (Second Cook): Place the assembled cobbler back into the microwave. Cook on HIGH power for another 2-4 minutes. The cooking time varies significantly based on your microwave (wattage) and the size/depth of your dish.
- Check for Doneness: The cobbler is done when the topping looks cooked through (no longer wet or doughy) and a toothpick inserted into the center of the topping comes out clean or with moist crumbs attached (not wet batter). The berry filling should be bubbly and thickened around the edges. If the topping still looks wet in the center, continue microwaving in 30-second increments, checking each time. Be cautious not to overcook, as the topping can become tough.
- Rest Before Serving: Carefully remove the cobbler from the microwave using oven mitts – the dish and the contents will be extremely hot! Let the cobbler rest for at least 5 minutes before serving. This allows the filling to thicken further as it cools slightly and prevents burnt tongues.
Nutrition Facts
Please note that these values are estimates and can vary based on specific ingredients used (like the type of berries, sugar quantity, and type of milk). This recipe typically makes 2-4 servings depending on portion size.
- Servings: 2-4 servings
- Calories per Serving (Approximate, assuming 4 servings): 250-350 kcal. A relatively moderate calorie count for a satisfying dessert, primarily influenced by sugar and butter content.
- Carbohydrates: Primarily from the berries, sugar, and flour. Berries also contribute dietary fiber. Provides the main source of energy in this dessert.
- Sugar: Comes from both the added granulated sugar and the natural sugars in the berries. The amount can be controlled by adjusting the added sugar.
- Fat: Mainly derived from the melted butter in the topping. Provides richness and contributes to the tender texture of the topping.
- Fiber: Contributed by the berries. Important for digestive health. The amount will vary depending on the types of berries used (raspberries and blackberries are generally higher in fiber).
Preparation Time
This recipe truly shines in its speed, making it perfect for last-minute cravings or busy schedules.
- Prep Time: Approximately 5-7 minutes. This includes gathering ingredients, mixing the filling, and preparing the topping batter.
- Cook Time: Approximately 4-7 minutes total microwave time (split into two cooking phases). This can vary based on microwave wattage and dish size.
- Total Time: Approximately 10-15 minutes from start to finish, plus a crucial 5 minutes resting time. It’s genuinely one of the fastest ways to get a warm, homemade fruit dessert on the table!
How to Serve
This Microwave Berry Cobbler is delicious on its own, straight from the microwave (after resting!), but adding a simple topping elevates it from a quick fix to a truly special treat. Serve it warm for the best experience. Here are some serving suggestions:
- Classic Comfort:
- Serve warm portions in bowls.
- Top with a generous scoop of vanilla bean ice cream. The contrast between the warm, bubbly cobbler and the cold, creamy ice cream is unbeatable.
- Creamy Dreamy:
- Dollop with freshly whipped cream (sweetened or unsweetened). Its lightness complements the rich berries and soft topping beautifully.
- A drizzle of heavy cream or half-and-half straight from the carton also adds simple richness.
- Tangy Twist:
- Serve with a spoonful of plain or vanilla Greek yogurt for a tangy counterpoint that balances the sweetness.
- A dollop of crème fraîche or sour cream can also provide a pleasant tang.
- Simple & Elegant:
- Dust lightly with powdered sugar just before serving for a pretty finish.
- Sprinkle with a little cinnamon or nutmeg for extra warmth.
- Extra Indulgence:
- Drizzle with a warm custard (crème anglaise) for a truly decadent experience.
- A spoonful of lemon curd alongside can enhance the berry flavours.
- Presentation:
- If made in individual ramekins, serve directly in them placed on small plates (to catch drips).
- If made in a larger bowl, scoop portions into individual dessert bowls.
Additional Tips
Make your Microwave Berry Cobbler even better with these helpful tips and variations:
- Berry Variations: Don’t limit yourself to mixed berries! This recipe works wonderfully with just blueberries, raspberries, blackberries, or even pitted cherries or sliced peaches/nectarines (adjust sugar accordingly). Using a single type of berry can create a more intense, focused flavour.
- Spice It Up: Add a pinch of cinnamon, nutmeg, cardamom, or even a tiny bit of ginger to the berry filling or the topping mixture for an extra layer of warmth and complexity. Start with ¼ teaspoon and adjust to your preference. A hint of orange or lemon zest in the topping is also delicious.
- Know Your Microwave: Microwave wattages vary significantly (usually 700W to 1200W). Higher wattage microwaves will cook faster. If you know your microwave is powerful, start checking for doneness on the lower end of the suggested cooking times. If it’s less powerful, you may need slightly longer. Cooking in 30-second increments towards the end is key.
- Choose the Right Dish: Use microwave-safe glass or ceramic dishes. Ensure they are deep enough to allow the berries to bubble without spilling over. Individual ramekins (around 6-8 oz) work perfectly for single servings and help control cooking time. A small (4-6 cup) microwave-safe bowl works for a larger batch. Avoid metal or dishes with metallic trim.
- Frozen vs. Fresh Berries: Both work well. If using frozen berries, you might need an extra 30-60 seconds on the initial cook time for the filling. There’s usually no need to thaw them completely; a quick rinse is sufficient. Frozen berries might release slightly more liquid, making the cornstarch even more important.
- Don’t Overmix the Topping: Stir the topping batter just until the dry and wet ingredients are combined. Overmixing develops the gluten in the flour, leading to a tougher, chewier topping instead of a tender, cakey one. Lumps are fine!
- Prevent a Runny Filling: Ensure you use the cornstarch or flour in the filling – it’s essential for thickening the juices released by the berries as they cook. Also, the resting time after cooking allows the filling to set and thicken further. If it still seems too thin, you might need slightly more cornstarch next time, especially if using very juicy berries.
- Add Texture (Post-Cooking): While the microwave topping is soft (it doesn’t crisp like an oven-baked cobbler), you can add texture after cooking. Sprinkle some toasted chopped nuts (pecans, walnuts, almonds), granola, or even crushed shortbread cookies over the top just before serving for a delightful crunch.
FAQ Section
Here are answers to some frequently asked questions about making Microwave Berry Cobbler:
- Q: Can I use frozen berries instead of fresh?
- A: Absolutely! Frozen berries work perfectly in this recipe. You don’t even need to thaw them completely. Just give them a quick rinse under cold water. You might need to add about 30-60 seconds to the initial cooking time for the filling, as the frozen berries will take slightly longer to heat through and start releasing their juices. The cornstarch is key here to thicken any extra liquid.
- Q: My cobbler topping seems dense or tough. What went wrong?
- A: The most common reason for a tough topping is overmixing the batter. When you combine the wet and dry ingredients for the topping, stir just until they come together. A few lumps are perfectly fine. Overmixing develops the gluten in the flour, resulting in a chewy texture instead of a tender one. Also, ensure your baking powder is fresh, as old baking powder won’t provide enough lift. Overcooking can also make the topping tough.
- Q: Can I make this recipe gluten-free?
- A: Yes, you likely can. Substitute the all-purpose flour in the topping with a good quality measure-for-measure gluten-free flour blend (one that contains xanthan gum). The texture might be slightly different from the original, potentially a bit denser or crumblier depending on the blend used, but it should still be delicious. Ensure your baking powder is also certified gluten-free if needed. Cornstarch used for thickening is naturally gluten-free.
- Q: Can I double the recipe?
- A: You can double the ingredients, but cooking it all in one large bowl in the microwave might lead to uneven cooking. Microwaves cook from the outside in, so a larger volume takes significantly longer, and the edges might overcook before the center is done. It’s generally better to make two separate batches or cook the doubled recipe in two medium-sized microwave-safe bowls simultaneously (if your microwave space allows) or sequentially. You will need to adjust cooking times upwards and monitor carefully. Cooking in individual ramekins is often the most reliable method for consistent results, even when scaling up.
- Q: Why is my berry filling watery?
- A: There are a few potential reasons. Firstly, ensure you added the cornstarch (or flour) – it’s essential for thickening the berry juices. Secondly, some berries are naturally juicier than others, or frozen berries might release more liquid. You might need to slightly increase the cornstarch next time (try 1.5 tablespoons). Thirdly, the cobbler needs the 5-minute resting time after cooking for the filling to fully thicken as it cools slightly. Finally, ensure you cooked the filling long enough in the first step to activate the thickener.
- Q: Can I make this ahead of time?
- A: This Microwave Berry Cobbler is definitely best enjoyed fresh and warm, shortly after cooking. The topping is softest and the berries are perfectly bubbly then. While you can store leftovers covered in the refrigerator for a day or two, the topping will absorb moisture from the filling and can become soggy when reheated. Reheating gently in the microwave is possible, but the texture won’t be quite the same as freshly made. Given it only takes about 15 minutes to make, preparing it fresh is highly recommended.
- Q: Can I use sugar substitutes?
- A: Yes, you can experiment with sugar substitutes like erythritol, xylitol (caution: toxic to dogs), or stevia blends. Use a substitute that measures cup-for-cup like sugar for the easiest conversion in both the filling and the topping. Be mindful that the taste and potentially the texture might differ slightly. Also, some sugar substitutes might not aid in the thickening of the berry filling quite as well as granulated sugar does alongside cornstarch, but the cornstarch should still do the primary job. Adjust amounts based on the sweetness level of your chosen substitute.
- Q: What kind of dishes are best for microwave cobbler?
- A: Always use dishes explicitly labeled as microwave-safe. Glass (like Pyrex) or ceramic bowls and ramekins are ideal. Choose dishes that are deep enough to prevent the berry filling from bubbling over the sides during cooking. Individual ramekins (6-8 ounce capacity) are excellent for single servings and promote even cooking. If making a larger batch, a round or oval dish often cooks more evenly in a microwave than a square or rectangular one (which can cause corners to overcook). Avoid anything with metal components or trim.

Microwave Berry Cobbler
Ingredients
Here’s what you’ll need to whip up this speedy dessert. The ingredients are simple and likely ones you already have on hand, especially if you keep frozen berries stocked!
For the Berry Filling:
- 2 cups Mixed Berries (Fresh or Frozen): The star of the show! Use any combination you like – strawberries, blueberries, raspberries, blackberries. If using frozen, no need to thaw completely, just rinse slightly.
- 2–4 tablespoons Granulated Sugar: Adjust based on the sweetness of your berries and your personal preference. Start with less; you can always add more sweetness with toppings.
- 1 tablespoon Cornstarch (or All-Purpose Flour): This is crucial for thickening the berry juices as they cook, preventing a watery filling.
- 1 teaspoon Lemon Juice (Optional, but Recommended): Brightens the flavour of the berries and balances the sweetness.
- Pinch of Salt: Enhances all the other flavours.
For the Cobbler Topping:
- ½ cup All-Purpose Flour: The structural base of our quick biscuit-style topping.
- ¼ cup Granulated Sugar: Provides sweetness to the topping, balancing the tartness of the berries.
- 1 teaspoon Baking Powder: The leavening agent that gives the topping its light, slightly cakey texture. Make sure it’s fresh for the best rise.
- Pinch of Salt: Balances the sweetness in the topping.
- ¼ cup Milk (Any Kind): Adds moisture and helps bring the dough together. Dairy or non-dairy milk works fine.
- 2 tablespoons Unsalted Butter, Melted: Adds richness, flavour, and tenderness to the topping.
Instructions
Follow these simple steps to create your delicious Microwave Berry Cobbler in minutes. The process is incredibly straightforward!
- Prepare the Berry Filling: In a microwave-safe bowl or individual ramekins (ensure they are deep enough to prevent bubbling over), combine the mixed berries, 2-4 tablespoons of granulated sugar (adjust to taste), cornstarch (or flour), optional lemon juice, and a pinch of salt. Gently stir everything together until the berries are evenly coated. If using larger berries like strawberries, consider halving or quartering them for more even cooking.
- Microwave the Filling (First Cook): Place the bowl or ramekins containing the berry mixture into the microwave. Cook on HIGH power for 2-3 minutes. The exact time will depend on your microwave’s wattage and whether you’re using fresh or frozen berries. The goal here is to slightly heat the berries and activate the cornstarch, starting the thickening process. You should see the mixture starting to bubble slightly around the edges. Carefully remove from the microwave (it will be hot!).
- Prepare the Cobbler Topping: While the berries are having their first cook (or just after), quickly mix the topping. In a separate small bowl, whisk together the all-purpose flour, ¼ cup granulated sugar, baking powder, and a pinch of salt. Ensure there are no lumps, especially from the baking powder.
- Add Wet Ingredients to Topping: Pour the melted butter and milk into the dry topping ingredients. Stir gently with a fork or small spatula just until combined. Be careful not to overmix; a few lumps are perfectly okay. Overmixing can result in a tough topping. The batter should be thick but scoopable.
- Assemble the Cobbler: Give the berry mixture in the microwave-safe dish(es) another quick stir. Drop spoonfuls of the cobbler topping batter evenly over the hot berry mixture. Don’t worry about covering every single bit of the berries; gaps are good and allow steam to escape, plus they look rustic and inviting. Spread it slightly if needed, but avoid pressing it down into the berries too much.
- Microwave the Cobbler (Second Cook): Place the assembled cobbler back into the microwave. Cook on HIGH power for another 2-4 minutes. The cooking time varies significantly based on your microwave (wattage) and the size/depth of your dish.
- Check for Doneness: The cobbler is done when the topping looks cooked through (no longer wet or doughy) and a toothpick inserted into the center of the topping comes out clean or with moist crumbs attached (not wet batter). The berry filling should be bubbly and thickened around the edges. If the topping still looks wet in the center, continue microwaving in 30-second increments, checking each time. Be cautious not to overcook, as the topping can become tough.
- Rest Before Serving: Carefully remove the cobbler from the microwave using oven mitts – the dish and the contents will be extremely hot! Let the cobbler rest for at least 5 minutes before serving. This allows the filling to thicken further as it cools slightly and prevents burnt tongues.
Nutrition
- Serving Size: one normal portion
- Calories: 350