In my house, the mornings can feel like a beautifully choreographed whirlwind of controlled chaos. Between packing lunches, finding missing shoes, and a final check for homework, the idea of a leisurely, home-cooked breakfast often feels like a distant dream. For the longest time, I was locked in a battle with pre-packaged snacks that were either loaded with unpronounceable ingredients or met with a lukewarm reception from my kids. I was on a mission to find the perfect grab-and-go solution: something quick, relatively wholesome, and, most importantly, something my family would actually be excited to eat. That’s when I stumbled upon the foundation of this no-bake cereal bar recipe. The first time I made them, the aroma of melting peanut butter and honey filled the kitchen, and I had a feeling I was onto something special. I let my kids help press the mixture into the pan, their little hands patting down what would soon become their new favorite treat. The true test came the next morning. Instead of a groan, I was met with genuine delight. The bars were a resounding success—crunchy, chewy, sweet but not overly so, and satisfyingly filling. They have since become our household’s undisputed champion of snacks. They’re our emergency breakfast, our after-school energy boost, our road trip companion, and even a simple dessert. This recipe isn’t just about food; it’s about finding a simple, delicious solution that brings a little bit of ease and a lot of joy to our busy lives.
Ingredients
This recipe relies on a handful of pantry staples to create something truly magical. Each component plays a crucial role in achieving the perfect balance of texture and flavor, resulting in a bar that is both satisfying and incredibly simple to prepare.
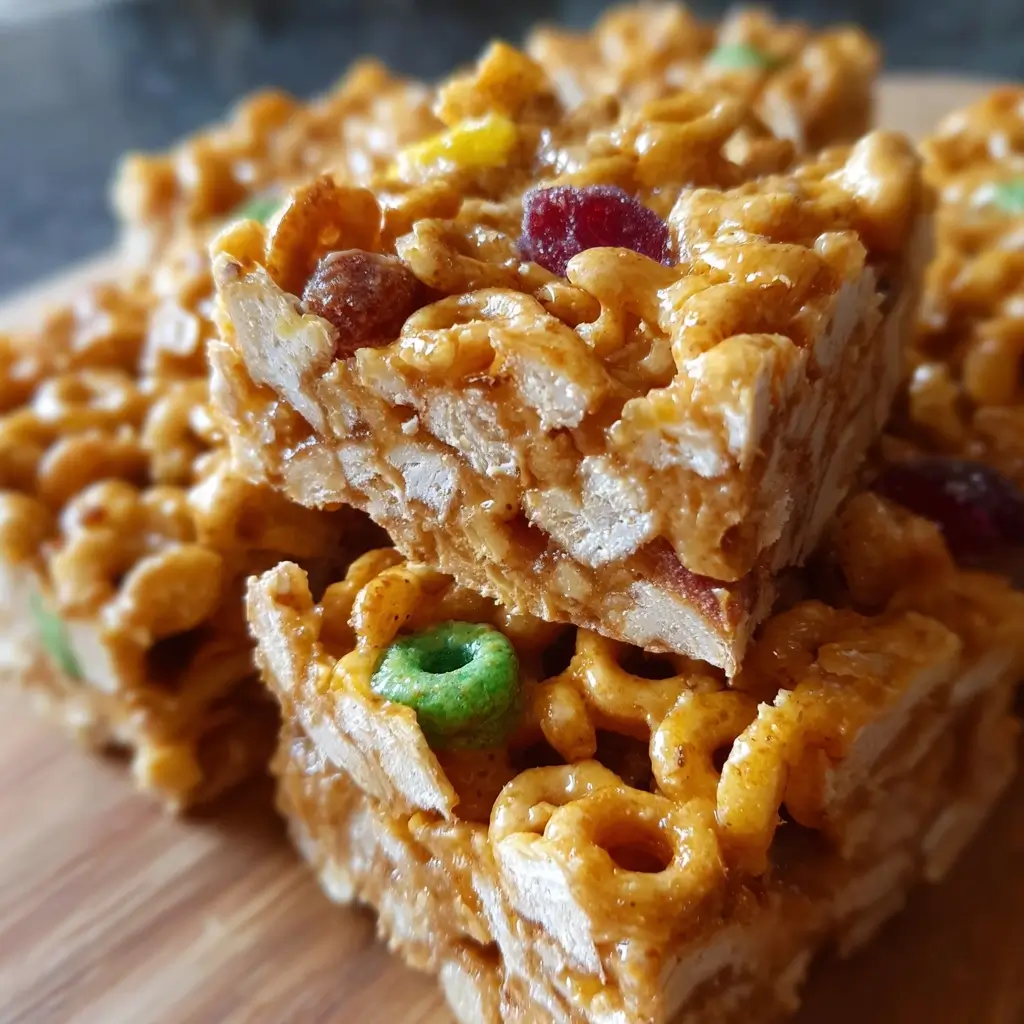
- 4 cups Toasted Oat Cereal (like Cheerios): This forms the crunchy, hearty base of the bars. The toasted oat flavor provides a wholesome, nutty foundation that pairs beautifully with the other ingredients. Using a simple, ring-shaped oat cereal ensures a light yet substantial texture.
- 1 cup Rolled Oats (Old-Fashioned): Adding rolled oats introduces a wonderful chewiness that contrasts with the crunch of the cereal. They also contribute fiber and substance, making the bars more filling and satisfying than if they were made with cereal alone.
- 1/2 cup Creamy Peanut Butter: This is the primary binding agent and the heart of the bars’ flavor. Use a standard commercial creamy peanut butter for the best results, as natural varieties can sometimes be too oily and may affect how the bars set. It provides healthy fats, protein, and that irresistible nutty taste.
- 1/2 cup Honey: Honey acts as both a sweetener and a crucial binder, creating the sticky “glue” that holds everything together. Its floral sweetness complements the peanut butter perfectly. For a vegan alternative, pure maple syrup can be used, though it may result in a slightly softer bar.
- 1/4 cup Coconut Oil (melted): This adds moisture and helps the bars solidify beautifully when chilled. It contributes to a smoother, richer mouthfeel and ensures the bars don’t become dry or crumbly. Unrefined coconut oil will add a subtle coconut flavor, while refined will be completely neutral.
- 1 teaspoon Vanilla Extract: A small amount of pure vanilla extract elevates all the other flavors in the recipe. It adds a layer of aromatic warmth and complexity that makes the bars taste more “finished” and homemade.
- 1/4 teaspoon Salt: Salt is a non-negotiable flavor enhancer. It balances the sweetness of the honey and brings out the nutty depth of the peanut butter and oats. A tiny pinch makes a world of difference.
- 1/2 cup Optional Mix-ins (e.g., mini chocolate chips, raisins, chopped nuts): This is where you can truly make the recipe your own. Mini chocolate chips will melt slightly into the warm mixture, creating decadent pockets of chocolate. Raisins add chewiness and natural sweetness, while chopped nuts like almonds or walnuts provide an extra layer of crunch and flavor.
Instructions
Follow these detailed steps carefully to ensure your no-bake cereal bars come out perfectly every time. The process is straightforward and quick, with the majority of the time being hands-off while the bars chill and set.
- Prepare the Pan: Begin by preparing your vessel. Take an 8×8 inch (or 9×9 inch) square baking pan and line it with parchment paper. The key here is to leave some overhang on at least two opposite sides. This parchment paper “sling” will be your best friend later, allowing you to lift the entire block of set bars out of the pan effortlessly for clean, easy cutting. Lightly grease the parchment paper and any exposed parts of the pan to prevent any possibility of sticking.
- Combine Dry Ingredients: In a large mixing bowl, combine the toasted oat cereal and the old-fashioned rolled oats. Use a spatula or a large spoon to toss them together, ensuring they are evenly distributed. This step ensures that every bite of your finished bars will have that perfect combination of crunch and chew. Set this bowl aside for now.
- Melt the Binders: In a medium-sized saucepan, combine the creamy peanut butter, honey, and melted coconut oil. Place the saucepan over medium-low heat. It is crucial to use gentle heat here. Your goal is to melt and combine, not to boil or scorch. Stir constantly with a heat-resistant spatula or wooden spoon. Continue stirring until the mixture is completely smooth, glossy, and well-combined. You should see no distinct lumps of peanut butter remaining. This process should only take a few minutes.
- Incorporate Final Flavors: Once the peanut butter mixture is perfectly smooth, remove the saucepan from the heat immediately. Stir in the vanilla extract and the salt. The vanilla will be very fragrant as it hits the warm mixture. Stir until these final flavorings are fully incorporated. This is the liquid “glue” for your bars.
- Combine Wet and Dry: Working quickly while the liquid mixture is still warm and fluid, pour it all over the cereal and oats in the large mixing bowl. Use a sturdy spatula to fold and mix everything together. Scrape the bottom and sides of the bowl to ensure every last piece of cereal and every oat is evenly coated in the sticky, sweet peanut butter mixture. The final mixture should be uniformly moist and very sticky.
- Add Your Mix-ins (Optional): If you are using optional mix-ins like mini chocolate chips, raisins, or chopped nuts, now is the time to add them. Fold them into the mixture until they are evenly distributed. If using chocolate chips, they may begin to melt slightly, which is perfectly fine and adds to the deliciousness.
- Press into the Pan: Transfer the entire sticky mixture into your prepared baking pan. This is the most critical step for ensuring your bars hold together. Using your spatula, spread the mixture out into an even layer, pushing it into the corners. Then, place a small piece of parchment or wax paper on top of the mixture (to prevent your hands from getting sticky) and use your hands or the bottom of a flat glass to press down very firmly and evenly across the entire surface. The firmer you press, the more compressed and solid your bars will be.
- Chill and Set: Place the pan, uncovered, into the refrigerator. Let the bars chill for at least 2 to 3 hours. This chilling time is essential; it allows the coconut oil and honey to solidify, firming up the bars and binding all the ingredients together. For even firmer bars, you can chill them for up to 4 hours or even overnight.
- Cut and Store: Once the bars are completely firm to the touch, use the parchment paper overhangs to lift the entire block out of the pan and onto a cutting board. Use a large, sharp knife to cut them into your desired size. You can make 12 larger bars or 16 smaller squares. Store the bars in an airtight container.
Nutrition Facts
These nutritional estimates are based on a batch of 16 servings without optional mix-ins.
- Servings: 16 bars
- Calories per serving: Approximately 180-210 kcal
- Protein (Approx. 5g): Sourced primarily from the peanut butter and oats, protein is essential for muscle repair and provides a feeling of fullness, helping to keep you satisfied between meals.
- Carbohydrates (Approx. 22g): The main energy source in these bars, carbohydrates from the oats, cereal, and honey provide the quick fuel your body and brain need to tackle the day.
- Healthy Fats (Approx. 10g): Coming from the peanut butter and coconut oil, these are primarily monounsaturated and polyunsaturated fats, which are beneficial for heart health and overall bodily function.
- Fiber (Approx. 2g): The rolled oats and whole-grain cereal contribute dietary fiber, which is crucial for digestive health and helps to regulate blood sugar levels.
- Sugar (Approx. 12g): The majority of the sugar content comes from the natural sugars in honey, which provides the sweetness and binding properties for the bars.
Preparation Time
The beauty of this recipe lies in its speed and simplicity. It’s designed for busy individuals who need a delicious, homemade snack without spending hours in the kitchen.
- Active Preparation Time (10-15 minutes): This is the hands-on time you’ll spend gathering ingredients, melting the binders, mixing everything together, and pressing it into the pan. It’s a quick and efficient process from start to finish.
- Chilling Time (2-3 hours): This is the completely hands-off portion of the recipe. While you go about your day, the refrigerator does all the hard work, transforming the sticky mixture into firm, sliceable bars. This passive time is what makes the recipe so manageable.
How to Serve
These no-bake cereal bars are incredibly versatile. They can be enjoyed in numerous ways, fitting seamlessly into any part of your day. Here are some ideas to get you started:
- The Quick and Easy Breakfast
- Grab a bar on your way out the door for a simple, satisfying breakfast that beats the drive-thru.
- Pair it with a piece of fruit, like a banana or an apple, for a more balanced and filling morning meal.
- Enjoy it alongside a hot cup of coffee or tea for a perfect start to your day.
- Serve with a glass of milk or a yogurt drink for an extra boost of protein and calcium.
- The Perfect Lunchbox Addition
- Tuck a bar into your child’s (or your own) lunchbox as a wholesome dessert or snack.
- Unlike many store-bought bars, you know exactly what’s in them.
- Cut them into smaller, bite-sized squares for little hands to enjoy easily.
- The After-School Energy Booster
- Have a plate of these ready for when the kids get home from school. They provide the perfect combination of carbohydrates for energy and protein for satiety to tide them over until dinner.
- Serve with a small bowl of fresh berries for added vitamins and a splash of color.
- A Simple, No-Fuss Dessert
- Crumble a bar over a scoop of vanilla ice cream or frozen yogurt for a delicious crunchy topping.
- Gently warm a bar in the microwave for 10 seconds and serve it with a drizzle of melted chocolate or caramel sauce for a more decadent treat.
- Serve alongside a bowl of Greek yogurt and honey for a healthier dessert option.
- Pre or Post-Workout Fuel
- The carbohydrates provide quick energy, making a bar an excellent pre-workout snack about 30-60 minutes before exercise.
- The combination of carbs and protein also makes it a great post-workout option to help replenish energy stores and aid in muscle recovery.
Additional Tips
To master this recipe and customize it to your liking, keep these eight essential tips in mind.
- Press with Purpose: Do not underestimate the importance of pressing the mixture into the pan. This compression is what helps the bars stick together and prevents them from being crumbly. Use the back of a sturdy spatula or cover the mixture with wax paper and press down firmly with your hands or the bottom of a measuring cup.
- The Parchment Sling is a Must: Leaving an overhang of parchment paper on two sides is a game-changer. It allows you to lift the entire block out of the pan at once, preventing you from having to dig out the first piece and ensuring perfectly square, clean-cut bars.
- Gentle Heat is Key: When melting the peanut butter, honey, and oil, use low to medium-low heat. Overheating or boiling the mixture can cause the sugars in the honey to crystalize, which can result in hard, rock-like bars instead of chewy, pleasant ones. Patience is your friend here.
- Don’t Skip the Chill: The chilling step is not optional. This is when the fats (from the coconut oil and peanut butter) solidify, which is the primary mechanism that firms up the bars. If you rush this step, your bars will be soft and may fall apart. For best results, let them chill for the full recommended time or even a bit longer.
- Master the Art of Customization: Think of this recipe as a template. You can swap the toasted oat cereal for other favorites like rice crispies, corn flakes, or a high-fiber bran cereal. You can exchange the peanut butter for almond butter, cashew butter, or even sunflower seed butter for a nut-free version. The mix-ins are endless: dried cranberries, shredded coconut, chia seeds, flax seeds, or different types of chocolate chips.
- For Cleaner Cuts: To get extra-clean, professional-looking slices, use a large, sharp chef’s knife. For an even cleaner cut, you can run the blade under hot water for a few seconds and then wipe it dry before each slice. The warm blade will glide through the chilled bars with ease.
- Smart Storage Solutions: These bars are best stored in an airtight container. They will stay fresh at room temperature for up to 3-4 days. For a firmer texture, or if your kitchen is warm, store them in the refrigerator, where they will last for up to two weeks. For long-term storage, they freeze exceptionally well.
- Freezing for the Future: To freeze, wrap individual bars tightly in plastic wrap and then place them in a freezer-safe zip-top bag or container. They can be frozen for up to 3 months. To enjoy, simply pull one out and let it thaw at room temperature for about 15-20 minutes. This is perfect for meal prepping snacks for the month ahead.
FAQ Section
Here are answers to some of the most common questions about making no-bake cereal bars.
1. Why are my cereal bars falling apart and not holding their shape?
This is the most common issue and usually comes down to one of three things. First, the ratio of wet-to-dry ingredients might be off. Ensure you’ve measured accurately. Second, you may not have pressed the mixture into the pan firmly enough. This compression is vital for creating a dense, solid bar. Third, you might not have chilled them for long enough. The chilling process solidifies the binders, so cutting them too soon will result in crumbly bars.
2. Can I make this recipe gluten-free?
Absolutely! To make these bars gluten-free, simply ensure that the two main grain ingredients are certified gluten-free. Use a certified gluten-free toasted oat cereal and certified gluten-free rolled oats. Most major brands now offer these options, which are processed in facilities that prevent cross-contamination with wheat. The other ingredients in the recipe are naturally gluten-free.
3. How can I make these cereal bars vegan?
This recipe is very easy to adapt for a vegan diet. The primary swap you need to make is the honey, as it is an animal byproduct. Replace the honey with an equal amount of pure maple syrup or brown rice syrup. Both work well as binders, though maple syrup can sometimes result in a slightly softer bar. Also, ensure your optional mix-ins, like chocolate chips, are dairy-free.
4. What other types of cereal can I use?
You have a lot of flexibility here! While toasted oat cereal provides a great base, you can experiment with many others. Puffed rice cereal (like Rice Krispies) will create a lighter, crispier bar. Corn flakes will add a distinct flavor and crunch. Even crushed bran flakes or a mix of your favorite cereals can work well. Just aim for a total of 4-5 cups of dry ingredients (cereal and oats combined).
5. How long will these no-bake cereal bars last?
Proper storage is key. In an airtight container at room temperature, they will stay fresh and delicious for about 3 to 4 days. If you prefer a firmer bar or if your home is warm, storing them in an airtight container in the refrigerator is the best option. In the fridge, they will last for up to 2 weeks.
6. Can I use a different nut butter or a nut-free alternative?
Yes, you can easily substitute the peanut butter. Almond butter and cashew butter are fantastic alternatives that work on a 1:1 ratio and will provide a slightly different nutty flavor profile. For a completely nut-free version, sunflower seed butter (sunbutter) or tahini are excellent choices. They provide the same binding properties and delicious taste.
7. My mixture seems too dry or too sticky. What did I do wrong?
This can sometimes happen due to slight variations in ingredients (e.g., how oily your peanut butter is). If the mixture seems too dry and isn’t coating all the cereal, add a bit more honey or melted coconut oil, one tablespoon at a time, until it comes together. If the mixture seems overly wet or sticky, add a few more tablespoons of rolled oats to help absorb the excess moisture.
8. Can I double this recipe?
Yes, this recipe doubles beautifully. Simply double all the ingredients and use a larger 9×13 inch baking pan. The preparation and chilling instructions remain the same. This is a great option if you’re making snacks for a larger family, a party, or want to stock up your freezer.

No-Bake Cereal Bars Recipe
Ingredients
This recipe relies on a handful of pantry staples to create something truly magical. Each component plays a crucial role in achieving the perfect balance of texture and flavor, resulting in a bar that is both satisfying and incredibly simple to prepare.
- 4 cups Toasted Oat Cereal (like Cheerios): This forms the crunchy, hearty base of the bars. The toasted oat flavor provides a wholesome, nutty foundation that pairs beautifully with the other ingredients. Using a simple, ring-shaped oat cereal ensures a light yet substantial texture.
- 1 cup Rolled Oats (Old-Fashioned): Adding rolled oats introduces a wonderful chewiness that contrasts with the crunch of the cereal. They also contribute fiber and substance, making the bars more filling and satisfying than if they were made with cereal alone.
- 1/2 cup Creamy Peanut Butter: This is the primary binding agent and the heart of the bars’ flavor. Use a standard commercial creamy peanut butter for the best results, as natural varieties can sometimes be too oily and may affect how the bars set. It provides healthy fats, protein, and that irresistible nutty taste.
- 1/2 cup Honey: Honey acts as both a sweetener and a crucial binder, creating the sticky “glue” that holds everything together. Its floral sweetness complements the peanut butter perfectly. For a vegan alternative, pure maple syrup can be used, though it may result in a slightly softer bar.
- 1/4 cup Coconut Oil (melted): This adds moisture and helps the bars solidify beautifully when chilled. It contributes to a smoother, richer mouthfeel and ensures the bars don’t become dry or crumbly. Unrefined coconut oil will add a subtle coconut flavor, while refined will be completely neutral.
- 1 teaspoon Vanilla Extract: A small amount of pure vanilla extract elevates all the other flavors in the recipe. It adds a layer of aromatic warmth and complexity that makes the bars taste more “finished” and homemade.
- 1/4 teaspoon Salt: Salt is a non-negotiable flavor enhancer. It balances the sweetness of the honey and brings out the nutty depth of the peanut butter and oats. A tiny pinch makes a world of difference.
- 1/2 cup Optional Mix-ins (e.g., mini chocolate chips, raisins, chopped nuts): This is where you can truly make the recipe your own. Mini chocolate chips will melt slightly into the warm mixture, creating decadent pockets of chocolate. Raisins add chewiness and natural sweetness, while chopped nuts like almonds or walnuts provide an extra layer of crunch and flavor.
Instructions
Follow these detailed steps carefully to ensure your no-bake cereal bars come out perfectly every time. The process is straightforward and quick, with the majority of the time being hands-off while the bars chill and set.
- Prepare the Pan: Begin by preparing your vessel. Take an 8×8 inch (or 9×9 inch) square baking pan and line it with parchment paper. The key here is to leave some overhang on at least two opposite sides. This parchment paper “sling” will be your best friend later, allowing you to lift the entire block of set bars out of the pan effortlessly for clean, easy cutting. Lightly grease the parchment paper and any exposed parts of the pan to prevent any possibility of sticking.
- Combine Dry Ingredients: In a large mixing bowl, combine the toasted oat cereal and the old-fashioned rolled oats. Use a spatula or a large spoon to toss them together, ensuring they are evenly distributed. This step ensures that every bite of your finished bars will have that perfect combination of crunch and chew. Set this bowl aside for now.
- Melt the Binders: In a medium-sized saucepan, combine the creamy peanut butter, honey, and melted coconut oil. Place the saucepan over medium-low heat. It is crucial to use gentle heat here. Your goal is to melt and combine, not to boil or scorch. Stir constantly with a heat-resistant spatula or wooden spoon. Continue stirring until the mixture is completely smooth, glossy, and well-combined. You should see no distinct lumps of peanut butter remaining. This process should only take a few minutes.
- Incorporate Final Flavors: Once the peanut butter mixture is perfectly smooth, remove the saucepan from the heat immediately. Stir in the vanilla extract and the salt. The vanilla will be very fragrant as it hits the warm mixture. Stir until these final flavorings are fully incorporated. This is the liquid “glue” for your bars.
- Combine Wet and Dry: Working quickly while the liquid mixture is still warm and fluid, pour it all over the cereal and oats in the large mixing bowl. Use a sturdy spatula to fold and mix everything together. Scrape the bottom and sides of the bowl to ensure every last piece of cereal and every oat is evenly coated in the sticky, sweet peanut butter mixture. The final mixture should be uniformly moist and very sticky.
- Add Your Mix-ins (Optional): If you are using optional mix-ins like mini chocolate chips, raisins, or chopped nuts, now is the time to add them. Fold them into the mixture until they are evenly distributed. If using chocolate chips, they may begin to melt slightly, which is perfectly fine and adds to the deliciousness.
- Press into the Pan: Transfer the entire sticky mixture into your prepared baking pan. This is the most critical step for ensuring your bars hold together. Using your spatula, spread the mixture out into an even layer, pushing it into the corners. Then, place a small piece of parchment or wax paper on top of the mixture (to prevent your hands from getting sticky) and use your hands or the bottom of a flat glass to press down very firmly and evenly across the entire surface. The firmer you press, the more compressed and solid your bars will be.
- Chill and Set: Place the pan, uncovered, into the refrigerator. Let the bars chill for at least 2 to 3 hours. This chilling time is essential; it allows the coconut oil and honey to solidify, firming up the bars and binding all the ingredients together. For even firmer bars, you can chill them for up to 4 hours or even overnight.
- Cut and Store: Once the bars are completely firm to the touch, use the parchment paper overhangs to lift the entire block out of the pan and onto a cutting board. Use a large, sharp knife to cut them into your desired size. You can make 12 larger bars or 16 smaller squares. Store the bars in an airtight container.
Nutrition
- Serving Size: one normal portion
- Calories: 210
- Sugar: 12g
- Fat: 10g
- Carbohydrates: 22g
- Fiber: 2g
- Protein: 5g