Of all the recipes that have become staples in my kitchen, this One-Pot Broccoli Cauliflower Curry holds a truly special place. I first made it on a frantic Tuesday evening when time was short, energy was low, and the collective family mood was teetering on the edge of “hangry.” I needed something fast, nutritious, and comforting, a culinary hug in a bowl. Pulling together some pantry staples and the beautiful heads of broccoli and cauliflower in the crisper, I wasn’t expecting magic, just sustenance. What emerged from that single pot thirty minutes later, however, was nothing short of a revelation. The aroma alone—a warm, fragrant cloud of ginger, garlic, and toasted spices—drew everyone to the kitchen. The first spoonful was met with wide eyes and appreciative murmurs. The creamy, rich coconut sauce perfectly coated the tender-crisp vegetables, creating a dish that was both incredibly satisfying and surprisingly light. It was an instant hit. Now, it’s our go-to meal for busy weeknights, a reliable crowd-pleaser when guests come over, and my personal favorite for a healthy lunch that feels indulgent. It proves that you don’t need a complicated process or a sink full of dishes to create a meal that is deeply flavorful, nourishing, and loved by all.
Ingredients
- 1 tablespoon Coconut Oil or Vegetable Oil: This is the base for sautéing our aromatics, helping to build the first layer of flavor.
- 1 large Yellow Onion, diced: Provides a sweet and savory foundation for the curry.
- 3 cloves Garlic, minced: Adds a pungent, aromatic depth that is essential to any good curry.
- 1 tablespoon Fresh Ginger, grated: Brings a warm, zesty spice that brightens the entire dish.
- 2 tablespoons Mild Curry Powder: The heart of our curry’s flavor. Use your favorite brand; a Madras or all-purpose blend works wonderfully.
- 1 teaspoon Turmeric Powder: Lends a beautiful golden color and an earthy, slightly bitter note that balances the other spices.
- 1/2 teaspoon Ground Cumin: Adds a warm, nutty, and slightly peppery flavor.
- 1/4 teaspoon Red Pepper Flakes (optional): For those who enjoy a gentle kick of heat. Adjust to your personal preference.
- 1 (13.5 oz / 400ml) can Full-Fat Coconut Milk: This is the secret to a luxuriously creamy and rich sauce. Do not substitute with light coconut milk for the best results.
- 1 cup Vegetable Broth or Water: Helps to thin the sauce to the perfect consistency and adds an extra layer of savory flavor.
- 1 medium head of Broccoli, cut into bite-sized florets: A powerhouse of nutrients that becomes perfectly tender-crisp in the curry.
- 1 medium head of Cauliflower, cut into bite-sized florets: Its mild, nutty flavor is a perfect canvas for the curry sauce, and it adds a wonderful texture.
- 1 (15 oz / 425g) can Chickpeas, rinsed and drained: An excellent source of plant-based protein and fiber, making the curry a complete and satisfying meal.
- 1 tablespoon Soy Sauce or Tamari: Adds a savory, umami depth that enhances all the other flavors.
- 1 tablespoon Lime Juice, freshly squeezed: A critical finishing touch that cuts through the richness and brightens the entire dish.
- Salt and Black Pepper to taste: To season and bring all the flavors into perfect harmony.
- Fresh Cilantro, chopped (for garnish): Adds a fresh, herbaceous finish.
- Toasted Cashews, chopped (for garnish): Provides a delightful crunch and nutty flavor.
Instructions
- Sauté the Aromatics: Place a large pot or Dutch oven over medium heat. Add the coconut oil and let it melt. Once shimmering, add the diced yellow onion and cook, stirring occasionally, until it softens and becomes translucent, about 5-7 minutes. Add the minced garlic and grated ginger, and continue to cook for another minute until fragrant. Be careful not to let the garlic burn.
- Bloom the Spices: Add the curry powder, turmeric powder, ground cumin, and optional red pepper flakes directly to the pot with the onions. Stir constantly for about 60 seconds. This step, known as “blooming,” toasts the spices, releasing their essential oils and creating a much deeper and more complex flavor base for your curry. The mixture will become incredibly aromatic.
- Create the Sauce Base: Pour in the full-fat coconut milk and vegetable broth, scraping up any browned bits from the bottom of the pot with your spoon—this is where a lot of flavor lives! Whisk everything together until the sauce is smooth and uniform in color.
- Simmer and Thicken: Bring the sauce to a gentle simmer. Add the soy sauce (or tamari), a pinch of salt, and a few cracks of black pepper. Reduce the heat to low, cover the pot, and let it simmer for 5-10 minutes. This allows the flavors to meld together and the sauce to thicken slightly.
- Cook the Vegetables: Add the broccoli and cauliflower florets to the simmering sauce. Stir gently to ensure they are all coated. Place the lid back on the pot and cook for 10-15 minutes, or until the vegetables are tender-crisp. You want them to be cooked through but still have a slight bite; avoid cooking them until they are mushy.
- Add Final Components: Once the vegetables have reached your desired tenderness, stir in the rinsed and drained chickpeas. Let them cook for another 2-3 minutes, just long enough to heat through.
- Finish and Adjust: Turn off the heat. Stir in the freshly squeezed lime juice. This final hit of acidity is crucial—it will brighten all the flavors and cut through the richness of the coconut milk. Taste the curry one last time and adjust the seasoning as needed. You may want to add more salt for flavor, more lime juice for brightness, or more red pepper flakes for heat.
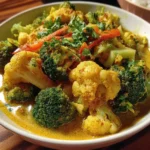
- Garnish and Serve: Ladle the hot curry into bowls. Garnish generously with fresh, chopped cilantro and toasted cashews for a wonderful textural contrast. Serve immediately and enjoy.
Nutrition Facts
- Servings: 4-6 servings
- Calories per serving: Approximately 380-450 kcal (This can vary based on serving size and specific ingredients used).
- Fiber: This dish is exceptionally high in dietary fiber, thanks to the broccoli, cauliflower, and chickpeas. Fiber is crucial for digestive health, helps you feel full and satisfied, and can aid in regulating blood sugar levels.
- Vitamin C: Broccoli and cauliflower are fantastic sources of Vitamin C, a powerful antioxidant that supports the immune system, promotes healthy skin, and aids in iron absorption.
- Healthy Fats: The full-fat coconut milk provides medium-chain triglycerides (MCTs), a type of saturated fat that is metabolized differently by the body. These fats contribute to the curry’s satisfying richness and help you absorb fat-soluble vitamins.
- Plant-Based Protein: With the inclusion of chickpeas, this curry offers a significant amount of plant-based protein, which is essential for muscle repair, growth, and overall bodily function, making it a well-rounded vegetarian meal.
- Micronutrients: This curry is a treasure trove of micronutrients from the spices and vegetables, including iron from chickpeas, potassium from coconut milk, and powerful anti-inflammatory compounds like curcumin from turmeric and gingerol from ginger.
Preparation Time
This one-pot wonder is designed for efficiency without sacrificing flavor. The total time from start to finish is approximately 35-40 minutes.
- Preparation Time (10-15 minutes): This includes washing and chopping the onion, garlic, ginger, and vegetables. To save time, you can buy pre-cut broccoli and cauliflower florets.
- Cooking Time (25 minutes): This is the active and simmering time on the stovetop. Because everything happens in one pot, cleanup is minimal, making this an ideal recipe for busy weeknights when you crave a wholesome, home-cooked meal without the fuss.
How to Serve
This Broccoli Cauliflower Curry is wonderfully versatile and can be served in numerous ways to suit your preference or occasion. Think of the curry as your canvas and the accompaniments as your paints.
- Classic and Comforting:
- Steamed Rice: The most traditional pairing. Fluffy Basmati or aromatic Jasmine rice are perfect for soaking up every last drop of the creamy sauce.
- Warm Naan Bread: Soft, pillowy naan bread (garlic or plain) is essential for scooping and dipping. There’s nothing more satisfying than tearing off a piece and mopping your bowl clean.
- Healthy and Hearty Grain Pairings:
- Quinoa: For an extra boost of protein and a slightly nutty flavor.
- Brown Rice: A whole-grain option that adds a chewier texture and more fiber.
- Couscous: A quick-cooking alternative that is light and fluffy.
- Create a “Curry Topping Bar” for a Fun, Interactive Meal:
- Freshness & Herbs: A small bowl of extra chopped cilantro or mint.
- Acidity: Wedges of lime or lemon for squeezing over the top.
- Crunch Factor:
- Toasted nuts like cashews, slivered almonds, or peanuts.
- Toasted seeds such as pumpkin seeds or sesame seeds.
- Crispy fried onions or shallots (store-bought or homemade).
- Creamy Coolness:
- A dollop of plain yogurt (dairy or plant-based) to provide a cool, tangy contrast.
- A swirl of extra coconut cream for added richness.
- A Touch of Sweetness:
- A spoonful of mango chutney on the side.
- Extra Heat:
- Thinly sliced red chilies or jalapeños.
- A drizzle of your favorite chili oil or Sriracha.
- Serve with Cooling Side Dishes:
- Cucumber Raita: A simple yogurt dish with grated cucumber, mint, and a pinch of cumin. It’s the perfect cooling counterpart to the warm spices of the curry.
- A Simple Green Salad: A side salad with a light vinaigrette can provide a refreshing contrast.
Additional tips
- Don’t Overcook the Vegetables: The magic of this dish lies in the texture contrast between the creamy sauce and the tender-crisp vegetables. Keep a close eye on the broccoli and cauliflower. Start checking for doneness after 10 minutes. They should be easily pierced with a fork but still retain a slight bite. Mushy vegetables will make the curry less appealing.
- Master the “Bloom”: Do not skip the step of toasting the spices in oil with the onions. This technique, called blooming, is fundamental to building deep flavor in Indian-inspired dishes. It unlocks the fat-soluble compounds in the spices, making the curry significantly more fragrant and richly flavored than if you were to just add the spices to the liquid.
- Protein Variations and Boosts: While chickpeas are fantastic, feel free to customize the protein.
- Lentils: Add 1/2 cup of red lentils along with the vegetable broth; they will cook down and help thicken the sauce beautifully.
- Tofu: Use firm or extra-firm tofu. Press it well, cube it, and either pan-fry it separately until golden before adding it at the end, or simply add the raw cubes with the chickpeas to warm through.
- Paneer: For a vegetarian (not vegan) option, cube paneer and pan-fry it until golden, then stir it in during the last few minutes of cooking.
- Vegetable Swaps and Additions: This recipe is a great way to clean out your vegetable drawer. Feel free to add or substitute with other vegetables.
- Hardy Veggies: Diced sweet potatoes, carrots, or butternut squash can be added with the onions to give them a head start on cooking.
- Softer Veggies: Bell peppers (any color), zucchini, or green beans can be added along with the broccoli and cauliflower.
- Leafy Greens: Stir in a few large handfuls of fresh spinach or kale at the very end. They will wilt into the hot curry in just a minute or two.
- Achieving the Perfect Creaminess: For the richest, most luscious sauce, always use full-fat, canned coconut milk. The kind in a carton is too thin and will result in a watery curry. If you want an even more decadent dish, stir in a few tablespoons of coconut cream at the end of cooking.
- Meal Prep and Freezing Instructions: This curry is an excellent candidate for meal prep. Store it in an airtight container in the refrigerator for up to 4 days; the flavors will actually deepen overnight. It also freezes well. Let it cool completely, then store it in a freezer-safe container for up to 3 months. Thaw it overnight in the refrigerator and gently reheat it on the stovetop. Note that the vegetables may be slightly softer after freezing and reheating.
- Control the Spice Level: This recipe is easily adaptable to your heat preference. For a very mild curry, omit the red pepper flakes entirely and ensure you are using a mild curry powder. For a medium heat, use the recommended amount or a hot curry powder. For a fiery curry, increase the red pepper flakes, add a pinch of cayenne pepper, or stir in a finely chopped chili with the garlic and ginger.
- The Importance of the Final Taste Test: The final step—tasting and adjusting—is what separates a good curry from a great one. Don’t be shy. Does it need more salt to make the flavors pop? More lime juice to brighten it up? A touch more sweetness (a pinch of sugar or a drop of maple syrup can work wonders)? A bit more heat? Trust your palate and adjust accordingly.
FAQ section
1. Can I make this curry vegan?
Yes, absolutely! This recipe is inherently vegan as written, provided you use coconut oil or another vegetable oil. Just be sure that your vegetable broth and curry powder are certified vegan and do not contain any hidden animal-derived ingredients.
2. Can I use frozen broccoli and cauliflower instead of fresh?
Yes, you can use frozen vegetables, which makes this recipe even more convenient. There’s no need to thaw them first. Simply add the frozen florets directly to the simmering sauce. You may need to add 5-7 minutes to the cooking time to ensure they cook through properly. They will release some extra water, so you might want to let the curry simmer for a few extra minutes uncovered if you prefer a thicker sauce.
3. My curry turned out too thin and watery. How can I fix it?
There are two easy ways to fix a thin curry. First, you can simply let it simmer uncovered for an additional 5-10 minutes. This allows excess liquid to evaporate and the sauce to reduce and thicken naturally. Second, for a quicker fix, you can create a cornstarch slurry. Mix 1 tablespoon of cornstarch with 2 tablespoons of cold water in a small bowl until smooth. Slowly pour the slurry into the simmering curry while stirring constantly. The sauce should thicken up within a minute.
4. What is the best kind of curry powder to use for this recipe?
The “best” curry powder really comes down to personal taste. A standard “mild” or “medium” yellow curry powder from the supermarket is a great all-purpose choice. For a slightly spicier and more complex flavor, look for Madras curry powder. If you’re feeling adventurous, you can even make your own blend by combining spices like coriander, cumin, turmeric, fenugreek, and chili powder.
5. Can I make this recipe without coconut milk?
While coconut milk provides the signature creaminess, you can make substitutions if needed. For a different kind of creamy texture, you could blend 1 cup of raw, soaked cashews with 1 cup of water until completely smooth to create a cashew cream. For a non-vegan alternative, you could use heavy cream or evaporated milk, though this will significantly change the flavor profile. If you want a much lighter, broth-based curry, you can simply substitute the coconut milk with more vegetable broth.
6. How long will the Broccoli Cauliflower Curry last in the refrigerator?
When stored properly in an airtight container, this curry will last for 3 to 4 days in the refrigerator. In fact, many people find that the flavor is even better on the second day as the spices have more time to meld and deepen.
7. Is this recipe gluten-free?
Yes, this recipe is naturally gluten-free as long as you make two simple checks. Ensure you use tamari instead of soy sauce (as some soy sauce brands contain wheat) or use a certified gluten-free soy sauce. Additionally, double-check that your brand of curry powder and vegetable broth are certified gluten-free, as some can contain gluten-based anti-caking agents or flavorings.
8. What can I do if I don’t have fresh ginger or garlic?
Fresh aromatics are always best for flavor, but you can certainly use dried, powdered versions in a pinch. The general rule of thumb for substitution is 1/4 teaspoon of dried powder for every 1 teaspoon of fresh, minced ingredient. So, for this recipe, you would use approximately 3/4 teaspoon of garlic powder and 1 teaspoon of ground ginger. Add them along with the other dried spices to allow them to “bloom” in the oil.
One-Pot Broccoli Cauliflower Curry
Ingredients
- 1 tablespoon Coconut Oil or Vegetable Oil: This is the base for sautéing our aromatics, helping to build the first layer of flavor.
- 1 large Yellow Onion, diced: Provides a sweet and savory foundation for the curry.
- 3 cloves Garlic, minced: Adds a pungent, aromatic depth that is essential to any good curry.
- 1 tablespoon Fresh Ginger, grated: Brings a warm, zesty spice that brightens the entire dish.
- 2 tablespoons Mild Curry Powder: The heart of our curry’s flavor. Use your favorite brand; a Madras or all-purpose blend works wonderfully.
- 1 teaspoon Turmeric Powder: Lends a beautiful golden color and an earthy, slightly bitter note that balances the other spices.
- 1/2 teaspoon Ground Cumin: Adds a warm, nutty, and slightly peppery flavor.
- 1/4 teaspoon Red Pepper Flakes (optional): For those who enjoy a gentle kick of heat. Adjust to your personal preference.
- 1 (13.5 oz / 400ml) can Full-Fat Coconut Milk: This is the secret to a luxuriously creamy and rich sauce. Do not substitute with light coconut milk for the best results.
- 1 cup Vegetable Broth or Water: Helps to thin the sauce to the perfect consistency and adds an extra layer of savory flavor.
- 1 medium head of Broccoli, cut into bite-sized florets: A powerhouse of nutrients that becomes perfectly tender-crisp in the curry.
- 1 medium head of Cauliflower, cut into bite-sized florets: Its mild, nutty flavor is a perfect canvas for the curry sauce, and it adds a wonderful texture.
- 1 (15 oz / 425g) can Chickpeas, rinsed and drained: An excellent source of plant-based protein and fiber, making the curry a complete and satisfying meal.
- 1 tablespoon Soy Sauce or Tamari: Adds a savory, umami depth that enhances all the other flavors.
- 1 tablespoon Lime Juice, freshly squeezed: A critical finishing touch that cuts through the richness and brightens the entire dish.
- Salt and Black Pepper to taste: To season and bring all the flavors into perfect harmony.
- Fresh Cilantro, chopped (for garnish): Adds a fresh, herbaceous finish.
- Toasted Cashews, chopped (for garnish): Provides a delightful crunch and nutty flavor.
Instructions
- Sauté the Aromatics: Place a large pot or Dutch oven over medium heat. Add the coconut oil and let it melt. Once shimmering, add the diced yellow onion and cook, stirring occasionally, until it softens and becomes translucent, about 5-7 minutes. Add the minced garlic and grated ginger, and continue to cook for another minute until fragrant. Be careful not to let the garlic burn.
- Bloom the Spices: Add the curry powder, turmeric powder, ground cumin, and optional red pepper flakes directly to the pot with the onions. Stir constantly for about 60 seconds. This step, known as “blooming,” toasts the spices, releasing their essential oils and creating a much deeper and more complex flavor base for your curry. The mixture will become incredibly aromatic.
- Create the Sauce Base: Pour in the full-fat coconut milk and vegetable broth, scraping up any browned bits from the bottom of the pot with your spoon—this is where a lot of flavor lives! Whisk everything together until the sauce is smooth and uniform in color.
- Simmer and Thicken: Bring the sauce to a gentle simmer. Add the soy sauce (or tamari), a pinch of salt, and a few cracks of black pepper. Reduce the heat to low, cover the pot, and let it simmer for 5-10 minutes. This allows the flavors to meld together and the sauce to thicken slightly.
- Cook the Vegetables: Add the broccoli and cauliflower florets to the simmering sauce. Stir gently to ensure they are all coated. Place the lid back on the pot and cook for 10-15 minutes, or until the vegetables are tender-crisp. You want them to be cooked through but still have a slight bite; avoid cooking them until they are mushy.
- Add Final Components: Once the vegetables have reached your desired tenderness, stir in the rinsed and drained chickpeas. Let them cook for another 2-3 minutes, just long enough to heat through.
- Finish and Adjust: Turn off the heat. Stir in the freshly squeezed lime juice. This final hit of acidity is crucial—it will brighten all the flavors and cut through the richness of the coconut milk. Taste the curry one last time and adjust the seasoning as needed. You may want to add more salt for flavor, more lime juice for brightness, or more red pepper flakes for heat.
- Garnish and Serve: Ladle the hot curry into bowls. Garnish generously with fresh, chopped cilantro and toasted cashews for a wonderful textural contrast. Serve immediately and enjoy.
Nutrition
- Serving Size: one normal portion
- Calories: 450
