It’s a familiar scene in my house: the clock strikes six, the day’s chaos is winding down, and the dreaded question hangs in the air – “What’s for dinner?” I used to scramble for answers, often defaulting to the same old rotation. That was until the Roasted Bell Pepper and Bean Wrap entered our lives and completely changed our weeknight dinner game. The first time I made them, I was met with skepticism. My husband raised an eyebrow at the purely vegetarian filling, and the kids eyed the colorful peppers with suspicion. But then, the magic happened. The aroma of sweet, smoky roasted peppers and garlic filled the kitchen, and by the time I served the warm, perfectly rolled wraps, curiosity had replaced doubt. The first bite was a revelation. The tender-sweetness of the peppers, the hearty creaminess of the black beans, the zesty lime, and the subtle warmth of cumin all came together in a perfect harmony. My husband declared it a “keeper,” and the kids, after meticulously picking out a few pieces of onion, devoured theirs and asked for seconds. Now, this recipe is a celebrated staple, a go-to for a quick lunch, a satisfying dinner, or even a packed meal for a day out. It’s the meal that proved to my family that healthy, simple, and incredibly delicious can all exist in one perfect, handheld package.
Ingredients
- 3 Large Bell Peppers: A vibrant mix of red, yellow, and orange peppers is ideal, as they provide a beautiful sweetness when roasted.
- 1 Large Red Onion: This will be sliced and roasted alongside the peppers, contributing a deep, savory flavor that complements the sweetness.
- 2 Tablespoons Olive Oil: A good quality extra-virgin olive oil is used to coat the vegetables, helping them to roast perfectly and preventing them from sticking.
- 4 Cloves Garlic: Minced finely, the garlic adds a pungent, aromatic depth to the bean mixture.
- 1 Can (15-ounce) Black Beans: Rinsed and drained thoroughly, these beans form the hearty, protein-packed base of the wrap filling.
- 1 Teaspoon Ground Cumin: This warm, earthy spice is essential for giving the bean mixture its signature Southwestern-inspired flavor.
- 1/2 Teaspoon Smoked Paprika: Adds a lovely smoky dimension that echoes the flavor of the roasted peppers.
- 1/4 Teaspoon Chili Powder: For a gentle hint of warmth. You can adjust this to your personal preference for spice.
- 1/2 Lime: The juice of half a lime will be used to brighten up the bean mixture, adding a fresh, zesty kick.
- 1/4 Cup Fresh Cilantro: Chopped finely, cilantro adds a burst of fresh, herbaceous flavor that ties everything together.
- Salt and Black Pepper: To taste, for seasoning both the vegetables before roasting and the final bean mixture.
- 6-8 Large Flour Tortillas: Choose large, burrito-style tortillas that are soft and pliable, which will make rolling the wraps much easier.
- Optional Fillings: Shredded lettuce, diced tomatoes, avocado slices, shredded cheese (cheddar or Monterey Jack), or sour cream for added texture and flavor.
Instructions
- Prepare for Roasting: Begin by preheating your oven to 400°F (200°C). Line a large baking sheet with parchment paper for easy cleanup. This simple step prevents the vegetables from sticking and ensures they roast evenly.
- Slice the Vegetables: Wash and dry your bell peppers and red onion. Core the peppers and remove the seeds and white membranes. Slice the peppers and the red onion into long, thin strips, about 1/4-inch thick. Try to keep the slices relatively uniform in size to ensure they cook at the same rate.
- Roast the Vegetables: Place the sliced peppers and onions onto the prepared baking sheet. Drizzle them generously with the 2 tablespoons of olive oil, and season with a good pinch of salt and black pepper. Use your hands to toss everything together, making sure every vegetable slice is lightly coated in oil. Spread the vegetables out in a single, even layer. It’s important not to overcrowd the pan; use two pans if necessary. A single layer allows the vegetables to roast and caramelize rather than steam.
- Cooking the Vegetables: Place the baking sheet in the preheated oven and roast for 20-25 minutes. You’ll want to stir them halfway through the cooking time to promote even browning. The vegetables are done when they are tender, slightly shrunken, and have beautiful caramelized, browned edges. The natural sugars in the peppers and onions will have created a delicious sweetness.
- Prepare the Bean Mixture: While the vegetables are roasting, you can prepare the flavorful bean filling. In a medium-sized bowl, combine the rinsed and drained black beans, minced garlic, ground cumin, smoked paprika, and chili powder.
- Mash the Beans: Using a fork or a potato masher, gently mash about half of the beans. This technique is key to creating a creamy texture that helps hold the wrap together while still leaving some whole beans for a pleasant bite. Don’t over-mash; you want a rustic, varied texture.
- Add Final Flavors: Once the beans are partially mashed, stir in the juice from half a lime and the chopped fresh cilantro. Mix everything together until well combined. Give it a taste and add more salt, pepper, or lime juice if you feel it needs it. The lime juice will cut through the richness and add a wonderful freshness.
- Combine and Warm: Once the vegetables are finished roasting, remove them from the oven. Let them cool for just a minute or two before adding them to the bowl with the bean mixture. Gently fold the roasted peppers and onions into the beans until everything is evenly distributed.
- Warm the Tortillas: The secret to a perfect wrap that doesn’t crack or tear is a warm, pliable tortilla. You can warm your tortillas one at a time in a dry skillet over medium heat for about 15-20 seconds per side. Alternatively, wrap the stack of tortillas in a damp paper towel and microwave for 30-45 seconds until they are soft and steamy.
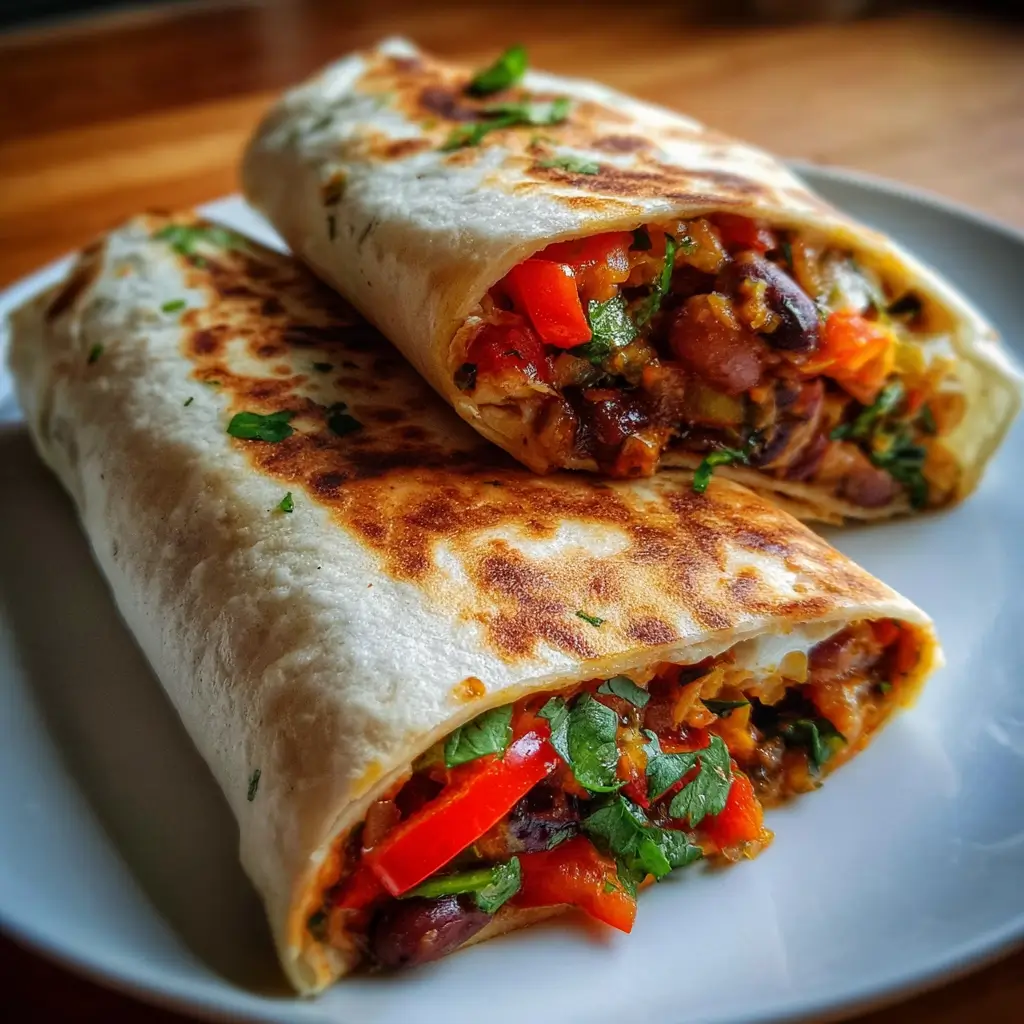
- Assemble the Wraps: Lay a warm tortilla on a flat surface. Spoon a generous amount of the roasted pepper and bean filling onto the center of the tortilla, arranging it in a line. Be careful not to overfill, as this will make rolling difficult. If using, add your desired optional fillings like shredded cheese, lettuce, or avocado slices on top of the bean mixture now.
- Roll the Wraps: To roll the wrap burrito-style, first fold in the two sides over the filling. Then, take the edge of the tortilla closest to you and pull it up and over the filling, tucking it in tightly. Continue to roll the tortilla away from you, keeping the roll snug, until you have a perfectly sealed wrap.
- Serve Immediately: Serve the wraps immediately while they are still warm for the best experience. You can also give them a final toast in a pan if you prefer a crispy exterior.
Nutrition Facts
- Servings: 6-8 Wraps
- Calories per Serving: Approximately 350-400 kcal (This can vary based on tortilla size and optional additions like cheese or sour cream).
- Fiber: This wrap is an excellent source of dietary fiber, primarily from the black beans and vegetables. Fiber is crucial for maintaining good digestive health, regulating blood sugar levels, and promoting a feeling of fullness, which can aid in weight management.
- Protein: A single serving provides a substantial amount of plant-based protein from the black beans. Protein is the building block for muscles, tissues, and enzymes in your body, and it helps keep you feeling satisfied and energized long after your meal.
- Vitamin C: Bell peppers, especially the red and yellow varieties, are packed with Vitamin C. This powerful antioxidant is essential for a healthy immune system, skin health, and the repair of all body tissues.
- Iron: Black beans are a good source of iron, a vital mineral that helps transport oxygen in your blood and is critical for preventing fatigue and maintaining overall energy levels.
- Complex Carbohydrates: The beans and whole-grain tortillas (if used) provide complex carbohydrates, which are digested slowly, offering a steady release of energy without the spike and crash associated with simple sugars.
Preparation Time
The total time to bring these delicious Roasted Bell Pepper and Bean Wraps to your table is approximately 45 minutes. This is broken down into about 15-20 minutes of active preparation time, which includes washing and slicing the vegetables and mixing the bean filling. The remaining 25-30 minutes is hands-off cooking time while the vegetables roast to perfection in the oven, giving you the perfect window to clean up or prepare any side dishes.
How to Serve
These wraps are wonderfully versatile and can be served in various ways to suit any meal or occasion. Here are some of our favorite ways to enjoy them:
- As a Complete Lunch or Dinner:
- Serve the wrap whole and warm, straight from the pan.
- Pair it with a side of Spanish or cilantro-lime rice to create a more substantial and filling meal.
- A simple side salad with a zesty vinaigrette provides a fresh, crisp contrast to the warm, savory wrap.
- With Dips and Sauces:
- Slice the wrap into 1-inch thick pinwheels for a fantastic appetizer or party food.
- Serve with a bowl of guacamole for dipping. The creamy avocado is a perfect partner to the smoky peppers.
- Offer a side of salsa or pico de gallo for a fresh, tangy kick.
- A simple avocado crema (avocado, sour cream or Greek yogurt, lime juice, and salt blended until smooth) makes an incredible dipping sauce or drizzle.
- For a To-Go Meal:
- Allow the filling to cool completely before assembling the wraps to prevent them from becoming soggy.
- Wrap each wrap tightly in aluminum foil or plastic wrap. This makes them perfect for a packed lunch for work or school, a picnic, or a healthy meal on a road trip.
- Enhanced Presentation:
- For a sit-down meal, slice the wrap in half on a diagonal to showcase the beautiful, colorful filling inside.
- Garnish the plate with a lime wedge and a few fresh sprigs of cilantro for a restaurant-quality touch.
Additional Tips
- Master the Meal Prep: This recipe is a dream for meal prepping. You can roast a large batch of the peppers and onions and prepare the bean mixture ahead of time. Store them in separate airtight containers in the refrigerator for up to 4 days. When you’re ready to eat, simply assemble and warm the wraps for a meal in under 5 minutes.
- Avoid the Dreaded Soggy Wrap: The key to a wrap that holds up well, especially for packed lunches, is managing moisture. Ensure your roasted vegetables have cooled down before mixing them with the beans and assembling. Also, place ingredients like shredded lettuce or fresh tomatoes in the center of the filling, away from the tortilla itself.
- Customize Your Spice Level: Don’t be afraid to play with the heat. For a milder wrap, you can omit the chili powder entirely. For those who love a spicy kick, add a pinch of cayenne pepper, a dash of your favorite hot sauce to the bean mixture, or even roast a sliced jalapeño along with the bell peppers.
- Boost the Protein: While these wraps are satisfying on their own, you can easily increase the protein content. Consider adding some seasoned, grilled, and sliced chicken breast or some savory browned ground beef to the filling for a heartier, non-vegetarian version.
- Get Cheesy with It: Cheese adds a fantastic creamy, salty element. While cheddar or Monterey Jack are classic choices, don’t hesitate to experiment. Crumbled cotija cheese or feta would add a salty, tangy bite, while a pepper jack cheese would complement the spices and add extra heat.
- Bean Variations: Black beans are a great choice, but this recipe works wonderfully with other beans too. Try using pinto beans for a classic burrito feel, or even chickpeas (garbanzo beans) for a slightly different texture and nutty flavor. Just be sure to rinse and drain any canned beans you use.
- The Perfect Roll: The technique for rolling a wrap is crucial to keeping it from falling apart. Don’t overfill it! Leave about an inch of space around the edges. Fold the sides in first, then tightly roll from the bottom up. This creates a sealed packet that holds all the delicious filling inside.
- Make it Gluten-Free: To make this recipe completely gluten-free, simply swap the flour tortillas for your favorite gluten-free brand. Corn tortillas also work well, though they are smaller and you may need to serve them more like soft tacos rather than large, rolled wraps.
FAQ Section
1. Can I make these Roasted Bell Pepper and Bean Wraps ahead of time?
Absolutely! This recipe is perfect for making ahead. The best method is to prepare the filling (both the roasted vegetables and the bean mixture) and store it in an airtight container in the refrigerator for up to 4 days. Assemble the wraps just before serving to ensure the tortillas don’t get soggy. If you need to pack them for lunch, assemble them in the morning with cooled filling for the best results.
2. How do I store leftover wraps?
If you have leftover assembled wraps, wrap each one individually and tightly in plastic wrap or aluminum foil. They can be stored in the refrigerator for up to 2 days. The tortilla may soften over time. To reheat, you can microwave them for 30-60 seconds or, for a better texture, toast them in a dry skillet over medium heat for a couple of minutes per side until warmed through and slightly crispy.
3. Are these wraps considered a healthy meal?
Yes, this Roasted Bell Pepper and Bean Wrap is a fantastic healthy meal option. It’s packed with plant-based protein and fiber from the beans, which aids in digestion and keeps you full. The bell peppers provide a wealth of vitamins, particularly Vitamin C. By using whole-grain tortillas and being mindful of high-fat additions like excessive cheese or sour cream, you can easily keep this meal low in saturated fat and high in nutrients.
4. Can I use pre-roasted peppers from a jar instead of roasting my own?
You certainly can, and it’s a great time-saving shortcut! If you use jarred roasted peppers, be sure to drain them well and pat them dry to remove excess liquid before slicing and adding them to the filling. While you’ll miss the aroma of freshly roasted peppers, it’s a convenient alternative for a super-fast meal.
5. What is the best type of tortilla to use for these wraps?
For the best rolling experience, you’ll want to use large (10-12 inch) “burrito-style” flour tortillas. They are typically softer and more pliable than other varieties, which helps prevent them from cracking or tearing when you roll them. Warming the tortillas before filling them is the most important step, as it makes any tortilla much easier to work with.
6. My wraps always fall apart. What am I doing wrong?
There are a few common culprits for wraps that fall apart. First, you might be overfilling it. Try using a little less filling next time. Second, make sure your tortilla is warm and pliable before you start. A cold, stiff tortilla is almost guaranteed to crack. Finally, focus on your rolling technique: fold the sides in first, then pull the bottom flap up and over the filling, tucking it in snugly before you continue to roll. A tight roll is a secure roll.
7. Can I freeze these wraps?
Yes, these wraps are freezer-friendly, which makes them an amazing option for batch cooking. To freeze, assemble the wraps but omit any watery ingredients like fresh lettuce, tomato, or sour cream (you can add those after reheating). Wrap each wrap tightly in plastic wrap and then in a layer of aluminum foil. They can be frozen for up to 3 months. To reheat, unwrap and microwave from frozen, or for best results, let them thaw in the refrigerator overnight and then toast in a skillet.
8. What other vegetables can I add to this recipe?
This recipe is incredibly forgiving and a great way to use up other vegetables you have on hand. You can roast sliced zucchini, mushrooms, or corn kernels along with the peppers and onions. You could also stir in some fresh spinach or kale into the warm bean mixture to let it wilt. Finely shredded carrots or cabbage would add a nice crunch if added in fresh just before rolling.

Roasted Bell Pepper and Bean Wrap
Ingredients
- 3 Large Bell Peppers: A vibrant mix of red, yellow, and orange peppers is ideal, as they provide a beautiful sweetness when roasted.
- 1 Large Red Onion: This will be sliced and roasted alongside the peppers, contributing a deep, savory flavor that complements the sweetness.
- 2 Tablespoons Olive Oil: A good quality extra-virgin olive oil is used to coat the vegetables, helping them to roast perfectly and preventing them from sticking.
- 4 Cloves Garlic: Minced finely, the garlic adds a pungent, aromatic depth to the bean mixture.
- 1 Can (15-ounce) Black Beans: Rinsed and drained thoroughly, these beans form the hearty, protein-packed base of the wrap filling.
- 1 Teaspoon Ground Cumin: This warm, earthy spice is essential for giving the bean mixture its signature Southwestern-inspired flavor.
- 1/2 Teaspoon Smoked Paprika: Adds a lovely smoky dimension that echoes the flavor of the roasted peppers.
- 1/4 Teaspoon Chili Powder: For a gentle hint of warmth. You can adjust this to your personal preference for spice.
- 1/2 Lime: The juice of half a lime will be used to brighten up the bean mixture, adding a fresh, zesty kick.
- 1/4 Cup Fresh Cilantro: Chopped finely, cilantro adds a burst of fresh, herbaceous flavor that ties everything together.
- Salt and Black Pepper: To taste, for seasoning both the vegetables before roasting and the final bean mixture.
- 6–8 Large Flour Tortillas: Choose large, burrito-style tortillas that are soft and pliable, which will make rolling the wraps much easier.
- Optional Fillings: Shredded lettuce, diced tomatoes, avocado slices, shredded cheese (cheddar or Monterey Jack), or sour cream for added texture and flavor.
Instructions
- Prepare for Roasting: Begin by preheating your oven to 400°F (200°C). Line a large baking sheet with parchment paper for easy cleanup. This simple step prevents the vegetables from sticking and ensures they roast evenly.
- Slice the Vegetables: Wash and dry your bell peppers and red onion. Core the peppers and remove the seeds and white membranes. Slice the peppers and the red onion into long, thin strips, about 1/4-inch thick. Try to keep the slices relatively uniform in size to ensure they cook at the same rate.
- Roast the Vegetables: Place the sliced peppers and onions onto the prepared baking sheet. Drizzle them generously with the 2 tablespoons of olive oil, and season with a good pinch of salt and black pepper. Use your hands to toss everything together, making sure every vegetable slice is lightly coated in oil. Spread the vegetables out in a single, even layer. It’s important not to overcrowd the pan; use two pans if necessary. A single layer allows the vegetables to roast and caramelize rather than steam.
- Cooking the Vegetables: Place the baking sheet in the preheated oven and roast for 20-25 minutes. You’ll want to stir them halfway through the cooking time to promote even browning. The vegetables are done when they are tender, slightly shrunken, and have beautiful caramelized, browned edges. The natural sugars in the peppers and onions will have created a delicious sweetness.
- Prepare the Bean Mixture: While the vegetables are roasting, you can prepare the flavorful bean filling. In a medium-sized bowl, combine the rinsed and drained black beans, minced garlic, ground cumin, smoked paprika, and chili powder.
- Mash the Beans: Using a fork or a potato masher, gently mash about half of the beans. This technique is key to creating a creamy texture that helps hold the wrap together while still leaving some whole beans for a pleasant bite. Don’t over-mash; you want a rustic, varied texture.
- Add Final Flavors: Once the beans are partially mashed, stir in the juice from half a lime and the chopped fresh cilantro. Mix everything together until well combined. Give it a taste and add more salt, pepper, or lime juice if you feel it needs it. The lime juice will cut through the richness and add a wonderful freshness.
- Combine and Warm: Once the vegetables are finished roasting, remove them from the oven. Let them cool for just a minute or two before adding them to the bowl with the bean mixture. Gently fold the roasted peppers and onions into the beans until everything is evenly distributed.
- Warm the Tortillas: The secret to a perfect wrap that doesn’t crack or tear is a warm, pliable tortilla. You can warm your tortillas one at a time in a dry skillet over medium heat for about 15-20 seconds per side. Alternatively, wrap the stack of tortillas in a damp paper towel and microwave for 30-45 seconds until they are soft and steamy.
- Assemble the Wraps: Lay a warm tortilla on a flat surface. Spoon a generous amount of the roasted pepper and bean filling onto the center of the tortilla, arranging it in a line. Be careful not to overfill, as this will make rolling difficult. If using, add your desired optional fillings like shredded cheese, lettuce, or avocado slices on top of the bean mixture now.
- Roll the Wraps: To roll the wrap burrito-style, first fold in the two sides over the filling. Then, take the edge of the tortilla closest to you and pull it up and over the filling, tucking it in tightly. Continue to roll the tortilla away from you, keeping the roll snug, until you have a perfectly sealed wrap.
- Serve Immediately: Serve the wraps immediately while they are still warm for the best experience. You can also give them a final toast in a pan if you prefer a crispy exterior.
Nutrition
- Serving Size: one normal portion
- Calories: 400