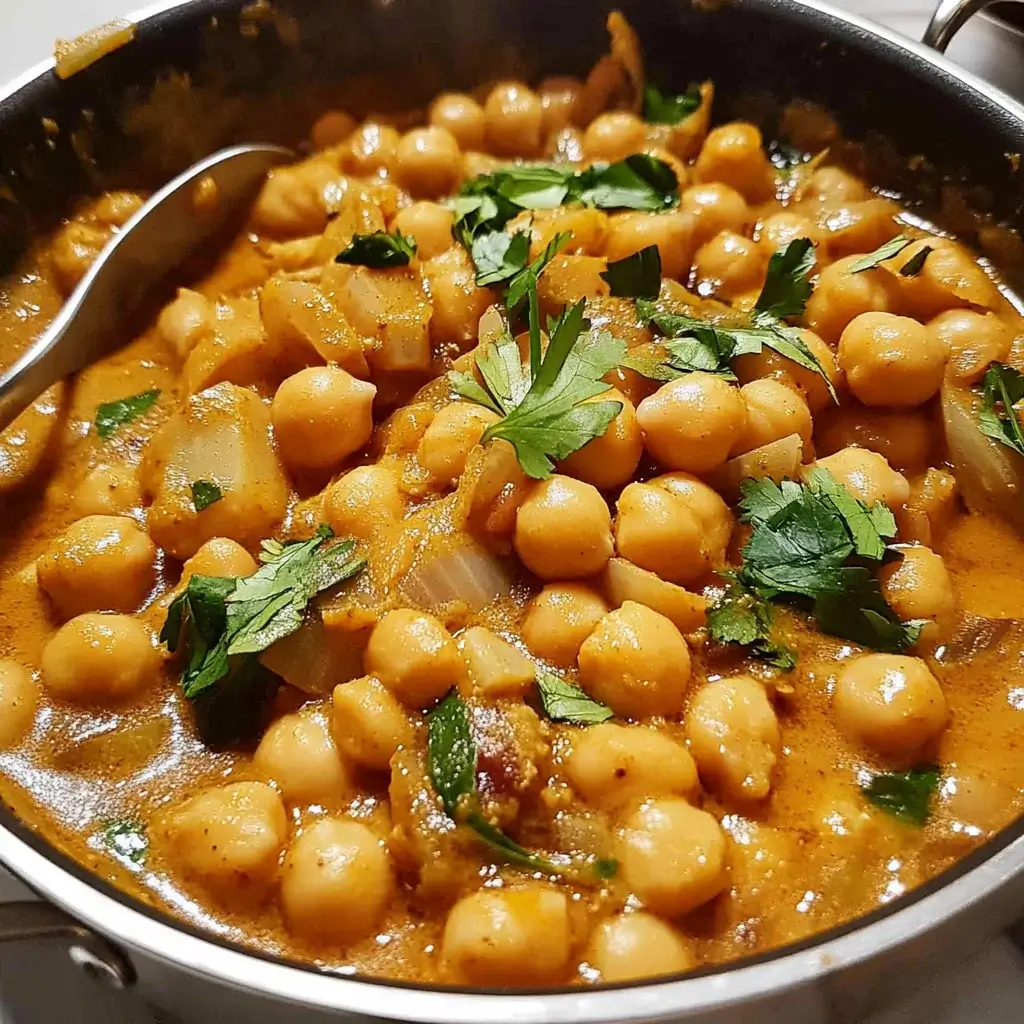
It’s funny how some of the simplest recipes become the most beloved in our homes. This Simple Vegetarian Chickpea Curry is a perfect example. I stumbled upon it during a frantic weeknight dinner search, and honestly, I wasn’t expecting much. But from the first whiff of fragrant spices simmering on the stove, I knew this was something special. My family, a mix of spice lovers and spice-averse individuals, devoured it. Even my notoriously picky teenager went back for seconds, declaring it “actually really good!” It’s become a regular in our rotation – quick, healthy, budget-friendly, and bursting with flavor. If you’re looking for a vegetarian meal that’s both satisfying and easy to make, look no further. This chickpea curry is a guaranteed crowd-pleaser.
Ingredients
Here’s what you’ll need to whip up this flavorful and satisfying vegetarian chickpea curry:
- Chickpeas: Two cans (15 ounces each), drained and rinsed. The star of the show, providing protein and a hearty texture.
- Diced Tomatoes: One can (14.5 ounces), undrained. Adds acidity and forms the base of the curry sauce.
- Onion: One medium, chopped. Aromatic base for flavor building.
- Garlic: 2-3 cloves, minced. Essential for savory depth.
- Ginger: 1 tablespoon, grated or minced. Adds warmth and spice.
- Vegetable Oil: 2 tablespoons. For sautéing and cooking the spices.
- Curry Powder: 2-3 tablespoons (adjust to taste). The heart of the curry flavor, a blend of spices.
- Turmeric Powder: 1 teaspoon. Adds color and earthy notes, also known for its health benefits.
- Cumin Powder: 1 teaspoon. Warm, earthy spice that complements the curry.
- Coriander Powder: 1 teaspoon. Citrusy and slightly sweet spice, adds complexity.
- Garam Masala: 1 teaspoon. A warm and fragrant spice blend, added at the end for finishing flavor.
- Coconut Milk: One can (13.5 ounces), full-fat or light. Creaminess and richness to the curry.
- Vegetable Broth or Water: ½ cup. To adjust the curry consistency.
- Fresh Cilantro: For garnish, chopped. Adds freshness and a pop of color.
- Salt and Pepper: To taste. Enhances all the flavors.
- Optional: Red Pepper Flakes: For a touch of heat.
Instructions
Follow these simple steps to create a delicious and aromatic vegetarian chickpea curry:
- Prepare the Aromatics: Begin by finely chopping the onion and mincing the garlic and ginger. Having these aromatics prepped and ready to go will streamline the cooking process and ensure a smooth flow once you start heating the oil. The foundation of any great curry lies in building a flavorful aromatic base, and this step sets you up for success. Take your time to chop the onion evenly so it cooks uniformly, and mince the garlic and ginger finely to release their maximum flavor into the oil.
- Sauté the Aromatics: In a large pot or Dutch oven, heat the vegetable oil over medium heat. Once the oil is shimmering and hot, add the chopped onion. Sauté the onion for about 5-7 minutes, or until it becomes softened and translucent. Stir occasionally to prevent sticking and ensure even cooking. Sautéing the onion first releases its natural sugars and creates a sweet and savory base for the curry. After the onions have softened, add the minced garlic and ginger to the pot. Sauté for another minute or two, until fragrant. Be careful not to burn the garlic, as it can become bitter. The fragrant aroma of garlic and ginger mingling with the softened onions is the first sign that your curry is developing beautifully.
- Bloom the Spices: This is a crucial step for unlocking the full potential of your spices and creating a truly flavorful curry. Reduce the heat to low. Add the curry powder, turmeric powder, cumin powder, and coriander powder to the pot with the sautéed aromatics. Stir continuously for about 30 seconds to 1 minute, until the spices become fragrant and slightly toasted. “Blooming” the spices in hot oil helps to release their essential oils and intensifies their flavors. Be mindful not to burn the spices, as this can make them taste bitter. Keep stirring and watch closely. You’ll know the spices are bloomed when their aroma becomes noticeably stronger and more fragrant. The kitchen should now be filled with the warm, inviting scent of Indian spices.
- Add Tomatoes and Chickpeas: Pour in the can of diced tomatoes (undrained) into the pot with the bloomed spices. Stir well to combine everything, scraping up any browned bits from the bottom of the pot – these bits are packed with flavor! The acidity of the tomatoes will help to deglaze the pot and further enhance the depth of flavor in the curry. Next, add the drained and rinsed chickpeas to the pot. Stir to coat the chickpeas with the tomato and spice mixture. Rinsing the chickpeas removes any excess sodium and canning liquid, allowing the chickpeas to better absorb the flavors of the curry.
- Simmer and Develop Flavor: Pour in the coconut milk and vegetable broth (or water) into the pot. Stir everything together to ensure all ingredients are well combined. Bring the curry to a gentle simmer. Once simmering, reduce the heat to low, cover the pot, and let it simmer for at least 15-20 minutes, or even longer for deeper flavor development. Simmering allows the flavors to meld together beautifully and the curry to thicken slightly. The longer you simmer, the more flavorful your curry will become. Stir occasionally during simmering to prevent sticking and ensure even cooking. Taste and adjust seasoning with salt and pepper as needed. This is also a good time to add a pinch of red pepper flakes if you desire a bit of heat.
- Finish with Garam Masala and Cilantro: Once the curry has simmered and thickened to your liking, stir in the garam masala. Garam masala is a fragrant spice blend that is typically added at the end of cooking to preserve its delicate aroma. Stir it in gently to incorporate it throughout the curry. Finally, stir in most of the chopped fresh cilantro, reserving some for garnish. The fresh cilantro adds a bright, herbaceous note that complements the richness of the curry and provides a beautiful finishing touch.
- Serve and Enjoy: Ladle the Simple Vegetarian Chickpea Curry into bowls. Garnish with the remaining fresh cilantro. Serve hot with your choice of accompaniments, such as cooked rice, naan bread, roti, or quinoa. A dollop of plain yogurt or raita can also be a cooling and refreshing addition. Enjoy your flavorful and satisfying homemade chickpea curry!
Nutrition Facts
(Approximate values per serving, based on 4 servings)
- Serving Size: Approximately 1.5 cups
- Calories: 350-400 kcal
- Fat: 20-25g
- Sodium: 400-500mg (can vary based on canned tomato and broth brands)
Note: Nutritional values are estimates and can vary based on specific ingredients and brands used. For more precise information, use a nutrition calculator with your specific ingredients.
Preparation Time
This Simple Vegetarian Chickpea Curry is wonderfully quick and easy to prepare, making it perfect for weeknight meals or whenever you need a flavorful dish in a hurry.
- Prep Time: 15 minutes (chopping vegetables, measuring spices, opening cans)
- Cook Time: 30 minutes (sautéing, simmering)
- Total Time: 45 minutes
From start to finish, you can have a steaming bowl of delicious and aromatic chickpea curry on the table in under 45 minutes. The active cooking time is relatively short, mostly involving sautéing aromatics and simmering the curry to allow the flavors to develop. This recipe is a fantastic option for busy individuals and families who want a healthy, homemade meal without spending hours in the kitchen.
How to Serve
This versatile Simple Vegetarian Chickpea Curry can be served in a variety of ways, making it a delightful meal for any occasion. Here are some delicious serving suggestions to enhance your curry experience:
- Basmati Rice: A classic and perfect pairing. Fluffy basmati rice absorbs the flavorful curry sauce beautifully, creating a comforting and satisfying meal. Consider adding a touch of turmeric or saffron to the rice while cooking for extra color and aroma.
- Naan Bread: Warm and pillowy naan bread is ideal for scooping up the rich chickpea curry. The slightly charred and soft texture of naan complements the smooth and flavorful curry perfectly. Garlic naan or butter naan would be especially delicious.
- Roti or Chapati: For a healthier whole wheat option, serve with roti or chapati. These Indian flatbreads are versatile and pair wonderfully with curry. They offer a more rustic and wholesome texture compared to naan.
- Quinoa: If you’re looking for a gluten-free and protein-rich alternative to rice, quinoa is an excellent choice. Its nutty flavor and slightly chewy texture provide a great base for the curry.
- Salad: A refreshing side salad can balance the richness of the curry. A simple salad with mixed greens, cucumber, tomatoes, and a light vinaigrette dressing would be a great accompaniment. Consider an Indian-inspired salad with yogurt and cucumber raita dressing for a cohesive flavor profile.
- Raita: Cool and creamy raita, made with yogurt, cucumber, and spices, is a traditional Indian condiment that provides a cooling contrast to the warm spices of the curry. It helps to balance the flavors and add a refreshing element to the meal.
- Chutney or Pickle: A dollop of mango chutney or Indian pickle can add a sweet, tangy, or spicy element to your meal, depending on your preference. These condiments can enhance the overall flavor profile and add complexity.
- Poppadums: Crispy poppadums (thin, crispy lentil crackers) offer a delightful textural contrast to the soft curry. They are perfect for dipping into the curry or enjoying alongside as a crunchy snack.
Additional Tips for the Best Chickpea Curry
Elevate your Simple Vegetarian Chickpea Curry from good to absolutely amazing with these helpful tips:
- Toast Your Spices: For an even deeper and more complex flavor, consider toasting your whole spices before grinding them or using ground spices. You can lightly toast whole cumin seeds, coriander seeds, and dried chilies in a dry pan over medium heat for a few minutes until fragrant. Then grind them fresh or add the toasted whole spices directly to the oil before adding onions. This step intensifies their aroma and flavor profile.
- Use Fresh Ginger and Garlic: While dried ginger and garlic powder can work in a pinch, fresh ginger and garlic make a significant difference in the flavor of your curry. Fresh ginger has a brighter, more pungent flavor, and fresh garlic is more aromatic and nuanced. Whenever possible, opt for fresh ingredients for the best results.
- Don’t Skimp on the Sautéing: Take your time sautéing the onions, garlic, and ginger until they are properly softened and fragrant. This step is crucial for building a flavorful base for your curry. Rushing this step can result in a less flavorful and slightly raw-tasting curry. Sautéing properly draws out the sweetness of the onions and allows the garlic and ginger to infuse the oil with their aromatic compounds.
- Adjust the Spice Level: Curry powder blends vary in spiciness. Start with 2 tablespoons of curry powder and taste as you go. If you prefer a milder curry, use less curry powder. If you like it spicier, add more curry powder or a pinch of red pepper flakes. You can also add a chopped fresh chili or a dash of chili powder for extra heat. Remember, you can always add more spice, but it’s harder to remove it once added.
- Simmer for Longer: While the recipe calls for simmering for 15-20 minutes, simmering for longer (30-45 minutes or even an hour) will allow the flavors to meld together even more deeply and the curry to thicken naturally. Low and slow simmering is key to developing rich and complex flavors in many curries and stews.
- Add a Touch of Acidity: If you find your curry is lacking brightness, a squeeze of fresh lemon or lime juice at the end can make a world of difference. The acidity helps to balance the richness of the coconut milk and spices and brightens the overall flavor profile. You can also add a tablespoon of tomato paste along with the diced tomatoes for a deeper tomato flavor and added acidity.
- Garnish Generously: Fresh cilantro is a must-have garnish for this chickpea curry, but don’t stop there! Consider adding other garnishes like a dollop of plain yogurt or raita, a sprinkle of toasted almonds or cashews for crunch, or a drizzle of chili oil for extra flavor and visual appeal. Garnishes not only enhance the presentation but also add layers of flavor and texture to the dish.
- Make it Ahead: Chickpea curry is a fantastic make-ahead dish. In fact, the flavors often improve after a day or two in the refrigerator as the spices have more time to meld together. This makes it perfect for meal prepping or for cooking ahead for a dinner party. Simply reheat gently on the stovetop or in the microwave before serving. Store leftover curry in an airtight container in the refrigerator for up to 3-4 days.
Frequently Asked Questions (FAQ)
Here are some common questions and answers about making Simple Vegetarian Chickpea Curry:
Q1: Can I make this curry vegan?
A1: Yes, absolutely! This recipe is naturally vegetarian and can easily be made vegan by ensuring you use plant-based vegetable broth and coconut milk. All the other ingredients are plant-based, making it a delicious and satisfying vegan meal option.
Q2: I don’t have curry powder. Can I use other spices?
A2: While curry powder is a convenient blend, you can definitely make your own spice blend. A good substitute would be a mix of cumin powder, coriander powder, turmeric powder, paprika, and a pinch of cayenne pepper or chili powder. Experiment with ratios to find a flavor profile you enjoy. Using individual spices will give you more control over the final flavor of your curry.
Q3: Can I use dried chickpeas instead of canned?
A3: Yes, you can use dried chickpeas. You will need to soak them overnight or use the quick-soak method (boil for 2 minutes, then soak for 1 hour). After soaking, cook the chickpeas until tender, which will take about 1-1.5 hours. Using dried chickpeas will result in a slightly nuttier flavor and firmer texture. Make sure you have about 3 cups of cooked chickpeas to substitute for the two cans.
Q4: Can I freeze leftover chickpea curry?
A4: Yes, chickpea curry freezes very well. Allow the curry to cool completely before transferring it to freezer-safe containers or bags. Freeze for up to 2-3 months. Thaw overnight in the refrigerator or gently reheat from frozen on the stovetop or in the microwave. The texture might change slightly after freezing, but the flavor will remain delicious.
Q5: Can I add other vegetables to this curry?
A5: Absolutely! This chickpea curry is very versatile, and you can easily add other vegetables. Some great additions include spinach, cauliflower florets, potatoes, sweet potatoes, peas, bell peppers, or zucchini. Add heartier vegetables like potatoes and cauliflower along with the chickpeas to allow them to cook through. Leafy greens like spinach should be added towards the end of cooking.
Q6: How can I make this curry creamier?
A6: This recipe is already creamy thanks to the coconut milk. For extra creaminess, you can use full-fat coconut milk instead of light coconut milk. You can also stir in a tablespoon or two of cashew cream or blended cashews at the end of cooking for added richness and creaminess.
Q7: My curry is too thick. How can I thin it out?
A7: If your curry is too thick, simply add a little more vegetable broth or water, one tablespoon at a time, until you reach your desired consistency. Stir well after each addition and allow the curry to simmer for a few more minutes to ensure the flavors meld together.
Q8: Is this recipe gluten-free?
A8: Yes, this Simple Vegetarian Chickpea Curry recipe is naturally gluten-free, as it does not contain any wheat or gluten-containing ingredients. However, always double-check the labels of your curry powder and vegetable broth to ensure they are certified gluten-free if you have strict dietary needs. Serve it with gluten-free accompaniments like rice or quinoa to keep the entire meal gluten-free.
Print
Simple Vegetarian Chickpea Curry Recipe
Ingredients
Here’s what you’ll need to whip up this flavorful and satisfying vegetarian chickpea curry:
- Chickpeas: Two cans (15 ounces each), drained and rinsed. The star of the show, providing protein and a hearty texture.
- Diced Tomatoes: One can (14.5 ounces), undrained. Adds acidity and forms the base of the curry sauce.
- Onion: One medium, chopped. Aromatic base for flavor building.
- Garlic: 2-3 cloves, minced. Essential for savory depth.
- Ginger: 1 tablespoon, grated or minced. Adds warmth and spice.
- Vegetable Oil: 2 tablespoons. For sautéing and cooking the spices.
- Curry Powder: 2-3 tablespoons (adjust to taste). The heart of the curry flavor, a blend of spices.
- Turmeric Powder: 1 teaspoon. Adds color and earthy notes, also known for its health benefits.
- Cumin Powder: 1 teaspoon. Warm, earthy spice that complements the curry.
- Coriander Powder: 1 teaspoon. Citrusy and slightly sweet spice, adds complexity.
- Garam Masala: 1 teaspoon. A warm and fragrant spice blend, added at the end for finishing flavor.
- Coconut Milk: One can (13.5 ounces), full-fat or light. Creaminess and richness to the curry.
- Vegetable Broth or Water: ½ cup. To adjust the curry consistency.
- Fresh Cilantro: For garnish, chopped. Adds freshness and a pop of color.
- Salt and Pepper: To taste. Enhances all the flavors.
- Optional: Red Pepper Flakes: For a touch of heat.
Instructions
Follow these simple steps to create a delicious and aromatic vegetarian chickpea curry:
- Prepare the Aromatics: Begin by finely chopping the onion and mincing the garlic and ginger. Having these aromatics prepped and ready to go will streamline the cooking process and ensure a smooth flow once you start heating the oil. The foundation of any great curry lies in building a flavorful aromatic base, and this step sets you up for success. Take your time to chop the onion evenly so it cooks uniformly, and mince the garlic and ginger finely to release their maximum flavor into the oil.
- Sauté the Aromatics: In a large pot or Dutch oven, heat the vegetable oil over medium heat. Once the oil is shimmering and hot, add the chopped onion. Sauté the onion for about 5-7 minutes, or until it becomes softened and translucent. Stir occasionally to prevent sticking and ensure even cooking. Sautéing the onion first releases its natural sugars and creates a sweet and savory base for the curry. After the onions have softened, add the minced garlic and ginger to the pot. Sauté for another minute or two, until fragrant. Be careful not to burn the garlic, as it can become bitter. The fragrant aroma of garlic and ginger mingling with the softened onions is the first sign that your curry is developing beautifully.
- Bloom the Spices: This is a crucial step for unlocking the full potential of your spices and creating a truly flavorful curry. Reduce the heat to low. Add the curry powder, turmeric powder, cumin powder, and coriander powder to the pot with the sautéed aromatics. Stir continuously for about 30 seconds to 1 minute, until the spices become fragrant and slightly toasted. “Blooming” the spices in hot oil helps to release their essential oils and intensifies their flavors. Be mindful not to burn the spices, as this can make them taste bitter. Keep stirring and watch closely. You’ll know the spices are bloomed when their aroma becomes noticeably stronger and more fragrant. The kitchen should now be filled with the warm, inviting scent of Indian spices.
- Add Tomatoes and Chickpeas: Pour in the can of diced tomatoes (undrained) into the pot with the bloomed spices. Stir well to combine everything, scraping up any browned bits from the bottom of the pot – these bits are packed with flavor! The acidity of the tomatoes will help to deglaze the pot and further enhance the depth of flavor in the curry. Next, add the drained and rinsed chickpeas to the pot. Stir to coat the chickpeas with the tomato and spice mixture. Rinsing the chickpeas removes any excess sodium and canning liquid, allowing the chickpeas to better absorb the flavors of the curry.
- Simmer and Develop Flavor: Pour in the coconut milk and vegetable broth (or water) into the pot. Stir everything together to ensure all ingredients are well combined. Bring the curry to a gentle simmer. Once simmering, reduce the heat to low, cover the pot, and let it simmer for at least 15-20 minutes, or even longer for deeper flavor development. Simmering allows the flavors to meld together beautifully and the curry to thicken slightly. The longer you simmer, the more flavorful your curry will become. Stir occasionally during simmering to prevent sticking and ensure even cooking. Taste and adjust seasoning with salt and pepper as needed. This is also a good time to add a pinch of red pepper flakes if you desire a bit of heat.
- Finish with Garam Masala and Cilantro: Once the curry has simmered and thickened to your liking, stir in the garam masala. Garam masala is a fragrant spice blend that is typically added at the end of cooking to preserve its delicate aroma. Stir it in gently to incorporate it throughout the curry. Finally, stir in most of the chopped fresh cilantro, reserving some for garnish. The fresh cilantro adds a bright, herbaceous note that complements the richness of the curry and provides a beautiful finishing touch.
- Serve and Enjoy: Ladle the Simple Vegetarian Chickpea Curry into bowls. Garnish with the remaining fresh cilantro. Serve hot with your choice of accompaniments, such as cooked rice, naan bread, roti, or quinoa. A dollop of plain yogurt or raita can also be a cooling and refreshing addition. Enjoy your flavorful and satisfying homemade chickpea curry!
Nutrition
- Serving Size: one normal portion
- Calories: 400
- Sodium: 500mg
- Fat: 25g