Of all the recipes in my regular rotation, this Teriyaki Chicken with Brown Rice holds a special place. It’s the dish that bridges the gap between a craving for takeout and the desire for a wholesome, home-cooked meal. I still remember the first time I perfected the sauce; the kitchen filled with that incredible aroma of sweet, savory, and tangy notes, and my family gathered around the stove, eagerly waiting with their bowls. It was an instant hit. The chicken, tender and juicy, was coated in a glossy, dark sauce that was worlds away from the overly sweet, one-dimensional bottled versions. Paired with the nutty, chewy texture of brown rice and vibrant, crisp-tender broccoli, it felt like a complete, nourishing meal that satisfied on every level. It has since become our go-to for busy weeknights, a reliable crowd-pleaser for guests, and the meal my kids request most often. This recipe isn’t just about food; it’s about creating a moment of pure comfort and deliciousness that brings everyone to the table, and I’m so excited to share it with you.
Ingredients
Here is the complete list of ingredients you’ll need to create this spectacular dish. Each component is chosen specifically for its role in building layers of flavor and texture, resulting in a perfectly balanced meal.
For the Homemade Teriyaki Sauce:
- ½ cup Low-Sodium Soy Sauce (or Tamari for a gluten-free option): This is the savory, umami-rich foundation of our sauce. Using low-sodium gives you better control over the final saltiness.
- ¼ cup Water: This helps to balance the intensity of the other ingredients, creating a sauce with the perfect consistency.
- ¼ cup Mirin: A sweet Japanese rice wine that adds a subtle sweetness and a beautiful gloss to the sauce. It’s a key component for authentic teriyaki flavor.
- 2 tablespoons Brown Sugar (packed): This provides a deep, molasses-like sweetness that complements the soy sauce perfectly. You can substitute with honey or maple syrup if preferred.
- 1 tablespoon Sesame Oil: Adds a distinctive nutty, toasty aroma and flavor that is essential to many Asian dishes. A little goes a long way.
- 2 cloves Garlic (minced): Fresh garlic provides a pungent, aromatic kick that infuses the sauce with incredible depth.
- 1 teaspoon Fresh Ginger (grated): Adds a warm, zesty, and slightly spicy note that brightens up the entire sauce.
- 1 tablespoon Cornstarch + 2 tablespoons Cold Water: This mixture, known as a slurry, is our secret weapon for thickening the sauce to a perfect, clingy consistency at the end of cooking.
For the Chicken and Rice:
- 1 ½ lbs Boneless, Skinless Chicken Breasts (or Thighs), cut into 1-inch cubes: Chicken breasts are a lean option, while thighs offer more flavor and are more forgiving if slightly overcooked.
- 1 tablespoon Olive Oil (or other neutral oil like avocado or canola): Used for searing the chicken, creating a beautiful golden-brown crust.
- 1 cup Uncooked Brown Rice: The nutty, wholesome base of our dish. It provides a wonderful chewy texture and fiber.
- 2 cups Water or Chicken Broth (for cooking the rice): Using broth to cook the rice will infuse it with extra flavor from the very beginning.
For Garnish and Serving (Optional but Recommended):
- 1 tablespoon Toasted Sesame Seeds: These add a lovely visual appeal, a slight crunch, and an extra layer of nutty flavor.
- 2 Green Onions (thinly sliced): Provide a fresh, mild oniony bite that cuts through the richness of the sauce.
- Steamed or Roasted Broccoli Florets: The perfect vegetable pairing, adding color, nutrients, and a fresh element to the meal.
Instructions
Follow these detailed, step-by-step instructions to ensure your Teriyaki Chicken and Brown Rice comes out perfectly every time. We’ll start by preparing the rice, then move on to the star of the show: the chicken and its irresistible sauce.
Step 1: Cook the Brown Rice
Cooking the brown rice first ensures it will be ready and waiting when the chicken is done. Brown rice takes longer to cook than white rice, so getting it started early is key.
- Rinse the Rice: Place the 1 cup of brown rice in a fine-mesh sieve and rinse it under cold running water for about 30-60 seconds, or until the water runs clear. This removes excess starch and helps prevent the rice from becoming gummy.
- Combine and Boil: In a medium saucepan with a tight-fitting lid, combine the rinsed rice with 2 cups of water or chicken broth. Add a small pinch of salt if you wish. Bring the mixture to a rolling boil over high heat.
- Simmer: Once boiling, immediately reduce the heat to the lowest possible setting. Cover the saucepan with the lid and let it simmer gently for 40-45 minutes. It’s crucial not to lift the lid during this time, as this allows steam to escape and can result in undercooked rice.
- Rest the Rice: After the simmering time is up, turn off the heat but leave the saucepan on the burner, still covered, for another 10 minutes. This resting period allows the rice to absorb any remaining moisture and finish steaming, resulting in a fluffy, perfect texture.
- Fluff and Serve: After resting, remove the lid and use a fork to gently fluff the rice. Keep it covered to stay warm until you’re ready to serve.
Step 2: Prepare the Teriyaki Sauce
While the rice is cooking, you can prepare the homemade teriyaki sauce. Making it from scratch is incredibly easy and yields a far superior flavor to any store-bought version.
- Combine Ingredients: In a small bowl or a liquid measuring cup, whisk together the ½ cup of low-sodium soy sauce, ¼ cup of water, ¼ cup of mirin, 2 tablespoons of brown sugar, 1 tablespoon of sesame oil, the 2 minced garlic cloves, and the 1 teaspoon of grated fresh ginger.
- Whisk Until Smooth: Continue whisking until the brown sugar has completely dissolved into the liquid. The mixture should be smooth and fragrant. Set this sauce aside for now.
Step 3: Cook the Chicken
Now it’s time to cook the chicken to juicy perfection.
- Prepare the Chicken: Ensure your chicken is cut into uniform, 1-inch cubes. Pat the chicken pieces dry with a paper towel. This step is vital for getting a good sear, as excess moisture will steam the chicken instead of browning it. Season lightly with salt and pepper.
- Heat the Pan: Place a large skillet or wok over medium-high heat. Add 1 tablespoon of olive oil and let it get hot. You’ll know it’s ready when the oil shimmers slightly.
- Sear the Chicken: Carefully add the chicken pieces to the hot skillet in a single layer. Be sure not to overcrowd the pan; cook in two batches if necessary. Let the chicken cook undisturbed for 3-4 minutes per side, until it’s golden brown and has a nice crust.
- Cook Through: Continue to cook, stirring occasionally, until the chicken is cooked through and no longer pink in the center. The internal temperature should reach 165°F (74°C) when checked with a meat thermometer.
Step 4: Combine and Thicken the Sauce
This is the final, magical step where everything comes together.
- Add the Sauce: Reduce the heat under the skillet to medium. Pour the prepared teriyaki sauce mixture over the cooked chicken in the pan. Bring the sauce to a gentle simmer, stirring to coat all the chicken pieces. Let it bubble for 1-2 minutes to allow the flavors to meld.
- Prepare the Slurry: In a small, separate bowl, whisk together the 1 tablespoon of cornstarch and 2 tablespoons of cold water until completely smooth. It is essential to use cold water to prevent the cornstarch from clumping.
- Thicken the Sauce: While stirring the sauce in the skillet constantly, slowly pour in the cornstarch slurry. Continue to stir and cook for another 1-2 minutes. You will see the sauce begin to thicken almost immediately, transforming into a glossy, rich glaze that beautifully coats every piece of chicken.
- Final Touches: Once the sauce has reached your desired consistency, remove the skillet from the heat.
Step 5: Assemble and Serve
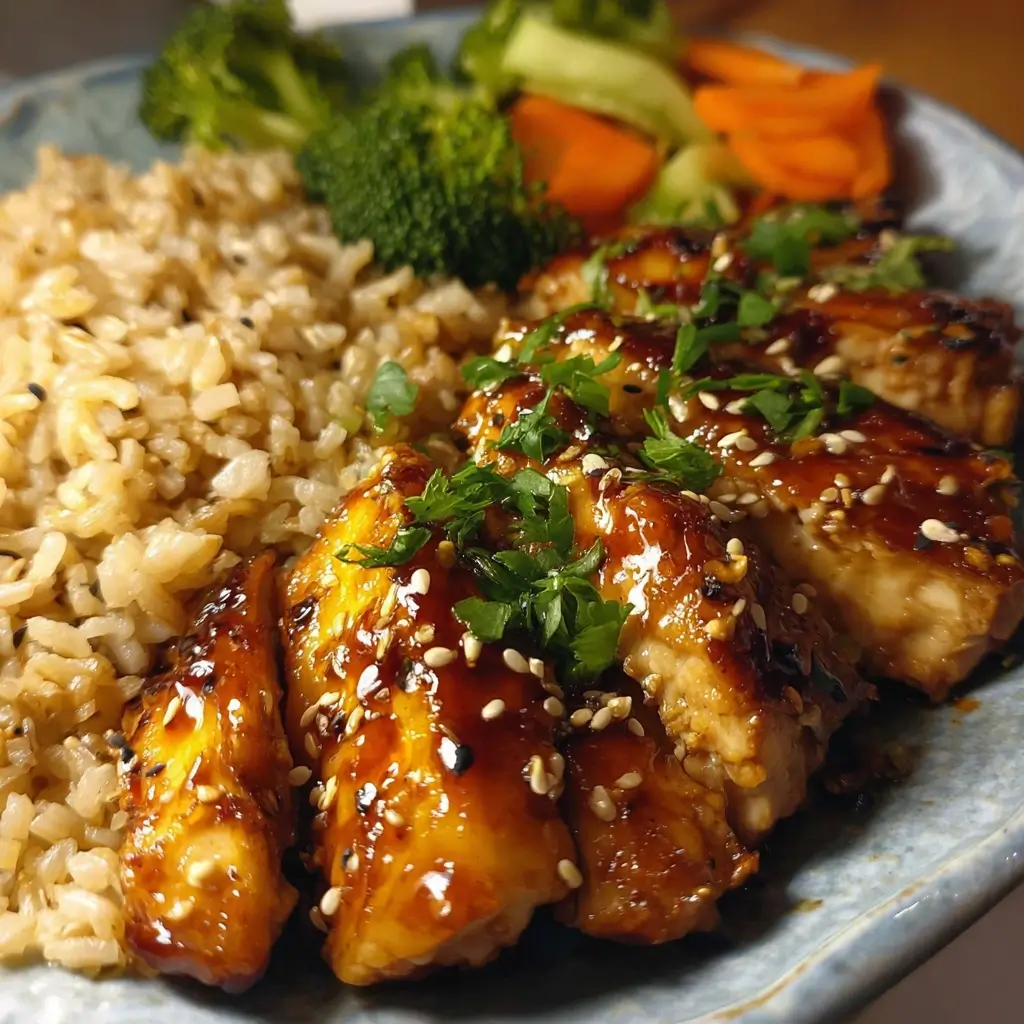
- Plate the Dish: Spoon a generous portion of the fluffy brown rice into each bowl. Top with a hearty serving of the saucy teriyaki chicken.
- Garnish: If using, add a side of steamed broccoli. Sprinkle the dish with toasted sesame seeds and thinly sliced green onions for a fresh, crunchy finish. Serve immediately and enjoy!
Nutrition Facts
This recipe is designed to be a balanced and satisfying meal. Here is an approximate nutritional overview.
- Servings: 4
- Calories per Serving: Approximately 550-650 kcal
- High in Protein (Approx. 40g per serving): The chicken breast is a fantastic source of lean protein, which is vital for building and repairing tissues, supporting muscle health, and keeping you feeling full and satisfied long after your meal.
- Excellent Source of Fiber (Approx. 7g per serving): Thanks to the whole-grain brown rice and the addition of broccoli, this dish provides a significant amount of dietary fiber. Fiber is crucial for digestive health, helps regulate blood sugar levels, and contributes to a feeling of fullness.
- Complex Carbohydrates: Brown rice provides complex carbohydrates, which are digested more slowly than simple carbs. This results in a more stable and sustained release of energy, preventing the energy spikes and crashes associated with refined grains.
- Controlled Sodium: By using low-sodium soy sauce and making the sauce from scratch, you have complete control over the sodium content, making this a much healthier alternative to many restaurant or store-bought versions.
- Rich in Micronutrients: Ingredients like garlic, ginger, and broccoli contribute essential vitamins and minerals, including Vitamin C, Vitamin K, and various B vitamins, supporting overall immune function and well-being.
Preparation Time
This meal is perfectly suited for a weeknight, with a straightforward timeline that gets a delicious dinner on the table efficiently.
- Preparation Time: 15 minutes. This includes dicing the chicken, mincing the garlic, grating the ginger, and mixing the sauce.
- Cooking Time: 45-50 minutes. The majority of this time is the hands-off cooking of the brown rice. The chicken and sauce come together in about 15-20 minutes, which you can do while the rice is finishing its cooking and resting cycle.
- Total Time: Approximately 1 hour.
How to Serve
This Teriyaki Chicken with Brown Rice is wonderfully versatile. Here are a few creative and delicious ways to serve it:
- The Classic Bowl:
- This is the most popular and straightforward method. Create a bed of fluffy brown rice in a wide, shallow bowl.
- Spoon the glossy teriyaki chicken and its sauce over one side of the rice.
- Arrange steamed or roasted vegetables like broccoli, edamame, or sliced carrots on the other side.
- Garnish generously with sesame seeds and fresh green onions for a restaurant-quality presentation.
- Meal Prep Bento Boxes:
- This recipe is a meal-prepper’s dream. Use sectioned containers to keep the components separate until you’re ready to eat.
- Place the brown rice in the largest compartment.
- Add the teriyaki chicken to another section. To prevent the rice from getting soggy, you can store extra sauce in a small, separate container.
- Fill the remaining compartment(s) with raw or blanched vegetables like snap peas, bell pepper strips, and cucumber slices for a refreshing crunch.
- Teriyaki Chicken Lettuce Wraps:
- For a low-carb or lighter option, serve the teriyaki chicken in crisp lettuce cups.
- Use large, sturdy leaves from iceberg, butter, or romaine lettuce.
- Spoon the chicken into the lettuce cups and top with shredded carrots, bean sprouts, and a sprinkle of chopped peanuts or cashews for extra texture.
- Stuffed Bell Peppers:
- Hollow out bell peppers (any color works well) and par-boil or roast them until slightly tender.
- Mix the cooked teriyaki chicken with the brown rice and some finely diced vegetables.
- Stuff the mixture into the bell peppers, top with a little extra sauce, and bake until heated through.
Additional Tips
Elevate your teriyaki chicken from great to unforgettable with these eight professional tips and tricks.
- Don’t Skip the Marinade (If You Have Time): While the recipe is delicious as is, allowing the chicken to marinate in about ¼ cup of the prepared teriyaki sauce for at least 30 minutes (or up to 4 hours) in the refrigerator will infuse it with even more flavor and result in more tender meat.
- The Secret to a Perfect Sear: The key to beautifully browned chicken is a hot pan and dry meat. Don’t rush the preheating step for your skillet, and always pat your chicken pieces dry with a paper towel before they hit the oil. This ensures they fry, not steam.
- Don’t Overcrowd the Pan: When searing the chicken, place the pieces in a single layer with space between them. If the pan is too crowded, the temperature will drop, and the chicken will steam in its own juices instead of developing a delicious golden-brown crust. Cook in two batches if your skillet isn’t large enough.
- Embrace Chicken Thighs: While chicken breasts are a great lean option, boneless, skinless chicken thighs are a fantastic choice for this recipe. They have a slightly higher fat content, which makes them more flavorful and incredibly juicy, and they are much more forgiving to cook without drying out.
- Balance Your Sauce: Taste your sauce before you thicken it. Does it need more sweetness? Add a touch more brown sugar or a drizzle of honey. More tang? A tiny splash of rice vinegar can work wonders. More warmth? Add a bit more fresh ginger. Customizing the sauce to your palate is the best part of cooking from scratch.
- The Cornstarch Slurry is Non-Negotiable: Never add cornstarch directly to a hot liquid, as it will instantly form lumps that are impossible to whisk out. Always mix it with an equal or double amount of cold water first to create a smooth slurry before pouring it into the simmering sauce.
- Toast Your Own Sesame Seeds: It only takes a minute and adds a huge punch of flavor. Simply place the sesame seeds in a dry skillet over medium heat. Shake the pan frequently for 2-3 minutes, until they become fragrant and turn a light golden brown. Watch them carefully as they can burn quickly.
- Incorporate Vegetables Directly into the Dish: To make this a true one-pan meal (after the rice is cooked), you can add quick-cooking vegetables directly to the skillet. After the chicken is cooked, remove it from the pan. Sauté broccoli florets, sliced bell peppers, or snap peas for a few minutes until crisp-tender. Then, add the chicken back to the pan, pour in the sauce, and thicken as directed.
FAQ Section
Here are answers to some of the most frequently asked questions about making Teriyaki Chicken with Brown Rice.
1. Can I make this recipe gluten-free?
Absolutely! The main source of gluten in this recipe is the soy sauce. To make it completely gluten-free, simply substitute the regular soy sauce with Tamari or a certified gluten-free soy sauce in equal amounts. All other ingredients in this recipe are naturally gluten-free.
2. How do I store and reheat leftovers?
Store any leftovers in an airtight container in the refrigerator for up to 3-4 days. For the best results when reheating, use a skillet over medium-low heat. Add a splash of water or chicken broth to the pan to help loosen the sauce and prevent the chicken from drying out as it warms up. You can also microwave it, but do so in short intervals, stirring in between.
3. Can I use a different type of rice or grain?
Yes, this dish is very flexible. While brown rice adds a wonderful nutty flavor and fiber, you can easily substitute it with:
- White Rice: Adjust the cooking time and water ratio according to package directions.
- Quinoa: A great high-protein, gluten-free alternative.
- Cauliflower Rice: For a low-carb, keto-friendly version, serve the teriyaki chicken over sautéed cauliflower rice.
4. Is it okay to use store-bought teriyaki sauce?
While homemade sauce is highly recommended for its superior flavor and controlled ingredients, you can certainly use a store-bought sauce in a pinch. If you do, look for a high-quality brand, and be aware that many are much sweeter and saltier than this homemade version. You likely won’t need to add any sugar, and you can skip the sauce-making and thickening steps entirely.
5. My sauce is too thin or too thick. How can I fix it?
This is an easy fix!
- If your sauce is too thin: It likely just needs a bit more cornstarch slurry. Mix another teaspoon of cornstarch with two teaspoons of cold water and slowly whisk it into the simmering sauce until it reaches your desired thickness.
- If your sauce is too thick: Simply whisk in a little bit of water or low-sodium chicken broth, a tablespoon at a time, until the sauce thins out to the perfect consistency.
6. Can I make this recipe with other proteins like beef or tofu?
Yes, this sauce is incredibly versatile.
- For Beef: Use sirloin or flank steak, thinly sliced against the grain. Sear it quickly over high heat, as it will cook much faster than chicken.
- For Tofu: Use extra-firm tofu. Press it for at least 30 minutes to remove excess water, then cube it. Pan-fry the tofu cubes until golden and crispy on all sides before adding the sauce.
- For Shrimp: Add cooked shrimp at the very end, just long enough to be coated in the hot, thickened sauce and heated through to avoid overcooking.
7. What other vegetables go well with teriyaki chicken?
Broccoli is a classic, but many other vegetables pair beautifully with this dish. Try adding steamed, roasted, or stir-fried:
- Bell Peppers (red, yellow, or orange)
- Snap Peas or Snow Peas
- Edamame
- Asparagus Spears
- Sliced Carrots
- Mushrooms
- Bok Choy
8. Is this recipe kid-friendly?
This recipe is a huge hit with kids! The sweet and savory flavor profile is very appealing to younger palates. If your children are sensitive to spice, you can reduce or omit the fresh ginger. Serving the components separately (rice, plain chicken, sauce on the side) can also be a great strategy for pickier eaters, allowing them to assemble their own bowl.

Teriyaki Chicken with Brown Rice
Ingredients
Here is the complete list of ingredients you’ll need to create this spectacular dish. Each component is chosen specifically for its role in building layers of flavor and texture, resulting in a perfectly balanced meal.
For the Homemade Teriyaki Sauce:
- ½ cup Low-Sodium Soy Sauce (or Tamari for a gluten-free option): This is the savory, umami-rich foundation of our sauce. Using low-sodium gives you better control over the final saltiness.
- ¼ cup Water: This helps to balance the intensity of the other ingredients, creating a sauce with the perfect consistency.
- ¼ cup Mirin: A sweet Japanese rice wine that adds a subtle sweetness and a beautiful gloss to the sauce. It’s a key component for authentic teriyaki flavor.
- 2 tablespoons Brown Sugar (packed): This provides a deep, molasses-like sweetness that complements the soy sauce perfectly. You can substitute with honey or maple syrup if preferred.
- 1 tablespoon Sesame Oil: Adds a distinctive nutty, toasty aroma and flavor that is essential to many Asian dishes. A little goes a long way.
- 2 cloves Garlic (minced): Fresh garlic provides a pungent, aromatic kick that infuses the sauce with incredible depth.
- 1 teaspoon Fresh Ginger (grated): Adds a warm, zesty, and slightly spicy note that brightens up the entire sauce.
- 1 tablespoon Cornstarch + 2 tablespoons Cold Water: This mixture, known as a slurry, is our secret weapon for thickening the sauce to a perfect, clingy consistency at the end of cooking.
For the Chicken and Rice:
- 1 ½ lbs Boneless, Skinless Chicken Breasts (or Thighs), cut into 1-inch cubes: Chicken breasts are a lean option, while thighs offer more flavor and are more forgiving if slightly overcooked.
- 1 tablespoon Olive Oil (or other neutral oil like avocado or canola): Used for searing the chicken, creating a beautiful golden-brown crust.
- 1 cup Uncooked Brown Rice: The nutty, wholesome base of our dish. It provides a wonderful chewy texture and fiber.
- 2 cups Water or Chicken Broth (for cooking the rice): Using broth to cook the rice will infuse it with extra flavor from the very beginning.
For Garnish and Serving (Optional but Recommended):
- 1 tablespoon Toasted Sesame Seeds: These add a lovely visual appeal, a slight crunch, and an extra layer of nutty flavor.
- 2 Green Onions (thinly sliced): Provide a fresh, mild oniony bite that cuts through the richness of the sauce.
- Steamed or Roasted Broccoli Florets: The perfect vegetable pairing, adding color, nutrients, and a fresh element to the meal.
Instructions
Follow these detailed, step-by-step instructions to ensure your Teriyaki Chicken and Brown Rice comes out perfectly every time. We’ll start by preparing the rice, then move on to the star of the show: the chicken and its irresistible sauce.
Step 1: Cook the Brown Rice
Cooking the brown rice first ensures it will be ready and waiting when the chicken is done. Brown rice takes longer to cook than white rice, so getting it started early is key.
- Rinse the Rice: Place the 1 cup of brown rice in a fine-mesh sieve and rinse it under cold running water for about 30-60 seconds, or until the water runs clear. This removes excess starch and helps prevent the rice from becoming gummy.
- Combine and Boil: In a medium saucepan with a tight-fitting lid, combine the rinsed rice with 2 cups of water or chicken broth. Add a small pinch of salt if you wish. Bring the mixture to a rolling boil over high heat.
- Simmer: Once boiling, immediately reduce the heat to the lowest possible setting. Cover the saucepan with the lid and let it simmer gently for 40-45 minutes. It’s crucial not to lift the lid during this time, as this allows steam to escape and can result in undercooked rice.
- Rest the Rice: After the simmering time is up, turn off the heat but leave the saucepan on the burner, still covered, for another 10 minutes. This resting period allows the rice to absorb any remaining moisture and finish steaming, resulting in a fluffy, perfect texture.
- Fluff and Serve: After resting, remove the lid and use a fork to gently fluff the rice. Keep it covered to stay warm until you’re ready to serve.
Step 2: Prepare the Teriyaki Sauce
While the rice is cooking, you can prepare the homemade teriyaki sauce. Making it from scratch is incredibly easy and yields a far superior flavor to any store-bought version.
- Combine Ingredients: In a small bowl or a liquid measuring cup, whisk together the ½ cup of low-sodium soy sauce, ¼ cup of water, ¼ cup of mirin, 2 tablespoons of brown sugar, 1 tablespoon of sesame oil, the 2 minced garlic cloves, and the 1 teaspoon of grated fresh ginger.
- Whisk Until Smooth: Continue whisking until the brown sugar has completely dissolved into the liquid. The mixture should be smooth and fragrant. Set this sauce aside for now.
Step 3: Cook the Chicken
Now it’s time to cook the chicken to juicy perfection.
- Prepare the Chicken: Ensure your chicken is cut into uniform, 1-inch cubes. Pat the chicken pieces dry with a paper towel. This step is vital for getting a good sear, as excess moisture will steam the chicken instead of browning it. Season lightly with salt and pepper.
- Heat the Pan: Place a large skillet or wok over medium-high heat. Add 1 tablespoon of olive oil and let it get hot. You’ll know it’s ready when the oil shimmers slightly.
- Sear the Chicken: Carefully add the chicken pieces to the hot skillet in a single layer. Be sure not to overcrowd the pan; cook in two batches if necessary. Let the chicken cook undisturbed for 3-4 minutes per side, until it’s golden brown and has a nice crust.
- Cook Through: Continue to cook, stirring occasionally, until the chicken is cooked through and no longer pink in the center. The internal temperature should reach 165°F (74°C) when checked with a meat thermometer.
Step 4: Combine and Thicken the Sauce
This is the final, magical step where everything comes together.
- Add the Sauce: Reduce the heat under the skillet to medium. Pour the prepared teriyaki sauce mixture over the cooked chicken in the pan. Bring the sauce to a gentle simmer, stirring to coat all the chicken pieces. Let it bubble for 1-2 minutes to allow the flavors to meld.
- Prepare the Slurry: In a small, separate bowl, whisk together the 1 tablespoon of cornstarch and 2 tablespoons of cold water until completely smooth. It is essential to use cold water to prevent the cornstarch from clumping.
- Thicken the Sauce: While stirring the sauce in the skillet constantly, slowly pour in the cornstarch slurry. Continue to stir and cook for another 1-2 minutes. You will see the sauce begin to thicken almost immediately, transforming into a glossy, rich glaze that beautifully coats every piece of chicken.
- Final Touches: Once the sauce has reached your desired consistency, remove the skillet from the heat.
Step 5: Assemble and Serve
- Plate the Dish: Spoon a generous portion of the fluffy brown rice into each bowl. Top with a hearty serving of the saucy teriyaki chicken.
- Garnish: If using, add a side of steamed broccoli. Sprinkle the dish with toasted sesame seeds and thinly sliced green onions for a fresh, crunchy finish. Serve immediately and enjoy!
Nutrition
- Serving Size: one normal portion
- Calories: 650
- Fiber: 7g
- Protein: 40g