The first time I made these Whipped Chocolate Mousse Cups, it was for a casual Friday night family dinner. I wanted something special but didn’t have hours to fuss over a complicated dessert. Chocolate is always a winner in our house, and the idea of individual, light-as-air mousse cups seemed perfect. I remember the kids hovering around the kitchen, eyes wide as I piped the glossy, deep brown mixture into little glasses. The hardest part was convincing them to wait while the mousse chilled! When dessert time finally arrived, the silence that fell over the table was punctuated only by the clinking of spoons against glass. My husband, usually a man of few words when it comes to sweets, declared it “restaurant-worthy,” and the kids scraped their cups clean, already asking when I could make it again. Since then, these mousse cups have become a staple for celebrations, potlucks, or simply when we need a guaranteed mood-booster. They look incredibly elegant, taste utterly decadent, yet remain surprisingly straightforward to prepare. The magic lies in the texture – impossibly light and airy, yet intensely chocolatey – a true cloud of cocoa bliss in every spoonful. This recipe isn’t just about dessert; it’s about creating those small moments of pure, unadulterated joy.
Ingredients
Here’s what you’ll need to create these delightful Whipped Chocolate Mousse Cups:
- 8 ounces (about 225g) High-Quality Semi-Sweet or Dark Chocolate (60-70% Cacao): Finely chopped. The quality of your chocolate is paramount; using a good bar (not chips, which contain stabilizers) results in a smoother melt and richer flavor. The percentage dictates the intensity – use semi-sweet for a classic taste or dark for a deeper, less sweet profile.
- 2 cups (480ml) Heavy Whipping Cream (at least 35% fat): Divided. It’s crucial to use cold heavy cream with a high fat content to achieve stable, voluminous whipped cream, which forms the airy base of the mousse. One portion will be whipped, the other gently heated.
- 1/4 cup (30g) Powdered Sugar (Confectioners’ Sugar): Sifted. This dissolves easily into the cream without grittiness, adding just the right amount of sweetness to balance the chocolate. Sifting prevents lumps.
- 1 teaspoon Pure Vanilla Extract: Enhances the chocolate flavor and adds warmth and complexity to the mousse. Use pure extract for the best taste.
- 1/4 teaspoon Fine Sea Salt: A small pinch sharpens the chocolate flavor and cuts through the richness, creating a more balanced profile.
- Optional: 1 teaspoon Instant Espresso Powder: Dissolved in 1 teaspoon hot water. This is a secret weapon! It doesn’t make the mousse taste like coffee but significantly deepens and intensifies the chocolate flavor.
- Optional Garnishes: Chocolate shavings or curls, fresh berries (raspberries, strawberries), a dollop of sweetened whipped cream, cocoa powder dusting, or mint sprigs.
Instructions
Follow these steps carefully for perfectly light and airy chocolate mousse:
- Prepare the Chocolate: Place the finely chopped chocolate in a medium-sized heatproof bowl. If using espresso powder, dissolve it in 1 teaspoon of hot water and set aside.
- Heat Some Cream: In a small saucepan, heat 1/2 cup (120ml) of the heavy whipping cream over medium-low heat. Bring it just to a simmer – you’ll see small bubbles forming around the edges. Do not let it boil vigorously.
- Create Ganache Base: Pour the hot cream directly over the chopped chocolate in the bowl. Let it sit undisturbed for 3-5 minutes. This allows the heat from the cream to gently melt the chocolate without scorching it.
- Stir Until Smooth: Add the salt and the dissolved espresso mixture (if using) to the chocolate and cream. Start stirring gently from the center outwards with a spatula or whisk until the mixture is completely smooth, glossy, and homogenous. If any small lumps remain, you can gently heat the mixture over a double boiler (a heatproof bowl set over a saucepan of simmering water, ensuring the bottom of the bowl doesn’t touch the water) or microwave in 10-second bursts, stirring in between, until fully melted and smooth.
- Cool the Ganache: Set the chocolate ganache aside to cool to room temperature, or slightly warmer (around 85-95°F or 30-35°C). This is crucial. If the chocolate is too hot when folded into the whipped cream, it will melt the cream and deflate the mousse. If it’s too cold and stiff, it won’t incorporate smoothly. Stir it occasionally as it cools to keep it fluid.
- Whip the Remaining Cream: While the ganache cools, pour the remaining 1 ½ cups (360ml) of cold heavy whipping cream into a large, chilled mixing bowl (chilling the bowl and beaters helps the cream whip faster and achieve more volume). Add the sifted powdered sugar and vanilla extract.
- Beat to Stiff Peaks: Using an electric hand mixer or a stand mixer fitted with the whisk attachment, beat the cream mixture on medium-high speed. Start on low speed to avoid splattering, then increase. Continue beating until stiff peaks form. This means when you lift the beaters out of the cream, the peak that forms holds its shape firmly and doesn’t slump over. Be careful not to overbeat, or the cream will start to turn grainy and buttery.
- Temper the Ganache: Gently fold about one-third (a large scoop) of the whipped cream into the cooled chocolate ganache using a rubber spatula. This lightens the ganache, making it easier to incorporate into the remaining whipped cream without deflating it significantly. Use gentle, sweeping motions, cutting down through the center and folding up from the bottom.
- Combine Mousse Mixtures: Carefully scrape the lightened chocolate mixture into the bowl with the remaining whipped cream.
- Fold Gently: Using the same gentle folding technique (cut down, sweep across the bottom, fold up and over), combine the chocolate mixture and whipped cream. Continue folding just until no white streaks remain. It’s essential to fold minimally to retain as much air as possible – this is what gives the mousse its signature light texture. Stop folding as soon as it’s combined; over-mixing will result in a dense, heavy mousse.
- Portion the Mousse: Divide the mousse mixture evenly among 4-6 small serving glasses, ramekins, jars, or small bowls. You can spoon the mousse in, but for a neater presentation, transfer the mousse to a piping bag fitted with a large star or round tip and pipe it into the cups. Fill them about three-quarters full to leave room for garnish.
- Chill Thoroughly: Cover the mousse cups loosely with plastic wrap (press it gently onto the surface if you don’t plan on adding a whipped cream topping later, to prevent a skin from forming, otherwise just cover the top of the glass) and refrigerate for at least 4 hours, or preferably 6 hours or overnight. Chilling is essential for the mousse to set properly and for the flavors to meld and deepen. The mousse will firm up considerably during this time.
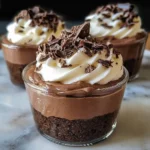
- Garnish and Serve: Once fully chilled and set, remove the mousse cups from the refrigerator. Garnish just before serving. Add a dollop of extra whipped cream, sprinkle with chocolate shavings, dust with cocoa powder, or top with fresh berries. Serve chilled.
Nutrition Facts
(Approximate values per serving, based on 6 servings. Actual values may vary based on specific ingredients used and portion size.)
- Servings: 6 individual cups
- Calories: Approximately 380-450 kcal per serving. Primarily from the fat in the chocolate and heavy cream, and sugar. This is a decadent dessert meant for indulgence.
- Fat: Approximately 30-38g per serving. Mostly saturated fat from the heavy cream and chocolate. Provides richness, flavor, and the characteristic velvety mouthfeel.
Disclaimer: These nutrition facts are estimates only. For precise nutritional information, please calculate based on the specific ingredients and brands you use.
Preparation Time
Making these Whipped Chocolate Mousse Cups involves both active preparation and essential chilling time:
- Active Preparation Time: Approximately 25-35 minutes. This includes chopping the chocolate, heating the cream, making the ganache, whipping the cream, folding the mixtures, and portioning the mousse into cups.
- Cooling Time (Ganache): Approximately 15-25 minutes for the ganache to cool to the right temperature before folding.
- Chilling Time (Mousse): Minimum 4 hours, ideally 6 hours or overnight. This inactive time is crucial for the mousse to set correctly and develop its full flavor and texture.
- Total Time: Approximately 4 hours 40 minutes to 7 hours (or longer if chilling overnight), with most of this being hands-off chilling time.
How to Serve
Presentation enhances the enjoyment of these elegant mousse cups. Here are some ideas:
- Choose Your Vessel:
- Clear Glasses: Small tumblers, wine glasses (stemless or stemmed), or even martini glasses showcase the airy texture and layers if you add garnish.
- Ramekins: Classic white or colored ramekins offer a sophisticated, bistro-style presentation.
- Small Jars: Mini mason jars or Weck jars give a rustic, charming look, great for picnics or casual gatherings (they come with lids!).
- Teacups: Vintage or elegant teacups provide a whimsical and unexpected serving option.
- Garnish Generously (Just Before Serving):
- Whipped Cream: A dollop or swirl of lightly sweetened whipped cream adds visual appeal and a creamy contrast.
- Chocolate:
- Shavings/Curls: Use a vegetable peeler or a sharp knife scraped across a block of chocolate.
- Dusting: A light dusting of unsweetened cocoa powder or powdered sugar offers simple elegance.
- Sauce: A drizzle of chocolate or caramel sauce adds extra decadence.
- Fruit:
- Berries: Fresh raspberries, sliced strawberries, or blueberries provide a pop of color and tartness to cut the richness.
- Cherry: A single fresh or maraschino cherry on top looks classic.
- Texture & Crunch:
- Chopped Nuts: Toasted hazelnuts, almonds, or pistachios add crunch.
- Cookie Crumbs: Crushed Oreos, shortbread, or biscotti sprinkled on top or layered at the bottom offer texture.
- Herbs: A single fresh mint sprig adds a touch of green and freshness.
- Serving Temperature: Always serve the mousse well-chilled, directly from the refrigerator. The cold temperature maintains its set texture and enhances its refreshing quality despite its richness.
- Accompaniments:
- Serve with a small, crisp cookie like a shortbread finger, biscotti, or a lace cookie for textural contrast.
- A small cup of espresso or strong coffee complements the chocolate flavor beautifully.
- For an adult pairing, consider a dessert wine like a Port or a Banyuls, or even a raspberry liqueur.
Additional Tips
Mastering the perfect Whipped Chocolate Mousse is easy with these extra tips:
- Use the Best Chocolate You Can Find: The flavor of your mousse is entirely dependent on the chocolate. Choose a high-quality bar (not chocolate chips) with a cacao percentage you enjoy (60-70% is generally recommended for a good balance). Taste the chocolate first – if you don’t enjoy eating it plain, you won’t love the mousse.
- Master the Melt: Avoid seizing your chocolate! Ensure your bowl and utensils are completely dry. Melt gently, either over a double boiler (making sure the bowl doesn’t touch the simmering water) or in the microwave in short bursts (15-20 seconds), stirring well after each interval. Stop heating when only a few small lumps remain and stir until smooth.
- Cool Chocolate Correctly: This is non-negotiable. Folding hot chocolate into whipped cream will melt the fat, causing the cream to collapse and resulting in a soupy or dense mousse. Cool the ganache until it’s barely warm to the touch (around body temperature or slightly warmer) but still fluid. Stir occasionally to prevent a skin from forming and ensure even cooling.
- Perfectly Whipped Cream: Start with very cold heavy cream, a cold bowl, and cold beaters. Beat until stiff peaks form – the cream should hold its shape firmly when the beaters are lifted. Don’t walk away during the final stages, as cream can go from perfect stiff peaks to over-whipped and grainy in seconds. Under-whipping will result in a softer-set mousse; over-whipping leads to a buttery, heavy texture.
- The Art of Folding: Use a large, flexible spatula. Cut vertically through the center of the mixture, sweep the spatula across the bottom of the bowl, and bring it back up, gently turning the mixture over on itself (a J-motion). Rotate the bowl slightly after each fold. The goal is to incorporate the ingredients with minimal deflation. Stop as soon as no large streaks of white cream remain. It’s better to slightly under-fold than over-fold.
- Flavor Experimentation: Don’t be afraid to customize!
- Citrus: Add 1-2 teaspoons of finely grated orange or lime zest to the ganache.
- Spice: A pinch of cinnamon, cayenne pepper (for a Mexican chocolate vibe), or cardamom infused into the warm cream can add complexity.
- Liqueur: Fold in 1-2 tablespoons of Grand Marnier, Cointreau, Bailey’s Irish Cream, Kahlua, or a good quality rum or brandy along with the vanilla extract. Reduce the cream slightly if adding liquid.
- Extracts: Replace or supplement vanilla with peppermint, almond, or coconut extract for different flavor profiles.
- Make-Ahead Magic: This mousse is an excellent make-ahead dessert. Prepare it a day or even two days in advance. Cover the cups tightly with plastic wrap and store them in the coldest part of your refrigerator. Garnish just before serving for the freshest look. The flavors actually deepen and meld beautifully overnight.
- Texture Control: For a slightly denser, richer mousse, you can slightly increase the amount of chocolate or use chocolate with a higher cacao percentage. For an even lighter, airier texture (though potentially less stable), ensure your cream is whipped perfectly to stiff peaks and be exceptionally gentle when folding. Using slightly less chocolate will also make it lighter.
Frequently Asked Questions (FAQ)
1. Can I use milk chocolate or white chocolate instead of dark/semi-sweet?
Yes, but with adjustments. Milk chocolate and white chocolate contain more sugar and milk solids and less cocoa solids/butter. They create a much sweeter, less intensely flavored, and softer-setting mousse. You might want to slightly reduce the added powdered sugar. White chocolate is particularly prone to overheating, so melt it very carefully. The texture will be different, likely softer.
2. Is this Whipped Chocolate Mousse recipe eggless?
Yes, the recipe provided above is eggless. Traditional French chocolate mousse often relies on raw or gently cooked eggs (yolks for richness, whipped whites for airiness). This version achieves its light texture solely through whipped cream, making it simpler and avoiding concerns about raw eggs.
3. How long will the chocolate mousse last in the refrigerator?
Properly covered (with plastic wrap pressed gently onto the surface or tightly covering the cup), the mousse will keep well in the refrigerator for 2-3 days. After that, the texture might start to degrade slightly, though it will still be safe to eat. Garnish just before serving for optimal freshness.
4. Can I freeze this chocolate mousse?
Freezing is generally not recommended for cream-based mousses like this one. The freezing and thawing process can damage the delicate air bubble structure created by the whipped cream, often resulting in a grainy, watery, or split texture upon defrosting. It’s best enjoyed fresh or refrigerated for a few days.
5. My mousse didn’t set properly / is too runny. What went wrong?
Several factors could be at play:
* Insufficient Chilling: The mousse needs at least 4 hours (preferably longer) in the fridge to fully set.
* Chocolate Too Hot: Folding hot ganache into the whipped cream melted the fat and deflated the air bubbles.
* Under-Whipped Cream: If the cream wasn’t beaten to stiff peaks, it lacked the structure to hold the mousse.
* Over-Mixing/Aggressive Folding: Folding too much or too vigorously deflated the whipped cream.
* Incorrect Cream Fat Content: Using light cream or half-and-half instead of heavy whipping cream (minimum 35% fat) won’t work.
6. Can I make this mousse vegan or dairy-free?
Yes, you can adapt it. Use high-quality dairy-free dark chocolate (check labels). Replace the heavy whipping cream with a full-fat canned coconut cream (use only the thick, solidified cream from the top after chilling the can overnight) or a high-quality vegan whipping cream alternative designed for whipping. Results may vary slightly in texture and flavor depending on the substitute used.
7. What’s the difference between chocolate mousse and chocolate pudding?
The main difference lies in texture and ingredients. Mousse is characterized by its light, airy texture, achieved by incorporating air through whipped cream or whipped egg whites (or both). It typically sets via chilling and the fat content. Pudding is usually denser and creamier, often thickened with a starch like cornstarch or flour, and sometimes enriched with egg yolks. Pudding is typically cooked on the stovetop.
8. Can I make one large bowl of mousse instead of individual cups?
Absolutely! You can pour the entire mousse mixture into one larger serving bowl instead of individual cups. It will still need to chill for at least 4-6 hours, possibly slightly longer due to the larger volume, to set properly. Cover the surface with plastic wrap while chilling. Serve by scooping portions into individual bowls at the table.
Whipped Chocolate Mousse Cups
Ingredients
Here’s what you’ll need to create these delightful Whipped Chocolate Mousse Cups:
- 8 ounces (about 225g) High-Quality Semi-Sweet or Dark Chocolate (60-70% Cacao): Finely chopped. The quality of your chocolate is paramount; using a good bar (not chips, which contain stabilizers) results in a smoother melt and richer flavor. The percentage dictates the intensity – use semi-sweet for a classic taste or dark for a deeper, less sweet profile.
- 2 cups (480ml) Heavy Whipping Cream (at least 35% fat): Divided. It’s crucial to use cold heavy cream with a high fat content to achieve stable, voluminous whipped cream, which forms the airy base of the mousse. One portion will be whipped, the other gently heated.
- 1/4 cup (30g) Powdered Sugar (Confectioners’ Sugar): Sifted. This dissolves easily into the cream without grittiness, adding just the right amount of sweetness to balance the chocolate. Sifting prevents lumps.
- 1 teaspoon Pure Vanilla Extract: Enhances the chocolate flavor and adds warmth and complexity to the mousse. Use pure extract for the best taste.
- 1/4 teaspoon Fine Sea Salt: A small pinch sharpens the chocolate flavor and cuts through the richness, creating a more balanced profile.
- Optional: 1 teaspoon Instant Espresso Powder: Dissolved in 1 teaspoon hot water. This is a secret weapon! It doesn’t make the mousse taste like coffee but significantly deepens and intensifies the chocolate flavor.
- Optional Garnishes: Chocolate shavings or curls, fresh berries (raspberries, strawberries), a dollop of sweetened whipped cream, cocoa powder dusting, or mint sprigs.
Instructions
Follow these steps carefully for perfectly light and airy chocolate mousse:
- Prepare the Chocolate: Place the finely chopped chocolate in a medium-sized heatproof bowl. If using espresso powder, dissolve it in 1 teaspoon of hot water and set aside.
- Heat Some Cream: In a small saucepan, heat 1/2 cup (120ml) of the heavy whipping cream over medium-low heat. Bring it just to a simmer – you’ll see small bubbles forming around the edges. Do not let it boil vigorously.
- Create Ganache Base: Pour the hot cream directly over the chopped chocolate in the bowl. Let it sit undisturbed for 3-5 minutes. This allows the heat from the cream to gently melt the chocolate without scorching it.
- Stir Until Smooth: Add the salt and the dissolved espresso mixture (if using) to the chocolate and cream. Start stirring gently from the center outwards with a spatula or whisk until the mixture is completely smooth, glossy, and homogenous. If any small lumps remain, you can gently heat the mixture over a double boiler (a heatproof bowl set over a saucepan of simmering water, ensuring the bottom of the bowl doesn’t touch the water) or microwave in 10-second bursts, stirring in between, until fully melted and smooth.
- Cool the Ganache: Set the chocolate ganache aside to cool to room temperature, or slightly warmer (around 85-95°F or 30-35°C). This is crucial. If the chocolate is too hot when folded into the whipped cream, it will melt the cream and deflate the mousse. If it’s too cold and stiff, it won’t incorporate smoothly. Stir it occasionally as it cools to keep it fluid.
- Whip the Remaining Cream: While the ganache cools, pour the remaining 1 ½ cups (360ml) of cold heavy whipping cream into a large, chilled mixing bowl (chilling the bowl and beaters helps the cream whip faster and achieve more volume). Add the sifted powdered sugar and vanilla extract.
- Beat to Stiff Peaks: Using an electric hand mixer or a stand mixer fitted with the whisk attachment, beat the cream mixture on medium-high speed. Start on low speed to avoid splattering, then increase. Continue beating until stiff peaks form. This means when you lift the beaters out of the cream, the peak that forms holds its shape firmly and doesn’t slump over. Be careful not to overbeat, or the cream will start to turn grainy and buttery.
- Temper the Ganache: Gently fold about one-third (a large scoop) of the whipped cream into the cooled chocolate ganache using a rubber spatula. This lightens the ganache, making it easier to incorporate into the remaining whipped cream without deflating it significantly. Use gentle, sweeping motions, cutting down through the center and folding up from the bottom.
- Combine Mousse Mixtures: Carefully scrape the lightened chocolate mixture into the bowl with the remaining whipped cream.
- Fold Gently: Using the same gentle folding technique (cut down, sweep across the bottom, fold up and over), combine the chocolate mixture and whipped cream. Continue folding just until no white streaks remain. It’s essential to fold minimally to retain as much air as possible – this is what gives the mousse its signature light texture. Stop folding as soon as it’s combined; over-mixing will result in a dense, heavy mousse.
- Portion the Mousse: Divide the mousse mixture evenly among 4-6 small serving glasses, ramekins, jars, or small bowls. You can spoon the mousse in, but for a neater presentation, transfer the mousse to a piping bag fitted with a large star or round tip and pipe it into the cups. Fill them about three-quarters full to leave room for garnish.
- Chill Thoroughly: Cover the mousse cups loosely with plastic wrap (press it gently onto the surface if you don’t plan on adding a whipped cream topping later, to prevent a skin from forming, otherwise just cover the top of the glass) and refrigerate for at least 4 hours, or preferably 6 hours or overnight. Chilling is essential for the mousse to set properly and for the flavors to meld and deepen. The mousse will firm up considerably during this time.
- Garnish and Serve: Once fully chilled and set, remove the mousse cups from the refrigerator. Garnish just before serving. Add a dollop of extra whipped cream, sprinkle with chocolate shavings, dust with cocoa powder, or top with fresh berries. Serve chilled.
Nutrition
- Serving Size: one normal portion
- Calories: 450
- Fat: 38g
