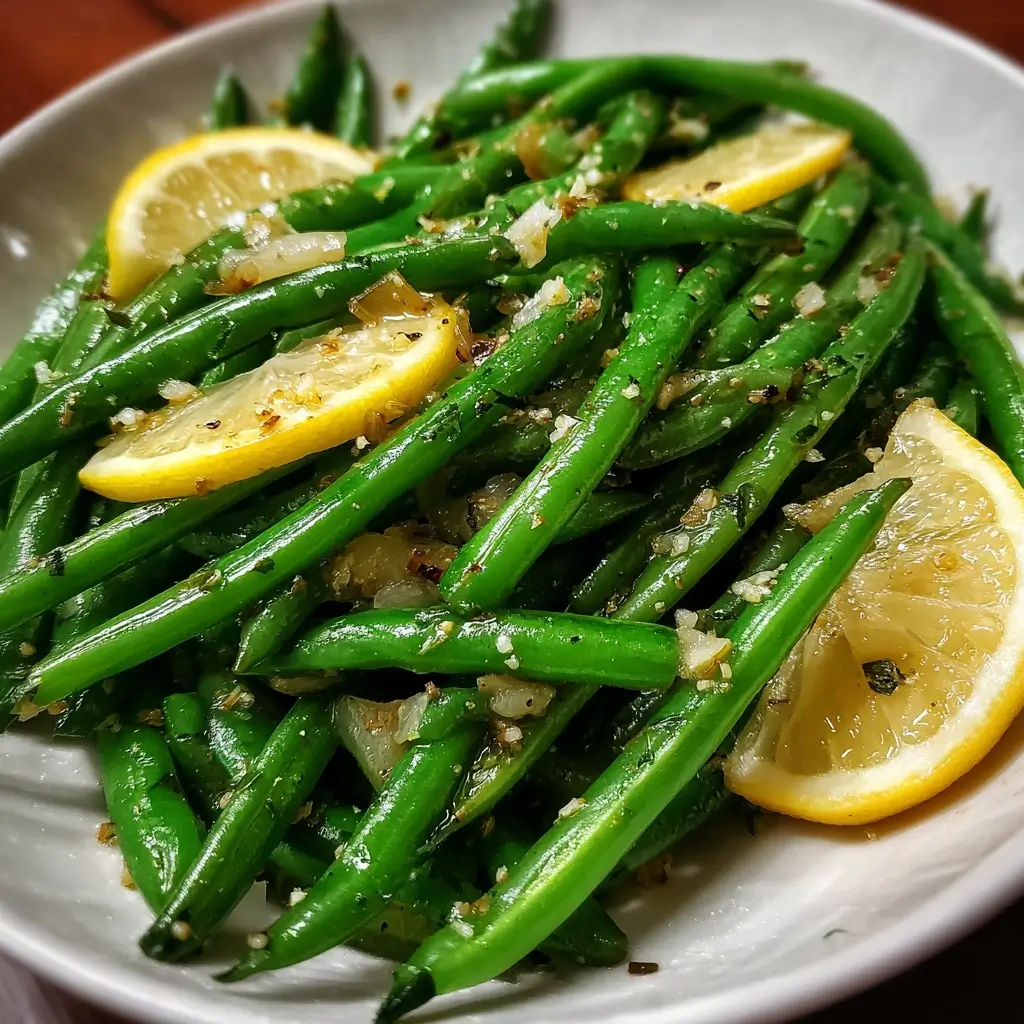
Of all the side dishes in my culinary repertoire, the ones that disappear the fastest are always the simplest, yet most flavorful. For years, I struggled to make green beans exciting. They were often the last vegetable left on the plate, a dutiful but unloved addition to our family meals. That all changed the day I decided to stop steaming them into submission and instead give them the vibrant, zesty treatment they truly deserved. The first time the aroma of garlic sizzling in olive oil, followed by the bright, sharp scent of fresh lemon, filled my kitchen, I knew I was onto something special. That evening, the platter of Zesty Lemon Garlic Green Beans was wiped clean before anything else. My husband, who typically regards green vegetables with polite indifference, asked for seconds. The kids, usually masters of pushing beans around their plates, actually fought over the last few. This recipe didn’t just transform a humble vegetable; it transformed our dinner table, proving that with a few quality ingredients and the right technique, even the most basic side can become the star of the show.
Ingredients
- 2 pounds Fresh Green Beans: The foundation of our dish. Select beans that are firm, bright green, and snap cleanly when bent. This indicates freshness and will ensure a wonderfully crisp-tender texture. Avoid any that are limp, brown, or overly large and tough.
- 3 tablespoons Extra Virgin Olive Oil: This is for sautéing and adding a rich, fruity flavor that complements the other ingredients beautifully. A good quality olive oil makes a noticeable difference.
- 8 cloves Garlic, finely minced: Don’t be shy with the garlic! Using fresh cloves and mincing them yourself provides a pungent, aromatic flavor that pre-minced jarred garlic simply can’t match. This is the “garlic” in our lemon garlic green beans, and its robust flavor is key.
- 1 large Lemon: We will be using both the zest and the juice from one large, fresh lemon. The zest provides fragrant, aromatic oils, while the juice adds that signature zesty, tangy kick that brightens the entire dish.
- 1 teaspoon Kosher Salt (or to taste): Kosher salt has larger crystals that dissolve well and are easier to control than table salt. It’s essential for bringing out the natural sweetness of the green beans and balancing the flavors.
- ½ teaspoon Freshly Ground Black Pepper (or to taste): Freshly ground pepper offers a much more potent and complex flavor than its pre-ground counterpart. It adds a subtle, spicy warmth that rounds out the dish.
- ¼ teaspoon Red Pepper Flakes (optional): For those who enjoy a little bit of heat. This small addition provides a gentle warmth on the palate that contrasts wonderfully with the bright lemon. Adjust the amount based on your preference for spice.
Instructions
- Prepare the Green Beans (The Foundation): The first step to perfect green beans is proper preparation. Begin by thoroughly washing the green beans under cool, running water to remove any dirt or debris. Pat them completely dry with a clean kitchen towel or paper towels; this is crucial for preventing them from steaming instead of sautéing later. Next, “top and tail” the beans by trimming off the tough stem ends. You can leave the tapered tail end on for a more rustic look, or trim it off for uniformity. This can be done efficiently by lining up a handful of beans on a cutting board and slicing off the ends all at once. Set the trimmed beans aside.
- Prepare the Aromatics (The Flavor Powerhouse): Now, let’s get our flavor components ready. Zest the entire lemon first, before you cut it in half to juice it. Using a microplane or the finest side of a box grater, carefully remove the yellow outer layer of the peel, avoiding the bitter white pith underneath. This zest contains the lemon’s essential oils and is packed with intense citrus aroma. Once zested, cut the lemon in half and squeeze out the juice, removing any seeds. Next, peel your garlic cloves and finely mince them. A sharp knife is best for this, as it releases the garlic’s flavor without crushing it into a paste, which can become bitter when cooked.
- Blanch the Green Beans (The Secret to Vibrancy and Texture): This step is the professional secret to achieving perfectly crisp-tender green beans that retain a beautiful, vibrant green color. Bring a large pot of water to a rolling boil and add a generous pinch of salt (about a tablespoon). While the water is heating, prepare an ice bath by filling a large bowl with cold water and plenty of ice cubes. Carefully add the prepared green beans to the boiling water and cook for just 2-3 minutes. They should be slightly tender but still have a distinct snap. Immediately use a slotted spoon or spider strainer to transfer the beans from the boiling water directly into the ice bath. This shocks the beans, instantly stopping the cooking process and locking in that gorgeous, bright green color. Let them sit in the ice bath for a minute or two until completely cooled, then drain them thoroughly and pat them dry once more.
- Sauté and Infuse (Bringing It All Together): In a large skillet or sauté pan (large enough to hold all the beans without crowding), heat the extra virgin olive oil over medium heat. You’ll know the oil is ready when it shimmers slightly. Add the minced garlic to the pan and sauté for about 30-60 seconds, stirring constantly. Be very careful here; you want the garlic to become incredibly fragrant and just lightly golden, but not brown. Burnt garlic will impart a bitter taste to the entire dish.
- The Final Toss (The Marriage of Flavors): Once the garlic is fragrant, add the blanched and dried green beans to the skillet. Increase the heat to medium-high. Using tongs, toss the green beans continuously to coat them in the garlic-infused olive oil. Sauté for 3-4 minutes, just until the beans are heated all the way through. You want to warm them up and marry the flavors, not cook them further into sogginess.
- Finishing Touches and Serving: Remove the skillet from the heat. This is an important step, as adding the lemon juice over high heat can cook off its fresh flavor. Sprinkle the lemon zest, lemon juice, kosher salt, freshly ground black pepper, and the optional red pepper flakes over the beans. Toss everything together one last time to ensure every single bean is coated in the zesty, garlicky goodness. Taste one bean and adjust seasoning if necessary—it might need another pinch of salt or a squeeze more of lemon. Transfer the Zesty Lemon Garlic Green Beans to a serving platter and serve immediately while they are hot and at their absolute best.
Nutrition Facts
This recipe is designed as a healthy, flavorful side dish. The nutritional information is an approximation and can vary based on the exact ingredients used.
- Servings: 4-6 as a side dish
- Calories Per Serving: Approximately 95 kcal
- Fiber: Green beans are an excellent source of dietary fiber, which is crucial for promoting healthy digestion, regulating blood sugar, and helping you feel full and satisfied after a meal.
- Vitamin C: Thanks to the generous amount of fresh lemon juice, this dish provides a significant boost of Vitamin C, a powerful antioxidant that supports a healthy immune system and skin health.
- Healthy Fats: The use of extra virgin olive oil provides monounsaturated fats, which are known as “good fats.” These fats are heart-healthy and can help reduce bad cholesterol levels in the body.
- Low in Sugar: This recipe contains no added sugars and is naturally low in sugar, making it a fantastic choice for a healthy, balanced diet and for those monitoring their sugar intake.
- Rich in Antioxidants: Both garlic (specifically its compound allicin) and green beans are packed with antioxidants, which help protect your body’s cells from damage caused by free radicals.
Preparation Time
This side dish is celebrated not only for its incredible flavor but also for its efficiency in the kitchen, making it a perfect choice for both busy weeknights and elaborate holiday dinners.
- Active Preparation Time: Approximately 10-12 minutes. This includes washing and trimming the beans, and mincing the garlic and zesting the lemon.
- Cooking Time: Approximately 8-10 minutes. This accounts for the quick blanching process and the final sauté in the skillet.
- Total Time: Around 20-22 minutes from start to finish. This quick turnaround allows you to prepare a fresh, gourmet-quality vegetable side dish in less time than it takes to preheat the oven for other parts of your meal.
How to Serve
These Zesty Lemon Garlic Green Beans are incredibly versatile and can elevate almost any meal. Their bright, clean flavor profile allows them to pair beautifully with a wide range of main courses. Here are some serving suggestions:
- As a Classic Side Dish: Serve them alongside your favorite proteins. They are the perfect complement to:
- A perfectly roasted chicken.
- A juicy, grilled steak or beef tenderloin.
- Pan-seared salmon, cod, or halibut.
- Hearty pasta dishes, providing a fresh, green contrast.
- Vegetarian mains like quinoa bowls, lentil loaf, or stuffed bell peppers.
- For Holiday Feasts: These beans are a standout addition to any holiday table, cutting through the richness of other traditional dishes.
- Thanksgiving: A vibrant green alternative or addition to the classic green bean casserole.
- Christmas: Pairs wonderfully with roasted turkey, prime rib, or a glazed ham.
- Easter: The bright lemon flavor is a natural fit for spring celebrations alongside lamb or other roasts.
- Elevate the Presentation: A few simple garnishes can make this dish look as impressive as it tastes.
- Sprinkle with extra fresh lemon zest right before serving for a pop of color and aroma.
- For added texture and a nutty flavor, top with a handful of toasted sliced almonds, pine nuts, or chopped walnuts.
- A light dusting of freshly grated Parmesan or Pecorino Romano cheese adds a salty, savory depth.
- Arrange them neatly on a long, white platter to make their vibrant green color stand out.
- In Salads: Allow the cooked beans to cool to room temperature and toss them into a salad for a substantial and flavorful addition. They are particularly good in a Niçoise-style salad or a simple mixed green salad with a light vinaigrette.
Additional Tips
To ensure your Zesty Lemon Garlic Green Beans are perfect every single time, keep these eight professional tips in mind:
- Don’t Ever Skip the Blanching and Ice Bath: It might seem like an extra step, but it is the single most important technique for achieving that signature vibrant green color and perfect crisp-tender bite. It par-cooks the beans just enough so they only need a quick sauté, preventing them from becoming dull and soggy in the pan.
- Fresh Ingredients are Non-Negotiable: For a recipe with so few ingredients, their quality is paramount. Use fresh green beans, fresh garlic cloves, and a fresh lemon. The flavor difference between fresh lemon juice and bottled juice, or fresh garlic and jarred, is immense and will define the final taste of your dish.
- Master Your Garlic Sauté: The most common mistake is burning the garlic, which will ruin the dish with a bitter flavor. Sauté it over medium heat and stir it constantly. The moment it becomes fragrant and turns a very light golden color (after about 30-60 seconds), it’s time to add the beans. Don’t walk away from the pan during this step.
- Zest Before You Juice: It’s a simple mechanical tip that makes life much easier. Trying to zest a floppy, juiced lemon half is a frustrating task. Always zest the firm, whole lemon first, then cut it in half to squeeze the juice. A microplane grater will give you the finest zest without any of the bitter white pith.
- Choose the Right Pan: Use a skillet or pan that is large enough to hold all the green beans in a relatively single layer. If you overcrowd the pan, the beans will steam instead of sauté, leading to a softer, less desirable texture. If making a double batch, it’s better to cook them in two separate batches.
- Make-Ahead Strategy for Stress-Free Meals: You can perform the most time-consuming steps ahead of time. Wash, trim, and blanch the green beans up to a day in advance. After the ice bath, dry them thoroughly and store them in an airtight container or a zip-top bag in the refrigerator. When you’re ready to serve, the final sauté will only take about 5 minutes.
- Customize with Herbs and Spices: While delicious as is, this recipe is a fantastic canvas for other flavors. After tossing with the lemon and garlic, consider adding a tablespoon of fresh chopped herbs like parsley (for freshness), dill (great with fish), or mint (for a surprising, bright twist).
- Get Nutty for Texture: Adding a crunchy element takes these green beans to the next level. For the best flavor, toast your nuts beforehand. Simply place sliced almonds, pine nuts, or chopped walnuts in a dry skillet over medium heat and toast for a few minutes, shaking the pan frequently, until they are golden and fragrant. Sprinkle them over the beans just before serving.
FAQ Section
Here are answers to some of the most frequently asked questions about making this recipe.
1. Can I use frozen green beans instead of fresh?
Yes, you can use frozen green beans in a pinch. However, the texture will be slightly different—they tend to be softer than fresh, blanched beans. To use them, let them thaw completely and pat them very dry with paper towels to remove excess moisture. You can skip the blanching step. Sauté them for a few minutes longer (5-6 minutes) in the garlic and oil to ensure they are heated through before adding the final ingredients.
2. How do I store leftovers and for how long?
Store any leftover green beans in an airtight container in the refrigerator for up to 3-4 days. They are best reheated gently in a skillet over medium heat for a few minutes until warmed through. Note that they will lose some of their crispness upon reheating but will still be delicious.
3. My green beans turned out soggy and mushy. What did I do wrong?
Sogginess is almost always a result of overcooking. This can happen in two ways: either you boiled them for too long during the blanching stage (remember, only 2-3 minutes!), or you sautéed them for too long at the end. The final sauté is just to heat them through and coat them in the sauce, not to cook them further.
4. Why did my green beans turn a dull, olive green instead of staying bright?
This happens when you skip the ice bath step after blanching. The ice bath immediately stops the cooking process and shocks the chlorophyll in the beans, which is what locks in that beautiful, vibrant green color. Letting them continue to sit in the hot water or just draining them will allow the cooking to continue, resulting in a duller color.
5. I’m making this for a large holiday crowd. Any tips for scaling the recipe?
Absolutely. The most important tip when scaling up is to work in batches. Do not try to cook 4 or 5 pounds of green beans in one skillet. Blanch the beans in batches, and more importantly, sauté them in batches. This ensures the pan stays hot and the beans sauté properly rather than steaming, maintaining their crisp texture. You can keep the finished batches warm in a low-temperature oven (around 200°F or 95°C) until all batches are done.
6. Is this recipe considered healthy?
Yes, this is a very healthy side dish. It’s low in calories, high in fiber, and packed with vitamins and antioxidants from the vegetables and lemon. The use of heart-healthy olive oil instead of butter or other fats makes it a nutritious choice that fits into almost any diet, including vegetarian, vegan, gluten-free, and low-carb.
7. Can I use this lemon-garlic sauce on other vegetables?
Definitely! This simple and flavorful preparation method is fantastic on a variety of other vegetables. It works wonderfully with asparagus spears, broccoli florets, broccolini, and even zucchini sticks. You may need to adjust the blanching time depending on the vegetable you choose (e.g., asparagus needs less time, broccoli florets a bit more).
8. Is there a substitute for fresh lemon juice?
While fresh lemon juice is highly recommended for the best, brightest flavor, you can use bottled lemon juice if it’s all you have. Be aware that bottled juice can sometimes have a slightly more muted or bitter aftertaste. If you use bottled juice, you will miss out on the incredible aroma from the fresh zest, which is a key component of the dish’s flavor profile.
Zesty Lemon Garlic Green Beans
Ingredients
- 2 pounds Fresh Green Beans: The foundation of our dish. Select beans that are firm, bright green, and snap cleanly when bent. This indicates freshness and will ensure a wonderfully crisp-tender texture. Avoid any that are limp, brown, or overly large and tough.
- 3 tablespoons Extra Virgin Olive Oil: This is for sautéing and adding a rich, fruity flavor that complements the other ingredients beautifully. A good quality olive oil makes a noticeable difference.
- 8 cloves Garlic, finely minced: Don’t be shy with the garlic! Using fresh cloves and mincing them yourself provides a pungent, aromatic flavor that pre-minced jarred garlic simply can’t match. This is the “garlic” in our lemon garlic green beans, and its robust flavor is key.
- 1 large Lemon: We will be using both the zest and the juice from one large, fresh lemon. The zest provides fragrant, aromatic oils, while the juice adds that signature zesty, tangy kick that brightens the entire dish.
- 1 teaspoon Kosher Salt (or to taste): Kosher salt has larger crystals that dissolve well and are easier to control than table salt. It’s essential for bringing out the natural sweetness of the green beans and balancing the flavors.
- ½ teaspoon Freshly Ground Black Pepper (or to taste): Freshly ground pepper offers a much more potent and complex flavor than its pre-ground counterpart. It adds a subtle, spicy warmth that rounds out the dish.
- ¼ teaspoon Red Pepper Flakes (optional): For those who enjoy a little bit of heat. This small addition provides a gentle warmth on the palate that contrasts wonderfully with the bright lemon. Adjust the amount based on your preference for spice.
Instructions
- Prepare the Green Beans (The Foundation): The first step to perfect green beans is proper preparation. Begin by thoroughly washing the green beans under cool, running water to remove any dirt or debris. Pat them completely dry with a clean kitchen towel or paper towels; this is crucial for preventing them from steaming instead of sautéing later. Next, “top and tail” the beans by trimming off the tough stem ends. You can leave the tapered tail end on for a more rustic look, or trim it off for uniformity. This can be done efficiently by lining up a handful of beans on a cutting board and slicing off the ends all at once. Set the trimmed beans aside.
- Prepare the Aromatics (The Flavor Powerhouse): Now, let’s get our flavor components ready. Zest the entire lemon first, before you cut it in half to juice it. Using a microplane or the finest side of a box grater, carefully remove the yellow outer layer of the peel, avoiding the bitter white pith underneath. This zest contains the lemon’s essential oils and is packed with intense citrus aroma. Once zested, cut the lemon in half and squeeze out the juice, removing any seeds. Next, peel your garlic cloves and finely mince them. A sharp knife is best for this, as it releases the garlic’s flavor without crushing it into a paste, which can become bitter when cooked.
- Blanch the Green Beans (The Secret to Vibrancy and Texture): This step is the professional secret to achieving perfectly crisp-tender green beans that retain a beautiful, vibrant green color. Bring a large pot of water to a rolling boil and add a generous pinch of salt (about a tablespoon). While the water is heating, prepare an ice bath by filling a large bowl with cold water and plenty of ice cubes. Carefully add the prepared green beans to the boiling water and cook for just 2-3 minutes. They should be slightly tender but still have a distinct snap. Immediately use a slotted spoon or spider strainer to transfer the beans from the boiling water directly into the ice bath. This shocks the beans, instantly stopping the cooking process and locking in that gorgeous, bright green color. Let them sit in the ice bath for a minute or two until completely cooled, then drain them thoroughly and pat them dry once more.
- Sauté and Infuse (Bringing It All Together): In a large skillet or sauté pan (large enough to hold all the beans without crowding), heat the extra virgin olive oil over medium heat. You’ll know the oil is ready when it shimmers slightly. Add the minced garlic to the pan and sauté for about 30-60 seconds, stirring constantly. Be very careful here; you want the garlic to become incredibly fragrant and just lightly golden, but not brown. Burnt garlic will impart a bitter taste to the entire dish.
- The Final Toss (The Marriage of Flavors): Once the garlic is fragrant, add the blanched and dried green beans to the skillet. Increase the heat to medium-high. Using tongs, toss the green beans continuously to coat them in the garlic-infused olive oil. Sauté for 3-4 minutes, just until the beans are heated all the way through. You want to warm them up and marry the flavors, not cook them further into sogginess.
- Finishing Touches and Serving: Remove the skillet from the heat. This is an important step, as adding the lemon juice over high heat can cook off its fresh flavor. Sprinkle the lemon zest, lemon juice, kosher salt, freshly ground black pepper, and the optional red pepper flakes over the beans. Toss everything together one last time to ensure every single bean is coated in the zesty, garlicky goodness. Taste one bean and adjust seasoning if necessary—it might need another pinch of salt or a squeeze more of lemon. Transfer the Zesty Lemon Garlic Green Beans to a serving platter and serve immediately while they are hot and at their absolute best.
Nutrition
- Serving Size: one normal portion
- Calories: 95