It started on one of those chaotic weekday mornings that every parent knows too well. The clock was ticking, the kids were moving at a glacial pace, and the thought of pouring yet another bowl of sugary cereal felt like a parental defeat. I needed something fast, but I also craved something genuinely nutritious to fuel our family for the day ahead. Scouring the fridge, I saw the essentials: a carton of eggs and a crisper drawer brimming with colorful vegetables. An idea sparked. Instead of a complex scramble or omelet, why not simplify? That morning, Boiled Eggs with Veggie Dippers was born, and to say it was a hit would be an understatement. The kids, who would normally turn their noses up at a pile of raw veggies, were suddenly fascinated. The act of dipping a bright red bell pepper strip or a crunchy carrot stick into the creamy yolk of a perfectly boiled egg turned breakfast into an interactive, fun experience. It was a game-changer. This simple, unassuming recipe has since become a cornerstone in our household, serving as a quick breakfast, a healthy after-school snack, a light lunch, and even a vibrant appetizer for casual get-togethers. It’s a testament to the fact that the most satisfying meals are often the simplest, relying on fresh ingredients and a touch of creativity to bring them to life. This dish is my secret weapon for a healthy, happy, and stress-free mealtime, and I’m thrilled to share the foolproof method that will make you fall in love with it, too.
Ingredients
- 8 Large Eggs: The star of the show. Using high-quality, fresh eggs will yield the best flavor and the creamiest yolks. If you can find them, pasture-raised eggs often have a richer, deeper orange yolk.
- 1 Large Cucumber: Provides a cool, refreshing crunch. We’ll be cutting this into long, sturdy sticks perfect for dipping.
- 2 Large Carrots: Sweet, crisp, and packed with vitamins. They add a beautiful orange hue to the platter.
- 1 Red Bell Pepper: Sweet, juicy, and less bitter than its green counterpart. Its vibrant red color makes the dish visually appealing.
- 1 Yellow Bell Pepper: Similar to the red pepper but with a slightly milder, fruitier taste. The combination of red and yellow peppers creates a stunning visual contrast.
- 1 cup Celery Stalks (about 2-3 stalks): Offers a distinct, slightly savory flavor and a satisfyingly fibrous snap.
- 1 cup Cherry Tomatoes: These little bursts of juicy sweetness don’t need to be cut, making them a perfect, low-prep addition to the platter.
- 1 tablespoon White Vinegar (Optional): A secret weapon for boiling eggs. Adding a splash to the water can help the egg whites set faster and can make peeling them significantly easier.
- Salt and Pepper to taste: For seasoning the eggs. A sprinkle of flaky sea salt and freshly cracked black pepper elevates the simple boiled egg to something special.
- Optional Dips (e.g., 1/2 cup hummus or Greek yogurt dip): While the egg yolk itself is a fantastic dip, offering an additional option like hummus or a seasoned yogurt dip adds another layer of flavor and variety.
Instructions
This recipe is beautifully simple, broken down into two main parts: perfecting the boiled eggs and prepping the vibrant vegetable dippers. Follow these steps for a flawless result every time.
Part 1: The Art of the Perfect Boiled Egg
The quality of your dish hinges on a perfectly cooked egg. Whether you prefer a slightly jammy center or a fully firm yolk, this method is foolproof.
- Prepare the Eggs: Gently place the 8 large eggs in a single layer at the bottom of a medium or large saucepan. Do not stack them, as this can lead to uneven cooking and cracking.
- Add Cold Water: Cover the eggs with cold water, ensuring there is about 1 to 2 inches of water above the eggs. Starting with cold water helps the eggs cook more evenly from the outside in, preventing the whites from becoming rubbery before the yolk is cooked.
- Add Vinegar (Optional): If using, add 1 tablespoon of white vinegar to the water. This step is a game-changer for easy peeling, especially if you are using very fresh eggs.
- Bring to a Boil: Place the saucepan on the stove over high heat and bring the water to a full, rolling boil.
- Turn Off the Heat and Cover: As soon as the water reaches a rolling boil, immediately turn off the heat. Remove the pan from the hot burner and cover it with a tight-fitting lid.
- Let Them Sit: This is the most crucial step for determining the doneness of your yolk. Let the eggs sit in the hot water for the following times:
- For a soft, jammy yolk: 6-7 minutes.
- For a medium, creamy yolk: 8-10 minutes.
- For a classic hard-boiled yolk (fully set): 11-12 minutes.
- Prepare an Ice Bath: While the eggs are sitting, fill a large bowl with ice and cold water. This ice bath is essential for stopping the cooking process immediately.
- Shock the Eggs: Once the desired time has elapsed, use a slotted spoon to carefully transfer the hot eggs from the saucepan directly into the ice bath. Let them cool in the ice water for at least 5-10 minutes, or until they are cool enough to handle. This shock of cold water not only stops the cooking (preventing that unappetizing green ring around the yolk) but also causes the egg white to contract slightly, pulling away from the shell and making them much easier to peel.
- Peel the Eggs: Gently tap the cooled egg on a hard surface to crack the shell all over. Roll it between your palms to loosen the shell further. Start peeling from the wider end of the egg, where the air pocket is, preferably under a thin stream of running water to help wash away any small shell fragments.
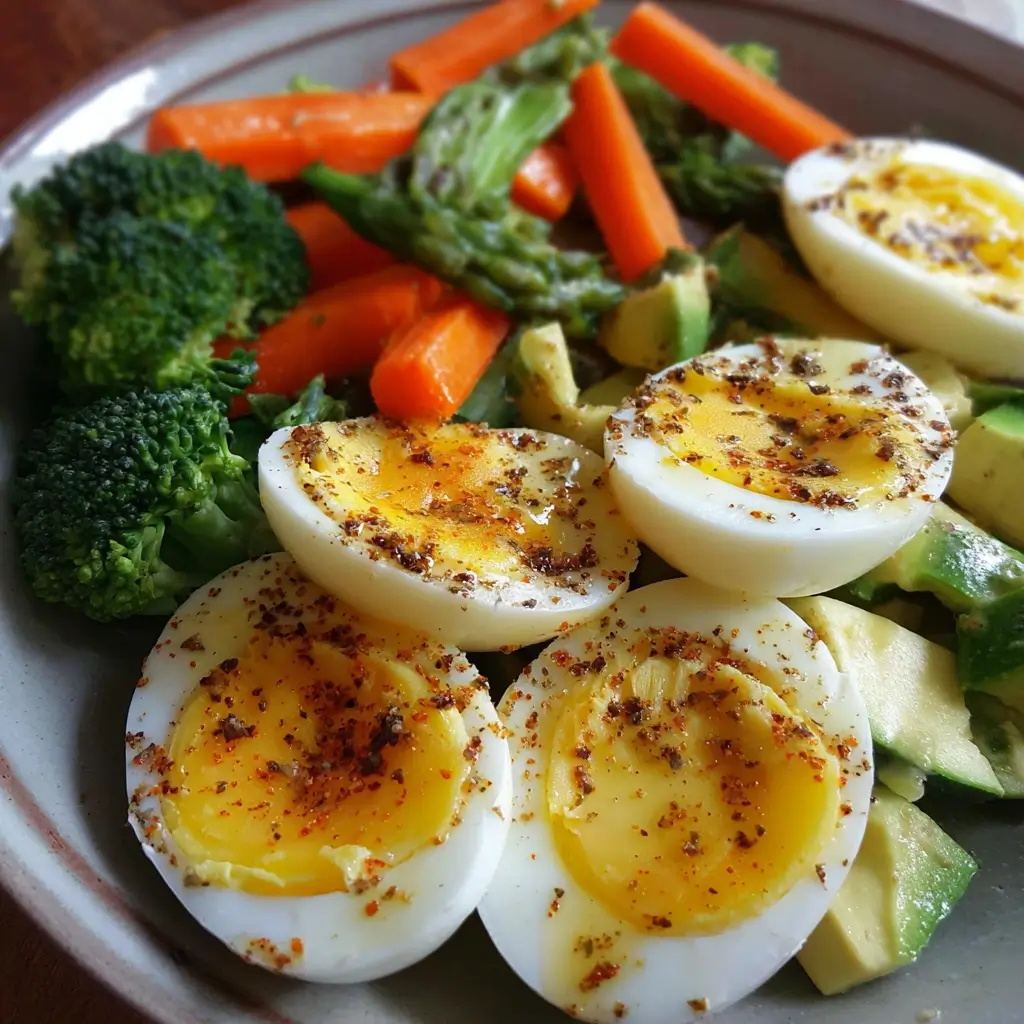
- Slice and Season: Once peeled, slice the eggs in half lengthwise. Arrange them on your serving platter, yolk-side up. Sprinkle generously with salt and freshly cracked black pepper.
Part 2: Preparing the Vibrant Veggie Dippers
While the eggs are cooking and cooling, you can efficiently prepare your fresh vegetables.
- Wash and Dry: Thoroughly wash all your vegetables under cold running water and pat them dry with a paper towel.
- Prepare the Carrots: Peel the carrots and trim off the ends. Cut them into sticks approximately 3-4 inches long and about 1/2-inch thick, similar to the size of a classic French fry.
- Prepare the Celery: Trim the ends of the celery stalks. Cut them into sticks of a similar length to the carrots. If the stalks are very wide, you can slice them in half lengthwise first.
- Prepare the Cucumber: You can choose to peel the cucumber or leave the skin on for extra color and fiber. Trim the ends and cut it in half crosswise. Then, cut each half into long, sturdy spears.
- Prepare the Bell Peppers: Slice the top and bottom off the red and yellow bell peppers. Make a single vertical cut down the side and open it up to lay it flat. Remove the seeds and the white pith. Slice the pepper into long, uniform strips perfect for dipping.
- Assemble the Platter: Artfully arrange the prepared vegetable sticks, cherry tomatoes, and halved boiled eggs on a large platter or board. If you’re using an additional dip like hummus or yogurt, place it in a small bowl in the center of the platter. Your delicious and healthy meal is now ready to be served.
Nutrition Facts
This recipe is a powerhouse of nutrition, balancing protein, healthy fats, and vitamin-rich carbohydrates.
- Servings: 4 servings
- Calories Per Serving: Approximately 280-320 kcal (This can vary based on the size of the eggs and vegetables and the inclusion of optional dips).
- Excellent Source of Protein (Approx. 14g per serving): The eggs provide high-quality, complete protein, which is essential for muscle repair, immune function, and keeping you feeling full and satisfied for longer.
- Rich in Healthy Fats (Approx. 20g per serving): The egg yolks are a fantastic source of healthy monounsaturated and polyunsaturated fats, as well as choline, a nutrient vital for brain health and development.
- Packed with Fiber and Vitamins: The variety of colorful vegetables delivers a significant dose of dietary fiber, which aids in digestion and gut health. They are also loaded with essential vitamins like Vitamin A (from carrots), Vitamin C (from bell peppers), and Vitamin K (from celery).
- Low in Carbohydrates: This dish is naturally low in carbohydrates, making it an excellent choice for those following a low-carb or ketogenic lifestyle. The carbs present are complex and come from nutrient-dense vegetables.
- Rich in Antioxidants: The vibrant colors of the vegetables, particularly the red and yellow peppers and cherry tomatoes, indicate a high concentration of antioxidants like beta-carotene and lycopene, which help fight inflammation and protect your cells from damage.
Preparation Time
This recipe is designed for efficiency, making it perfect for busy schedules.
- Total Preparation Time: 20-25 minutes
- Active Time: 10-15 minutes (This is the time you’ll spend actively washing, chopping, and arranging).
- Cooking/Cooling Time: 10-15 minutes (This time can be used efficiently to prepare the vegetables while the eggs cook and cool).
How to Serve
The beauty of this dish lies in its versatility. It can be adapted for any occasion, from a solo lunch to a party appetizer. Here are a few creative ways to serve your Boiled Eggs with Veggie Dippers:
- The Classic Deconstructed Platter:
- Arrange the halved, seasoned eggs in the center of a large round platter or wooden board.
- Create sections around the eggs for each type of vegetable, grouping them by color for a visually stunning effect.
- Place a small bowl of hummus, seasoned Greek yogurt, or another favorite dip in the middle. This is perfect for family-style sharing.
- The “On-the-Go” Bento Box:
- This is the ultimate meal-prep solution for work or school lunches.
- Use a bento-style container with multiple compartments.
- Place two or three halved eggs in one section.
- Fill the other sections with a mix of the veggie sticks.
- Use a small, leak-proof container for a serving of dip. It’s a complete, portable, and healthy lunch that will keep you energized.
- The Interactive “Dip Bar” for Kids:
- To make it extra fun for picky eaters, serve the components separately.
- Keep the eggs whole (but peeled) and let the kids slice them with a kid-safe knife.
- Offer a “dip bar” with 2-3 different healthy dip options (hummus, yogurt ranch, guacamole).
- This empowers them to build their own plate and makes eating vegetables feel like a fun game.
- The Elegant Appetizer Skewers:
- For a party or gathering, elevate the presentation by creating mini skewers.
- Use small bamboo skewers and thread on a cherry tomato, a folded slice of bell pepper, a chunk of cucumber, and a half of a boiled egg at the end.
- Arrange the skewers on a platter with a drizzle of olive oil and a sprinkle of fresh herbs like dill or chives.
Additional Tips
Take your Boiled Eggs with Veggie Dippers from great to absolutely perfect with these pro tips.
- The Age of the Egg Matters: While we all love fresh eggs, slightly older eggs (about a week old) are actually easier to peel. The membrane inside the shell of a very fresh egg tends to cling tightly to the egg white. As the egg ages, it loses a bit of moisture and an air pocket forms at the wide end, creating separation that makes for a cleaner peel.
- Master the Ice Bath: Do not skip the ice bath! It’s the single most important step for easy peeling and a perfect texture. Plunging the hot eggs into ice water causes the egg to contract, pulling it away from the shell. It also instantly stops the cooking process, ensuring your yolks are exactly how you like them and preventing the formation of a gray-green sulfur ring.
- Don’t Crowd the Pan: When boiling, make sure the eggs are in a single layer in your saucepan. If they’re crowded or stacked, they won’t cook evenly, and they’re more likely to knock into each other and crack during the boiling process.
- Get Creative with Veggie Cuts: Don’t just stick to sticks! For a more interesting platter, try different cuts. Use a crinkle-cutter for the carrots and cucumbers to create fun, wavy shapes. Slice radishes thinly into rounds. Use broccoli and cauliflower florets for a different texture. The more variety, the more appealing the platter will be.
- Dip Diversity is Key: The creamy egg yolk is a fantastic natural dip, but offering other options can elevate the experience. Think beyond hummus. Try a Greek yogurt dip with fresh dill and lemon juice, a smoky baba ghanoush, a zesty guacamole, or a simple pesto. Having multiple dips adds layers of flavor and makes the meal more satisfying.
- Meal Prep Magic: This recipe is a meal-prepper’s dream. Boil a dozen eggs at the start of the week and store them, unpeeled, in the refrigerator for up to 7 days. You can also wash and chop all your vegetables and store them in an airtight container with a paper towel at the bottom to absorb excess moisture. They will stay crisp for 3-4 days, allowing you to assemble a healthy snack or lunch in minutes.
- Seasoning is Your Friend: Don’t underestimate the power of seasoning. Beyond salt and pepper, try sprinkling your eggs with other spices. A dash of smoked paprika adds a lovely color and smoky flavor. A sprinkle of Everything Bagel Seasoning is a fan favorite for a reason. Red pepper flakes can add a kick of heat, and fresh herbs like chives or parsley add freshness.
- Involve the Kids in Prep: If you’re making this for your family, turn it into a fun activity. Kids are much more likely to eat vegetables they helped prepare. Let them wash the veggies, arrange them on the platter, or help mix up a simple yogurt dip. It fosters healthy eating habits and creates a positive association with nutritious food.
Frequently Asked Questions (FAQ)
Here are answers to some common questions about making this simple and delicious recipe.
1. How can I ensure my eggs are boiled to the perfect doneness for my preference?
The key is precise timing after the water has boiled and the heat is turned off. Use this guide: for a runny, liquid center (great for toast), aim for 4-5 minutes. For a “jammy” center that’s soft and slightly gooey (perfect for dipping), 6-7 minutes is ideal. For a firmer but still creamy yolk, go for 8-10 minutes. For a completely firm, classic hard-boiled egg, 11-12 minutes is the sweet spot. Set a timer to be exact!
2. Can I make this recipe ahead of time for meal prep?
Absolutely! This is one of the best recipes for meal prepping. You can boil the eggs and store them unpeeled in an airtight container in the fridge for up to a week. The vegetables can be washed, chopped, and stored in a separate airtight container for up to 4 days. To keep veggies like carrots, celery, and cucumbers extra crisp, you can store them in a container of water in the fridge. When you’re ready to eat, just peel and slice the eggs, drain the veggies, and assemble.
3. Why are my boiled eggs so difficult to peel?
This is a very common frustration! The primary culprit is usually the freshness of the egg. Very fresh eggs have a lower pH, which causes the inner membrane to stick stubbornly to the egg white. Using eggs that are at least a week old helps. The other critical factor is the ice bath. Shocking the hot eggs in ice water causes the egg white to shrink and pull away from the shell, making peeling significantly easier.
4. Is this recipe suitable for someone on a keto or low-carb diet?
Yes, this recipe is perfect for a ketogenic or low-carb lifestyle. Eggs are a keto staple, providing protein and healthy fats with virtually no carbs. The vegetables recommended—cucumbers, celery, and bell peppers—are all low-carb, high-fiber options. Just be mindful of your dip choice; stick to full-fat Greek yogurt dips, guacamole, or low-carb ranch, and avoid sugary or starchy dips.
5. What are the best vegetables to use for dipping?
While the recipe lists some classics, the best vegetables are the ones you enjoy! The key is to choose vegetables that are sturdy enough to hold up to dipping. Excellent choices include:
- For crunch: Carrots, celery, bell peppers, cucumbers, radishes, jicama sticks, snap peas.
- For a different texture: Lightly blanched asparagus spears, broccoli florets, cauliflower florets.
- For a burst of flavor: Cherry or grape tomatoes.
6. How should I store leftovers?
If you have leftovers, store the eggs and vegetables separately in airtight containers in the refrigerator. Peeled boiled eggs are best eaten within 2 days. The cut vegetables will last for another day or two but may lose some of their crispness. It’s best to assemble the platter just before serving for optimal freshness and texture.
7. My kids are very picky eaters. How can I make this dish more appealing to them?
Presentation is everything for kids. Try using a crinkle-cutter to make fun, wavy vegetable shapes. Serve the components in a “muffin tin meal,” with eggs in one cup, carrots in another, peppers in a third, and so on. Most importantly, offer a dip they already love, like a healthy ranch dip made with Greek yogurt. Letting them “play” with their food by dipping makes the experience more engaging and less intimidating.
8. Can I use different dips besides the egg yolk or hummus?
Of course! The possibilities are endless and allow you to customize the dish to your taste. Consider these delicious options:
- Guacamole: For healthy fats and a creamy, zesty flavor.
- Baba Ghanoush: A smoky, savory dip made from eggplant.
- Tzatziki: A refreshing Greek yogurt dip with cucumber, garlic, and dill.
- Pesto: For a burst of fresh, herbaceous flavor.
- White Bean Dip: A creamy, protein-packed alternative to hummus.

Boiled Eggs with Veggie Dippers
Ingredients
- 8 Large Eggs: The star of the show. Using high-quality, fresh eggs will yield the best flavor and the creamiest yolks. If you can find them, pasture-raised eggs often have a richer, deeper orange yolk.
- 1 Large Cucumber: Provides a cool, refreshing crunch. We’ll be cutting this into long, sturdy sticks perfect for dipping.
- 2 Large Carrots: Sweet, crisp, and packed with vitamins. They add a beautiful orange hue to the platter.
- 1 Red Bell Pepper: Sweet, juicy, and less bitter than its green counterpart. Its vibrant red color makes the dish visually appealing.
- 1 Yellow Bell Pepper: Similar to the red pepper but with a slightly milder, fruitier taste. The combination of red and yellow peppers creates a stunning visual contrast.
- 1 cup Celery Stalks (about 2–3 stalks): Offers a distinct, slightly savory flavor and a satisfyingly fibrous snap.
- 1 cup Cherry Tomatoes: These little bursts of juicy sweetness don’t need to be cut, making them a perfect, low-prep addition to the platter.
- 1 tablespoon White Vinegar (Optional): A secret weapon for boiling eggs. Adding a splash to the water can help the egg whites set faster and can make peeling them significantly easier.
- Salt and Pepper to taste: For seasoning the eggs. A sprinkle of flaky sea salt and freshly cracked black pepper elevates the simple boiled egg to something special.
- Optional Dips (e.g., 1/2 cup hummus or Greek yogurt dip): While the egg yolk itself is a fantastic dip, offering an additional option like hummus or a seasoned yogurt dip adds another layer of flavor and variety.
Instructions
This recipe is beautifully simple, broken down into two main parts: perfecting the boiled eggs and prepping the vibrant vegetable dippers. Follow these steps for a flawless result every time.
Part 1: The Art of the Perfect Boiled Egg
The quality of your dish hinges on a perfectly cooked egg. Whether you prefer a slightly jammy center or a fully firm yolk, this method is foolproof.
- Prepare the Eggs: Gently place the 8 large eggs in a single layer at the bottom of a medium or large saucepan. Do not stack them, as this can lead to uneven cooking and cracking.
- Add Cold Water: Cover the eggs with cold water, ensuring there is about 1 to 2 inches of water above the eggs. Starting with cold water helps the eggs cook more evenly from the outside in, preventing the whites from becoming rubbery before the yolk is cooked.
- Add Vinegar (Optional): If using, add 1 tablespoon of white vinegar to the water. This step is a game-changer for easy peeling, especially if you are using very fresh eggs.
- Bring to a Boil: Place the saucepan on the stove over high heat and bring the water to a full, rolling boil.
- Turn Off the Heat and Cover: As soon as the water reaches a rolling boil, immediately turn off the heat. Remove the pan from the hot burner and cover it with a tight-fitting lid.
- Let Them Sit: This is the most crucial step for determining the doneness of your yolk. Let the eggs sit in the hot water for the following times:
- For a soft, jammy yolk: 6-7 minutes.
- For a medium, creamy yolk: 8-10 minutes.
- For a classic hard-boiled yolk (fully set): 11-12 minutes.
- Prepare an Ice Bath: While the eggs are sitting, fill a large bowl with ice and cold water. This ice bath is essential for stopping the cooking process immediately.
- Shock the Eggs: Once the desired time has elapsed, use a slotted spoon to carefully transfer the hot eggs from the saucepan directly into the ice bath. Let them cool in the ice water for at least 5-10 minutes, or until they are cool enough to handle. This shock of cold water not only stops the cooking (preventing that unappetizing green ring around the yolk) but also causes the egg white to contract slightly, pulling away from the shell and making them much easier to peel.
- Peel the Eggs: Gently tap the cooled egg on a hard surface to crack the shell all over. Roll it between your palms to loosen the shell further. Start peeling from the wider end of the egg, where the air pocket is, preferably under a thin stream of running water to help wash away any small shell fragments.
- Slice and Season: Once peeled, slice the eggs in half lengthwise. Arrange them on your serving platter, yolk-side up. Sprinkle generously with salt and freshly cracked black pepper.
Part 2: Preparing the Vibrant Veggie Dippers
While the eggs are cooking and cooling, you can efficiently prepare your fresh vegetables.
- Wash and Dry: Thoroughly wash all your vegetables under cold running water and pat them dry with a paper towel.
- Prepare the Carrots: Peel the carrots and trim off the ends. Cut them into sticks approximately 3-4 inches long and about 1/2-inch thick, similar to the size of a classic French fry.
- Prepare the Celery: Trim the ends of the celery stalks. Cut them into sticks of a similar length to the carrots. If the stalks are very wide, you can slice them in half lengthwise first.
- Prepare the Cucumber: You can choose to peel the cucumber or leave the skin on for extra color and fiber. Trim the ends and cut it in half crosswise. Then, cut each half into long, sturdy spears.
- Prepare the Bell Peppers: Slice the top and bottom off the red and yellow bell peppers. Make a single vertical cut down the side and open it up to lay it flat. Remove the seeds and the white pith. Slice the pepper into long, uniform strips perfect for dipping.
- Assemble the Platter: Artfully arrange the prepared vegetable sticks, cherry tomatoes, and halved boiled eggs on a large platter or board. If you’re using an additional dip like hummus or yogurt, place it in a small bowl in the center of the platter. Your delicious and healthy meal is now ready to be served.
Nutrition
- Serving Size: one normal portion
- Calories: 320
- Fat: 20g
- Protein: 14g